Cosmos as Canvas
James Webb Image Processing Tutorial
Introduction
One amazing thing about all NASA missions is that the data is open source and free to use. However, it can be tricky at first to navigate. In this tutorial, you will learn the basics of downloading NASA data from the MAST archive and image processing with two free software tools: Siril and GIMP.
Indeed, many of the images you see in the news have been processed by citizen scientists. Judy Schmidt for example, has no formal astronomy training, yet she has processed many JWST images that have been picked up by NY Times and even NASA in their press-releases.
I have uploaded a zip file to which you can download and unpack which has some data already downloaded from NASA (Pillars of Creation 4 filters, Southern Ring Nebula 5 filters, and Cosmic Cliffs 6 filters which have also been downsized for your convenience) and saved at each phase of the image processing tutorial so if you get stuck on one step, you can skip to the next.
Before beginning, do the following to get set-up:
- Download and install Siril
- Download and install GIMP
- Download and unzip Tutorial Data Zip File
Part 1: Download Image Files from MAST Directory
The MAST archive is where you will find all observations from any NASA telescope (Hubble, James Webb, Chandra, and many many more. There are 274+ million observations in this database. It’s an awkward, old, and slow database to search so there are a few tips that will help you.
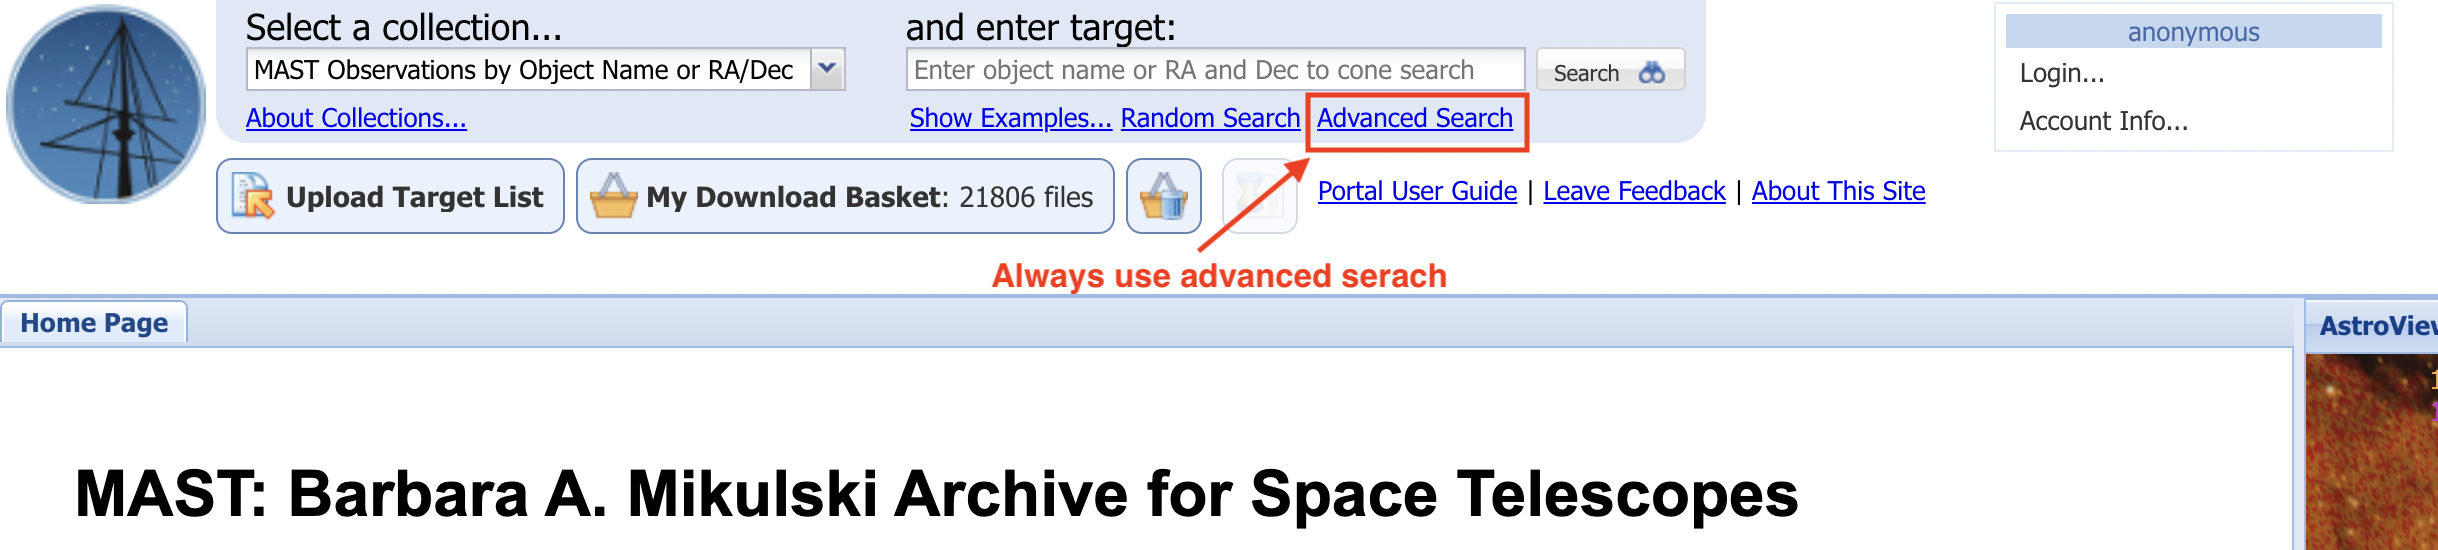
Step 1: Advanced Search
You will always want "Advanced Search" on the MAST website.
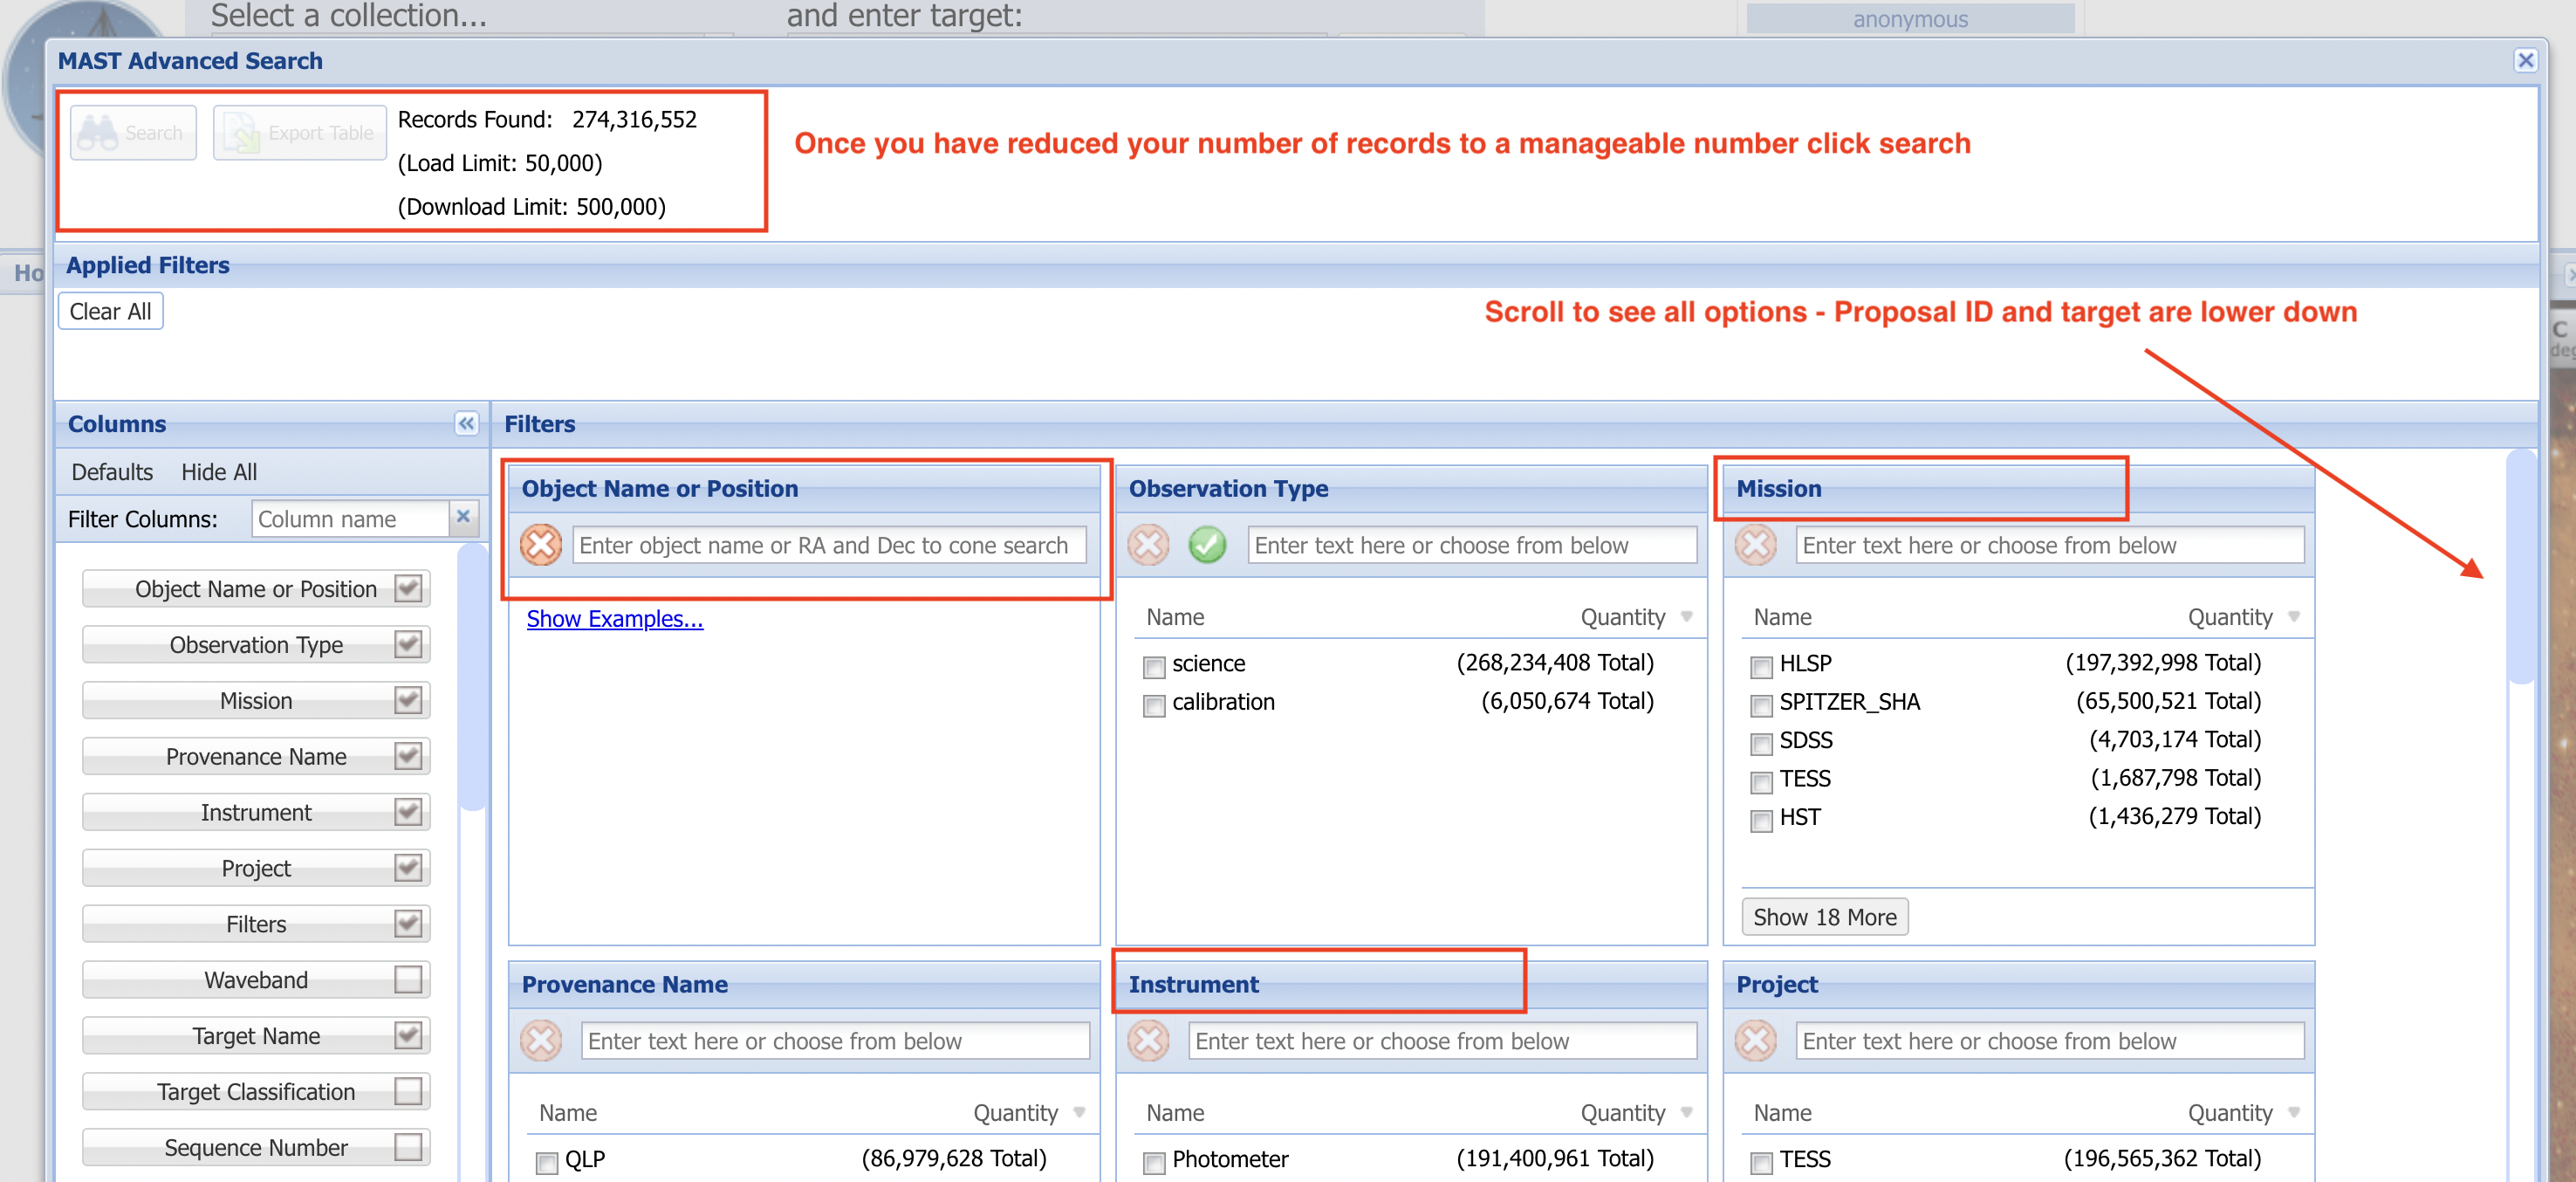
Step 2: Narrowing Results
In advanced search you can see many ways to filter your search. You can scroll to see all of them on the right. We are going to focus on object name, target name, proposal ID, mission, and instruments. But we need to first find what we are going to put into these boxes. To do that, let’s go over to the main JWST website.
First, you need to identify the image you want to search. You can search for your favorite famous Webb images here: https://webbtelescope.org/images
Here is, for example, a link to the NIRCam image of the Southern Ring Nebula.
We’ll look for 3 pieces of information, the object name, proposal ID, and the filters used. From the information in the link you can see that the astronomical object name is NGC 3132, we can also see the proposal ID number is 2733. We’ll want to start with NIRCam data over MIRI data, but you can add MIRI once you get more comfortable. The filters on NIRCam that were used were: F090W, F187N, F212N, F356W, F405N, F470N.
Troubleshooting tip: Sometimes you get different results from seemingly silly differences. For example, for Pillars of creation, whose astronomical name is M16, you will see different results depending on if you put in “M 16” vs “M16” vs “M-16”. So depending on the object, you might have to play around with that.
Step 3: Search MAST
Once you've identified the image you want, you can search with these identifiers. If we continue with our Southern Ring Nebula example, put “NGC 3132” in Object Name, “NIRCAM/Image” in Instrument, and “2733” in Proposal ID we will have narrowed the results to 6 observations, each corresponding to 1 instrument filter. We will want to download all 6, so click search.
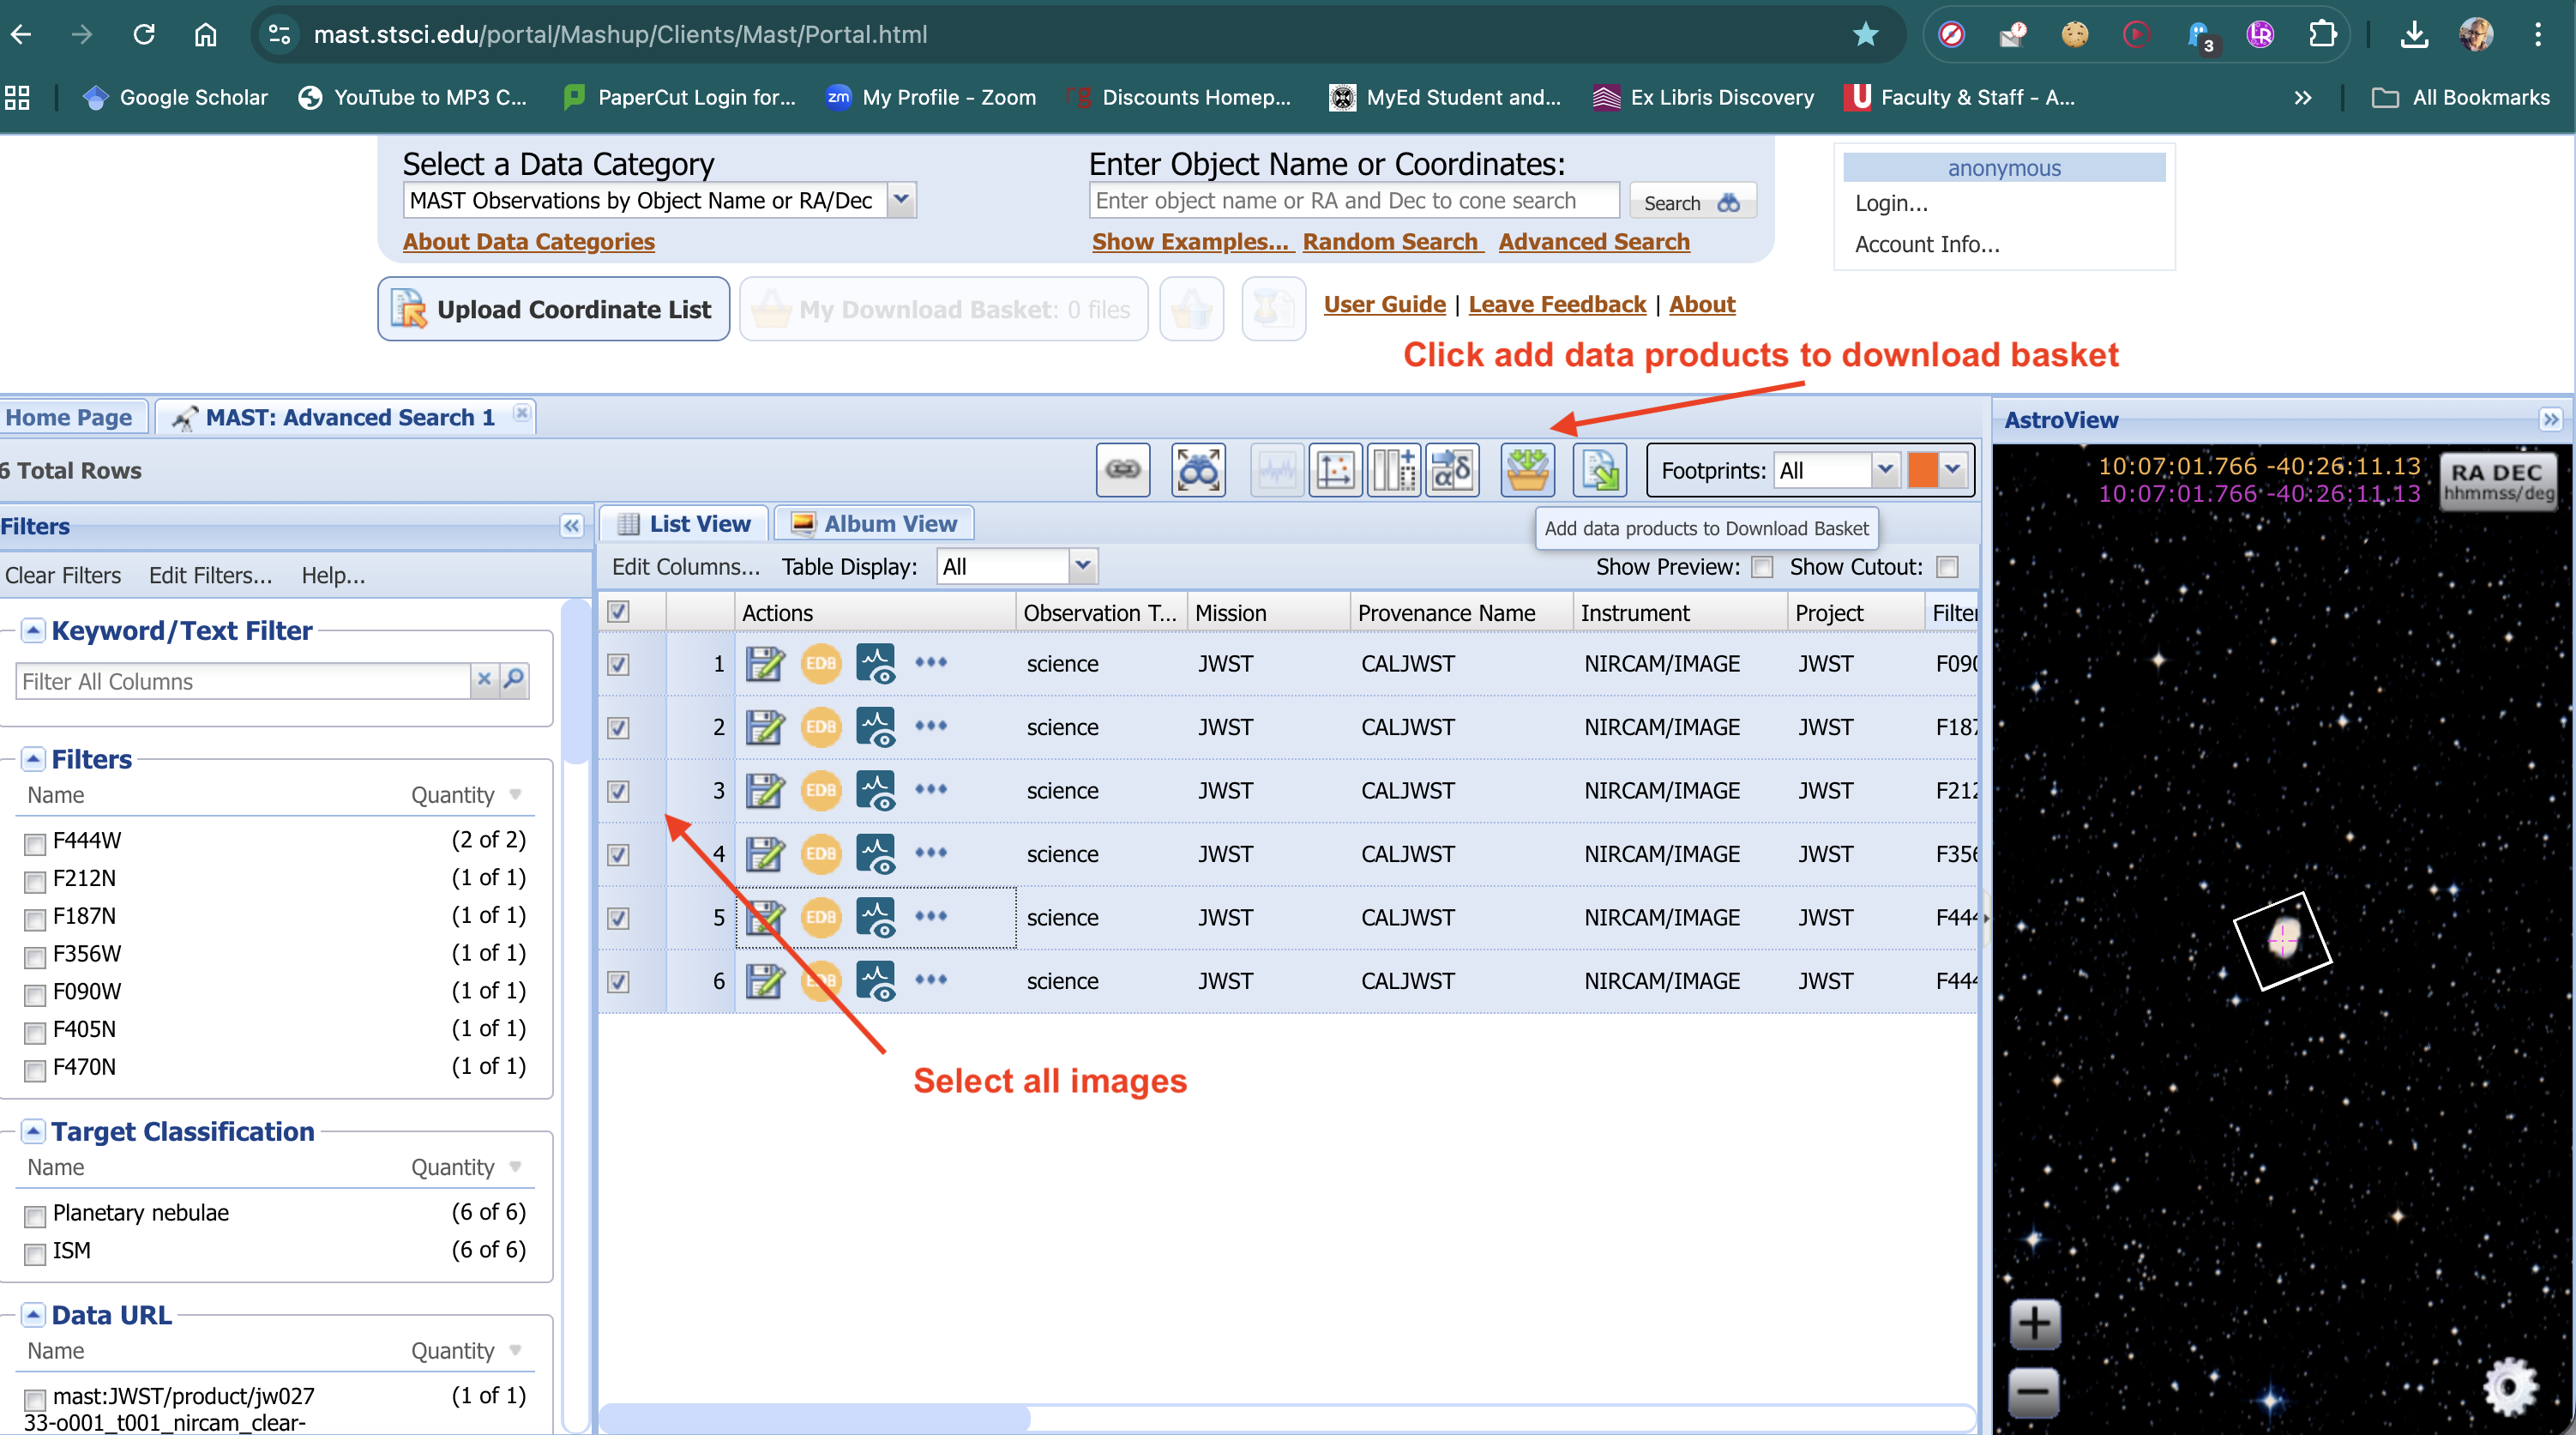
Step 4: Adding to Basket
Select the images and add them to your download basket (it's free!).
Step 5: Downloading Fits Files
Click the expand arrow, since we don’t want to download everything for each observation.

We only want to download the *_i2d.fits files. Note, the files have the specific instrument filter in the name. Then click download! The files are big, ranging from 1GB to 5GB in size. Thus, you will want to use your best computer for image processing. [For more advanced computer users, you can use this python script to downsize your files to a lower resolution].
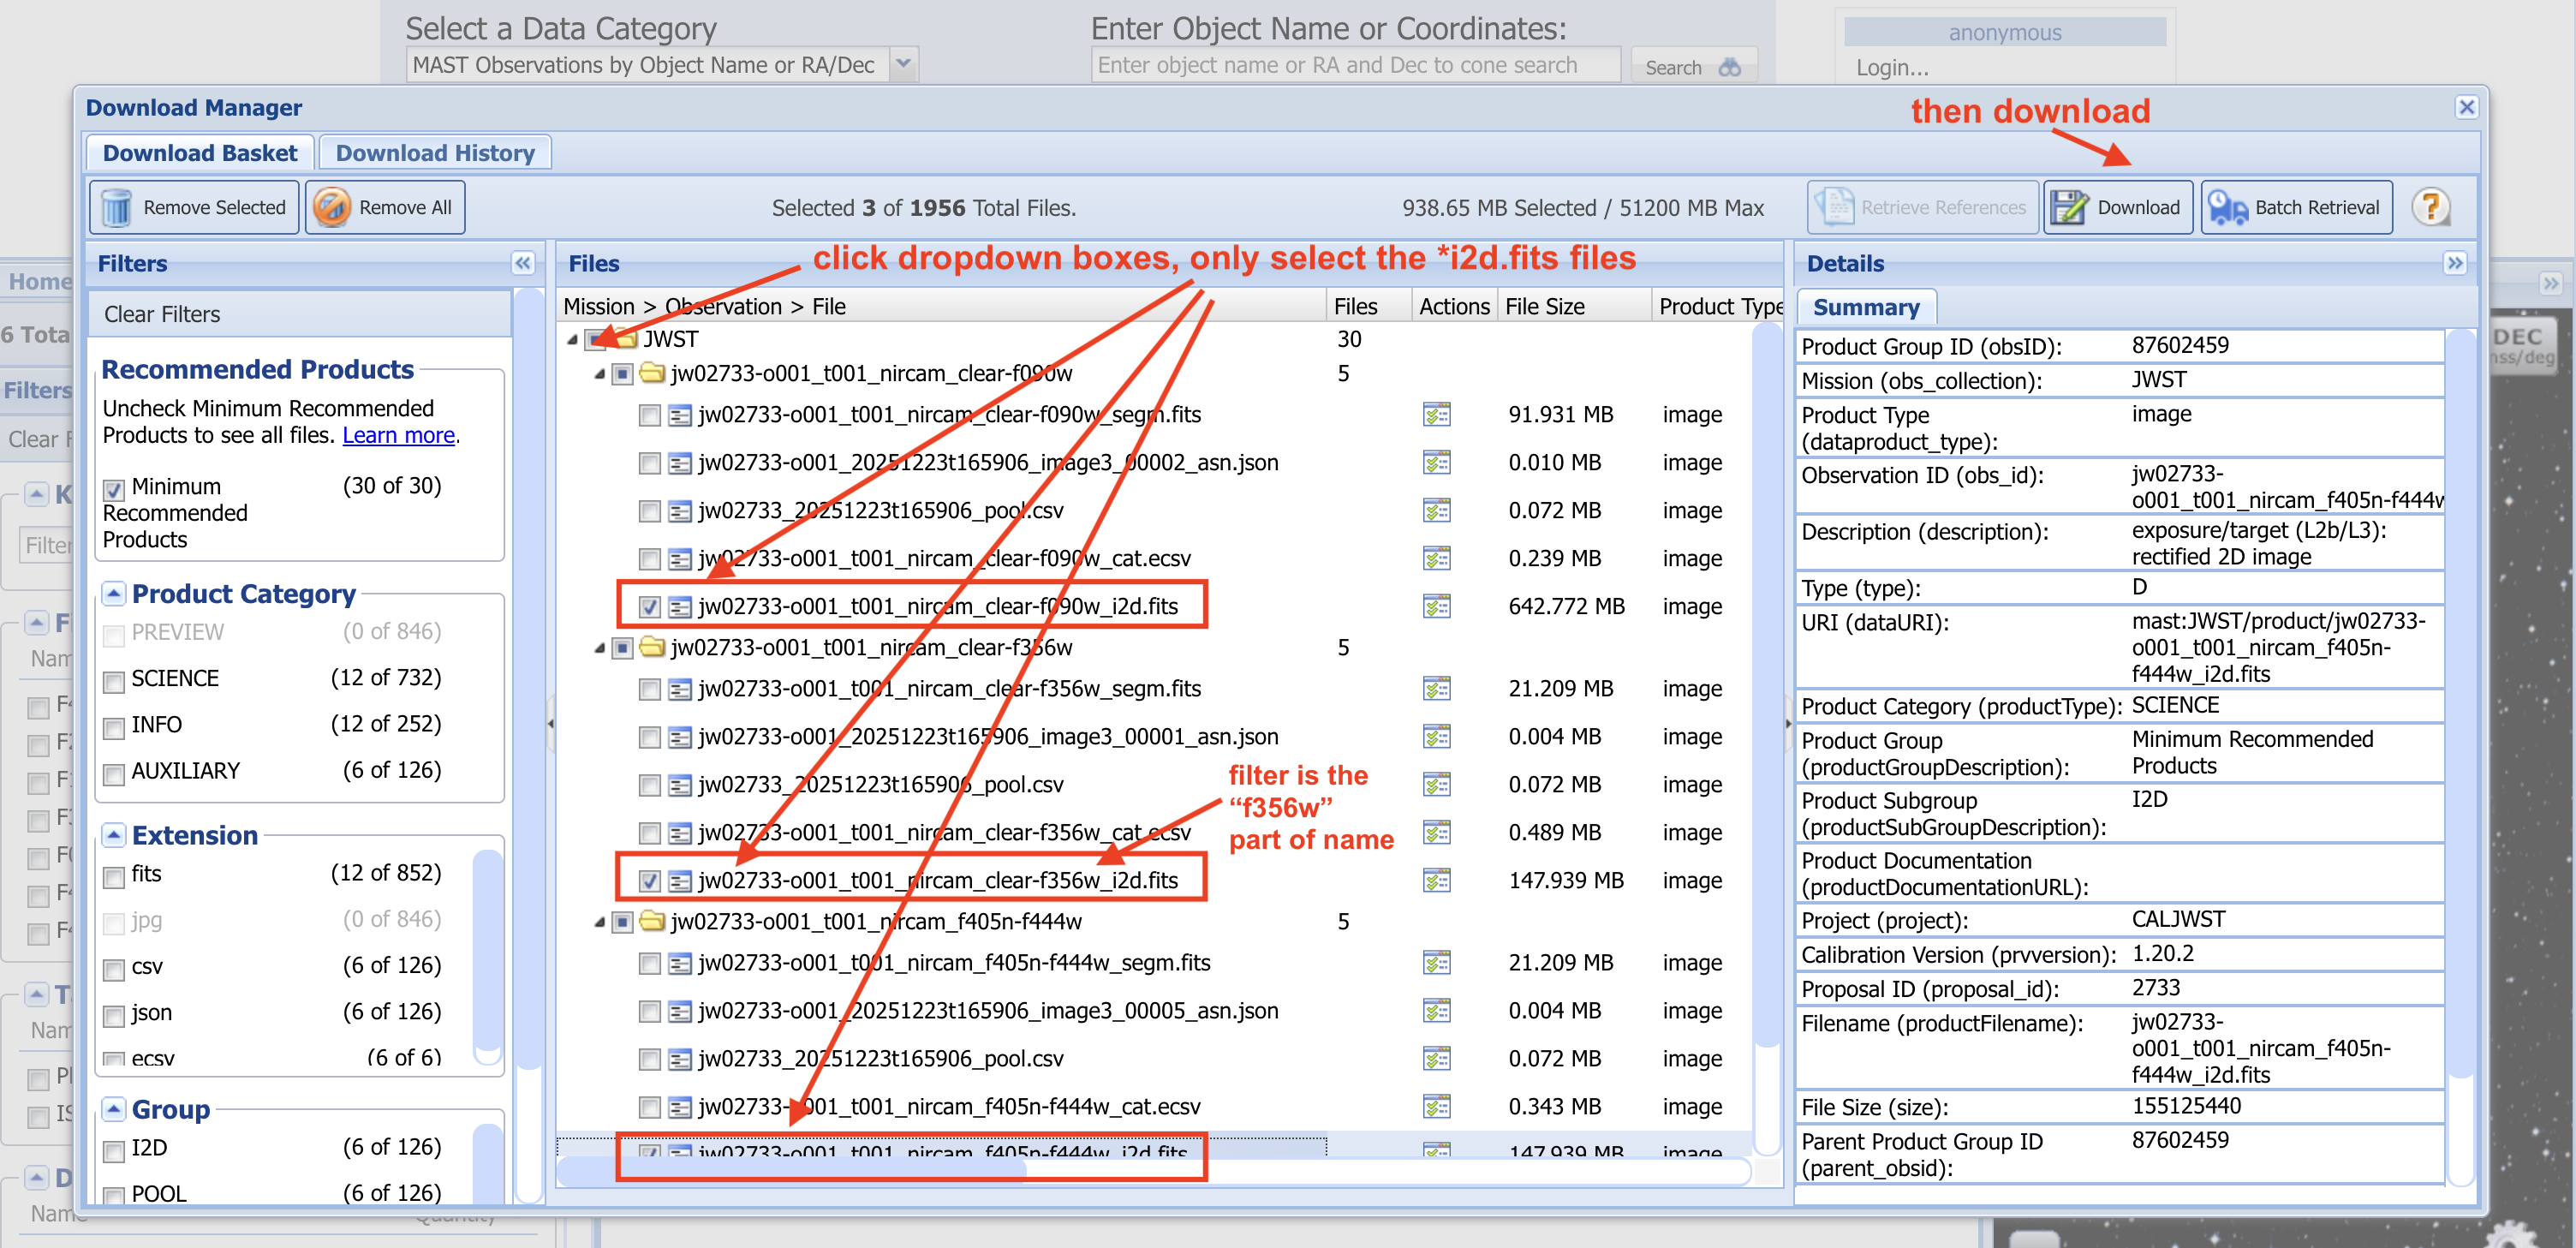
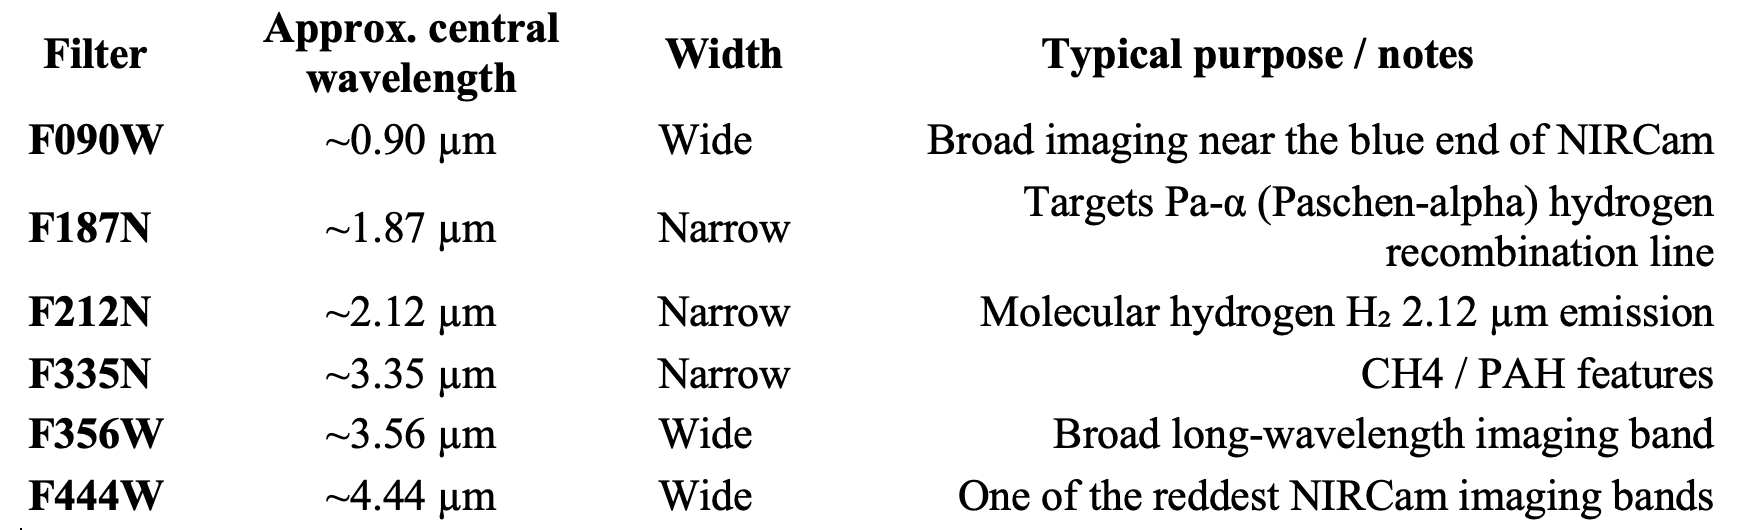
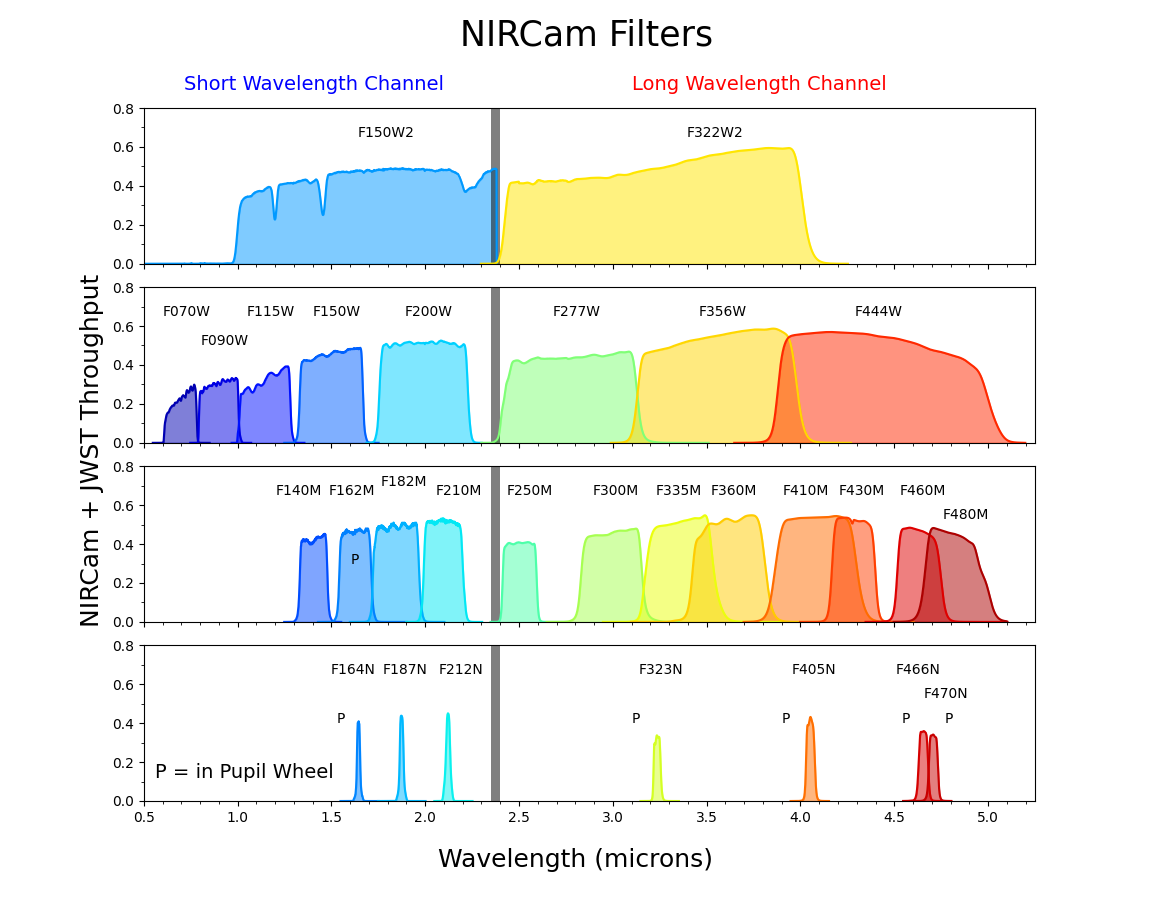
A few things to note on the file naming convention – jw2733 in the first part of the file is James Webb + the proposal ID, in this case 2733. In JWST NIRCam filter names, the number gives the approximate central wavelength in microns ×100, and the final letter indicates the bandwidth—W for wide, M for medium, and N for narrow. Visit NASA's page on NIRCam filters for more details.
1.Start
Part 2: Preliminary Steps with Siril
Interface and Navigation
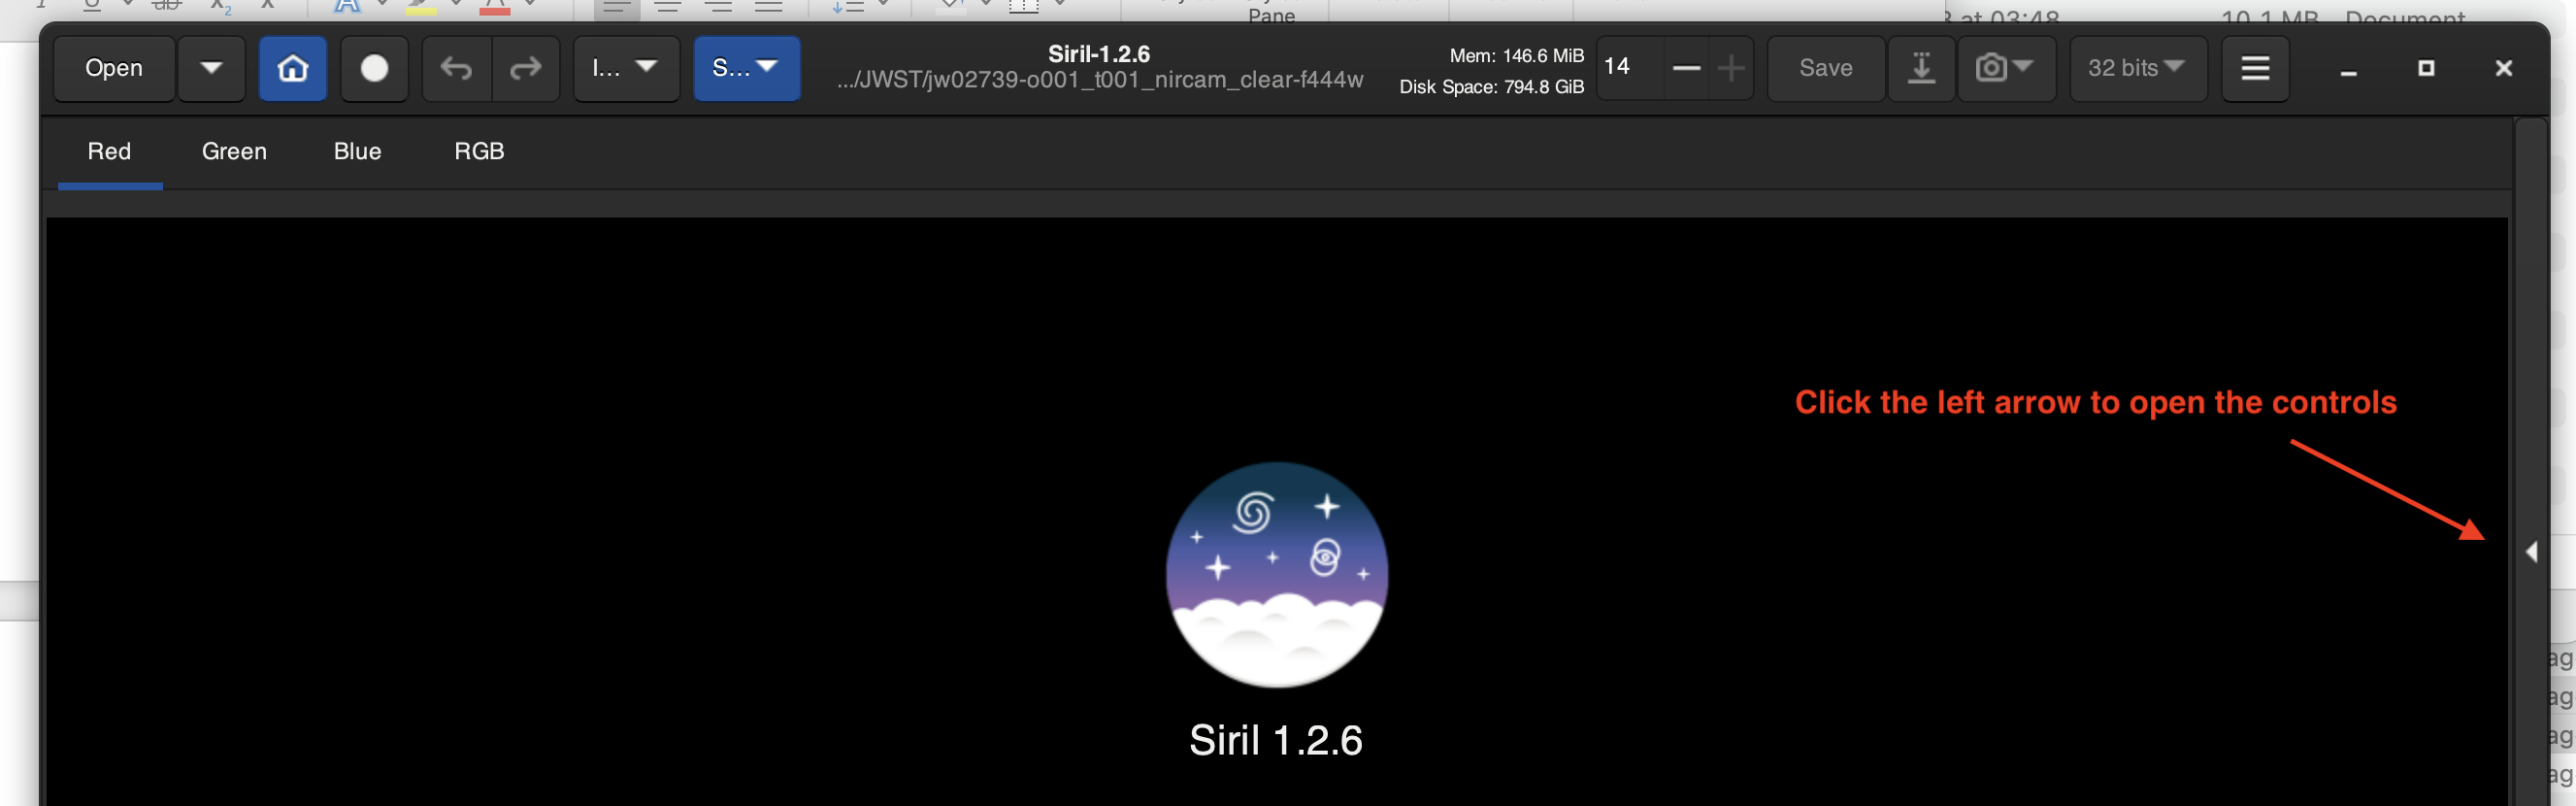
Sometimes Siril will open in too big of a window. Just drag the size of the application window from the top or top corner and then drag up again so you can see the entire application. You can also right click and hit maximize on windows to make the application full screen. Also sometimes Siril opens and the split screen is hidden where the control panel is. Click the arrow on the far right in the middle to open it.
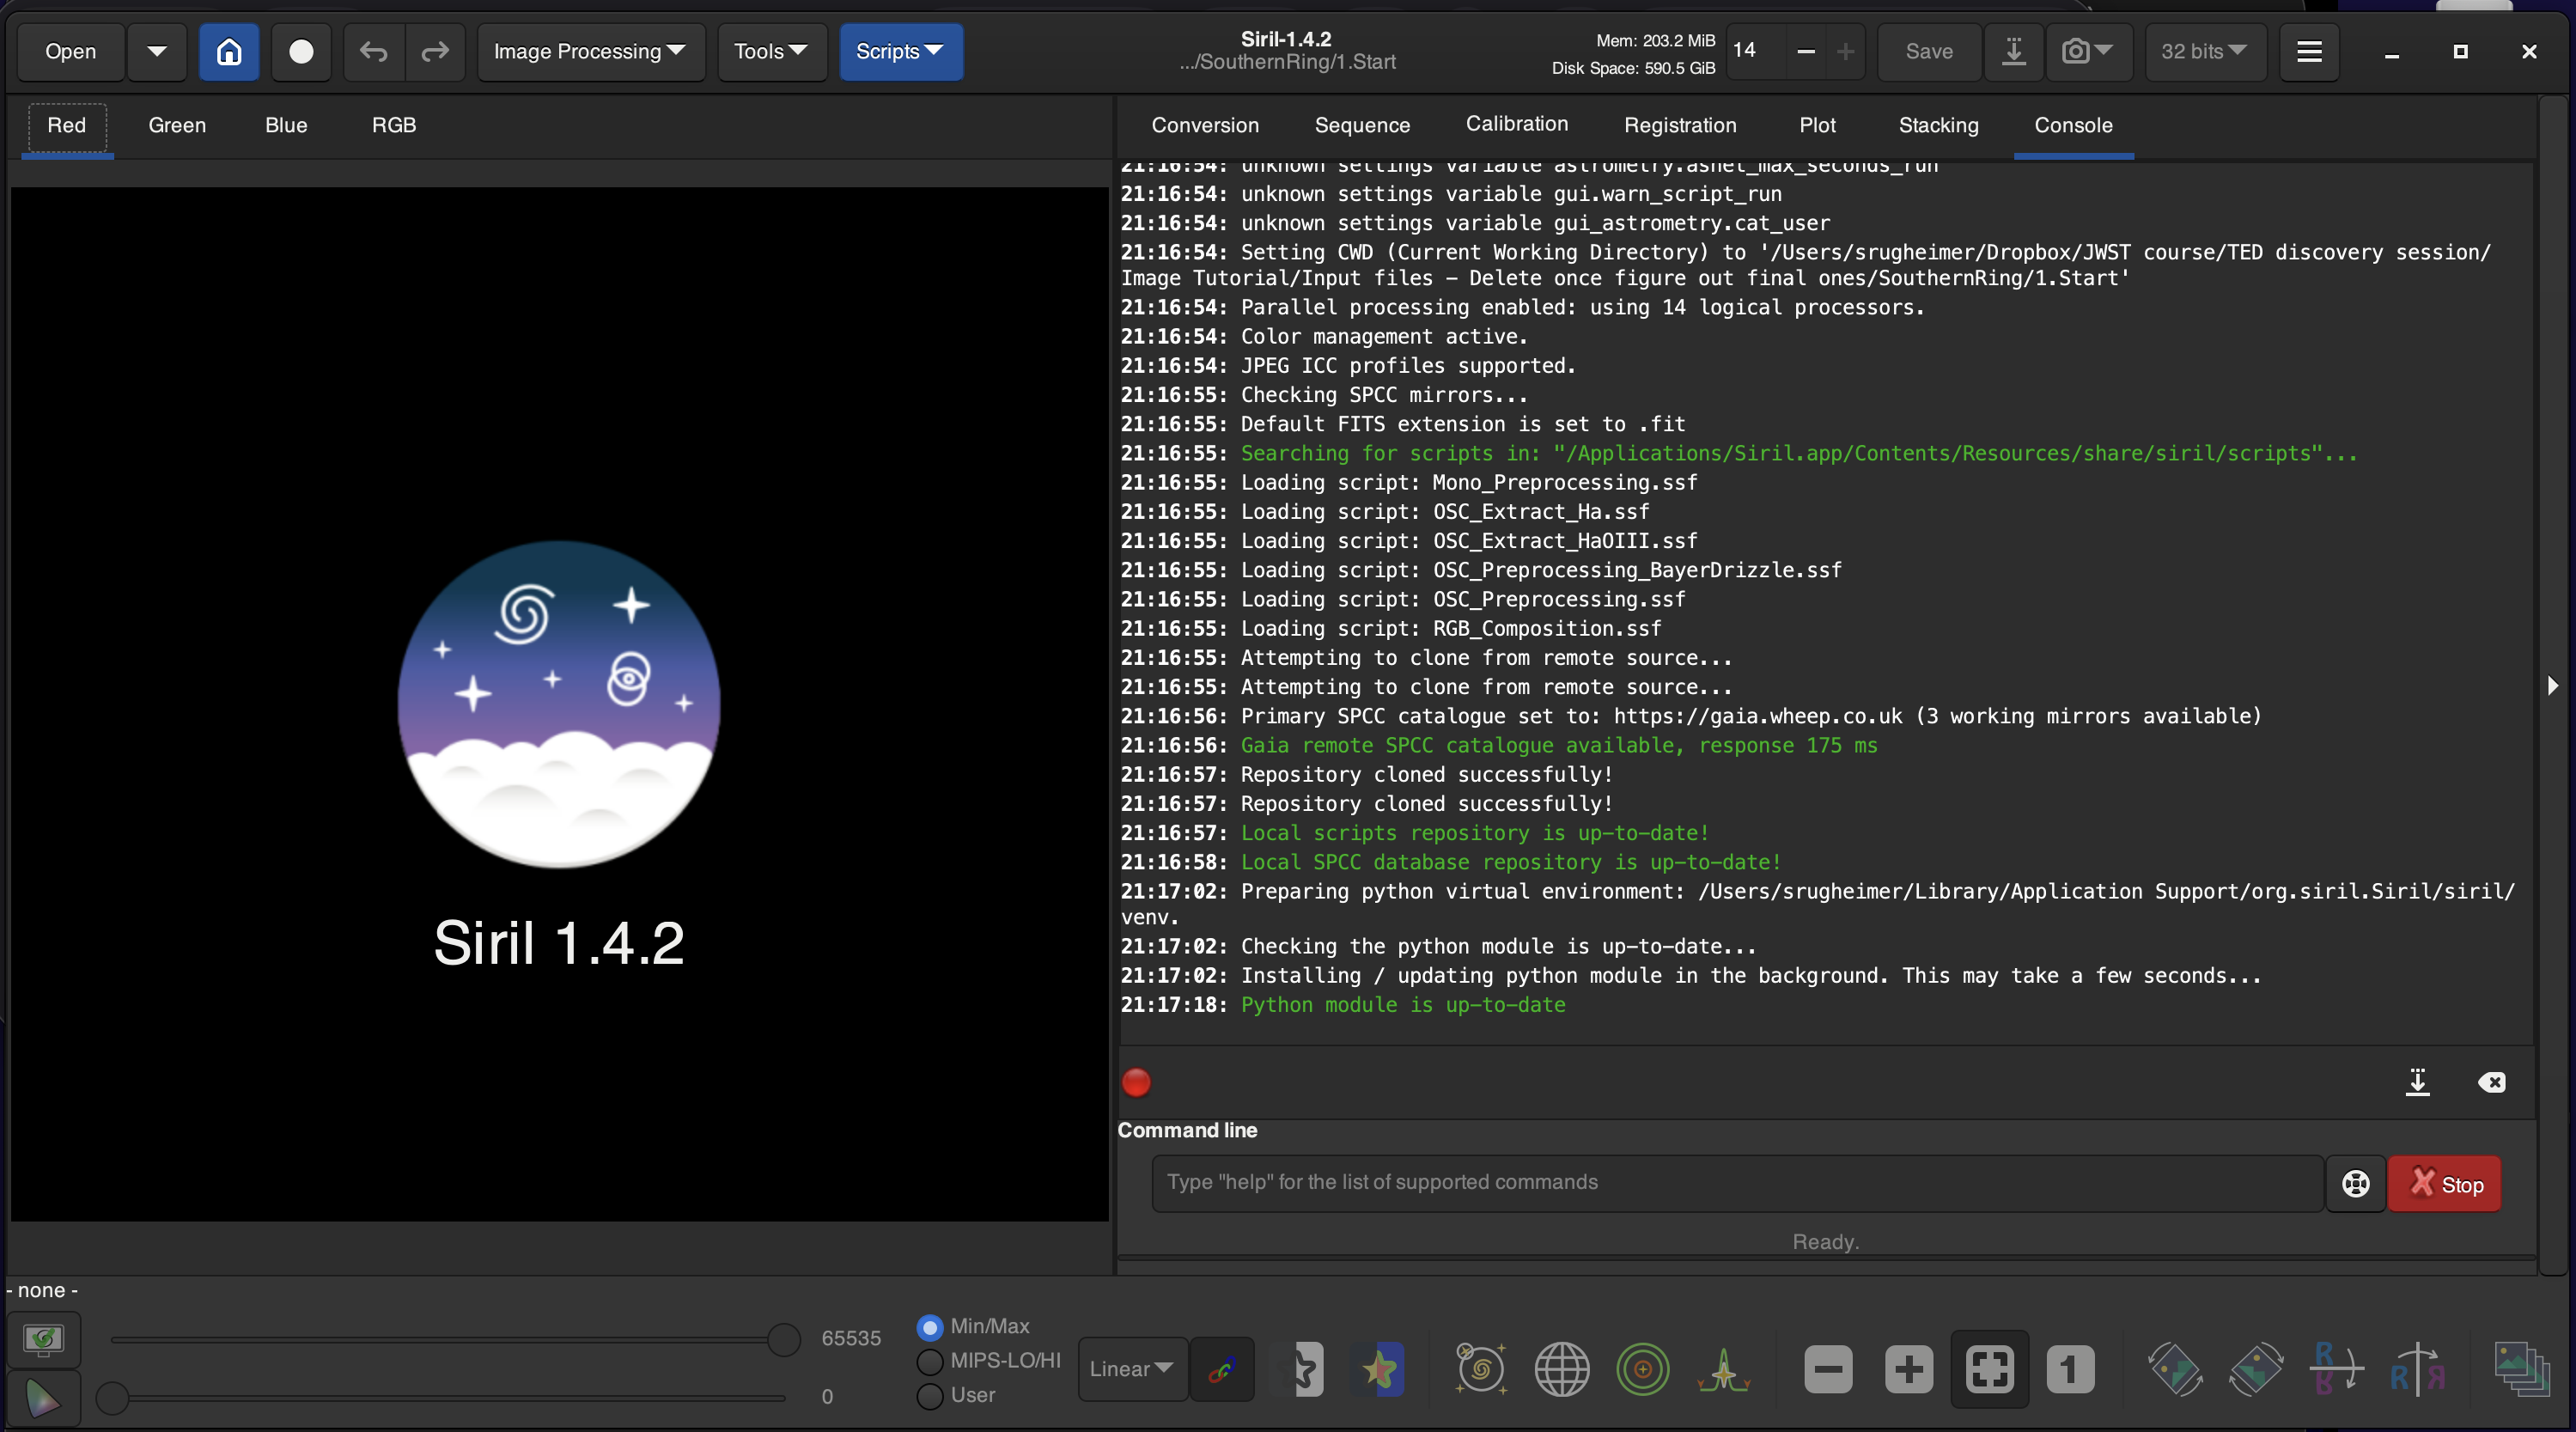
This is how Siril often looks at first:
If the controls are missing, you can open them here:
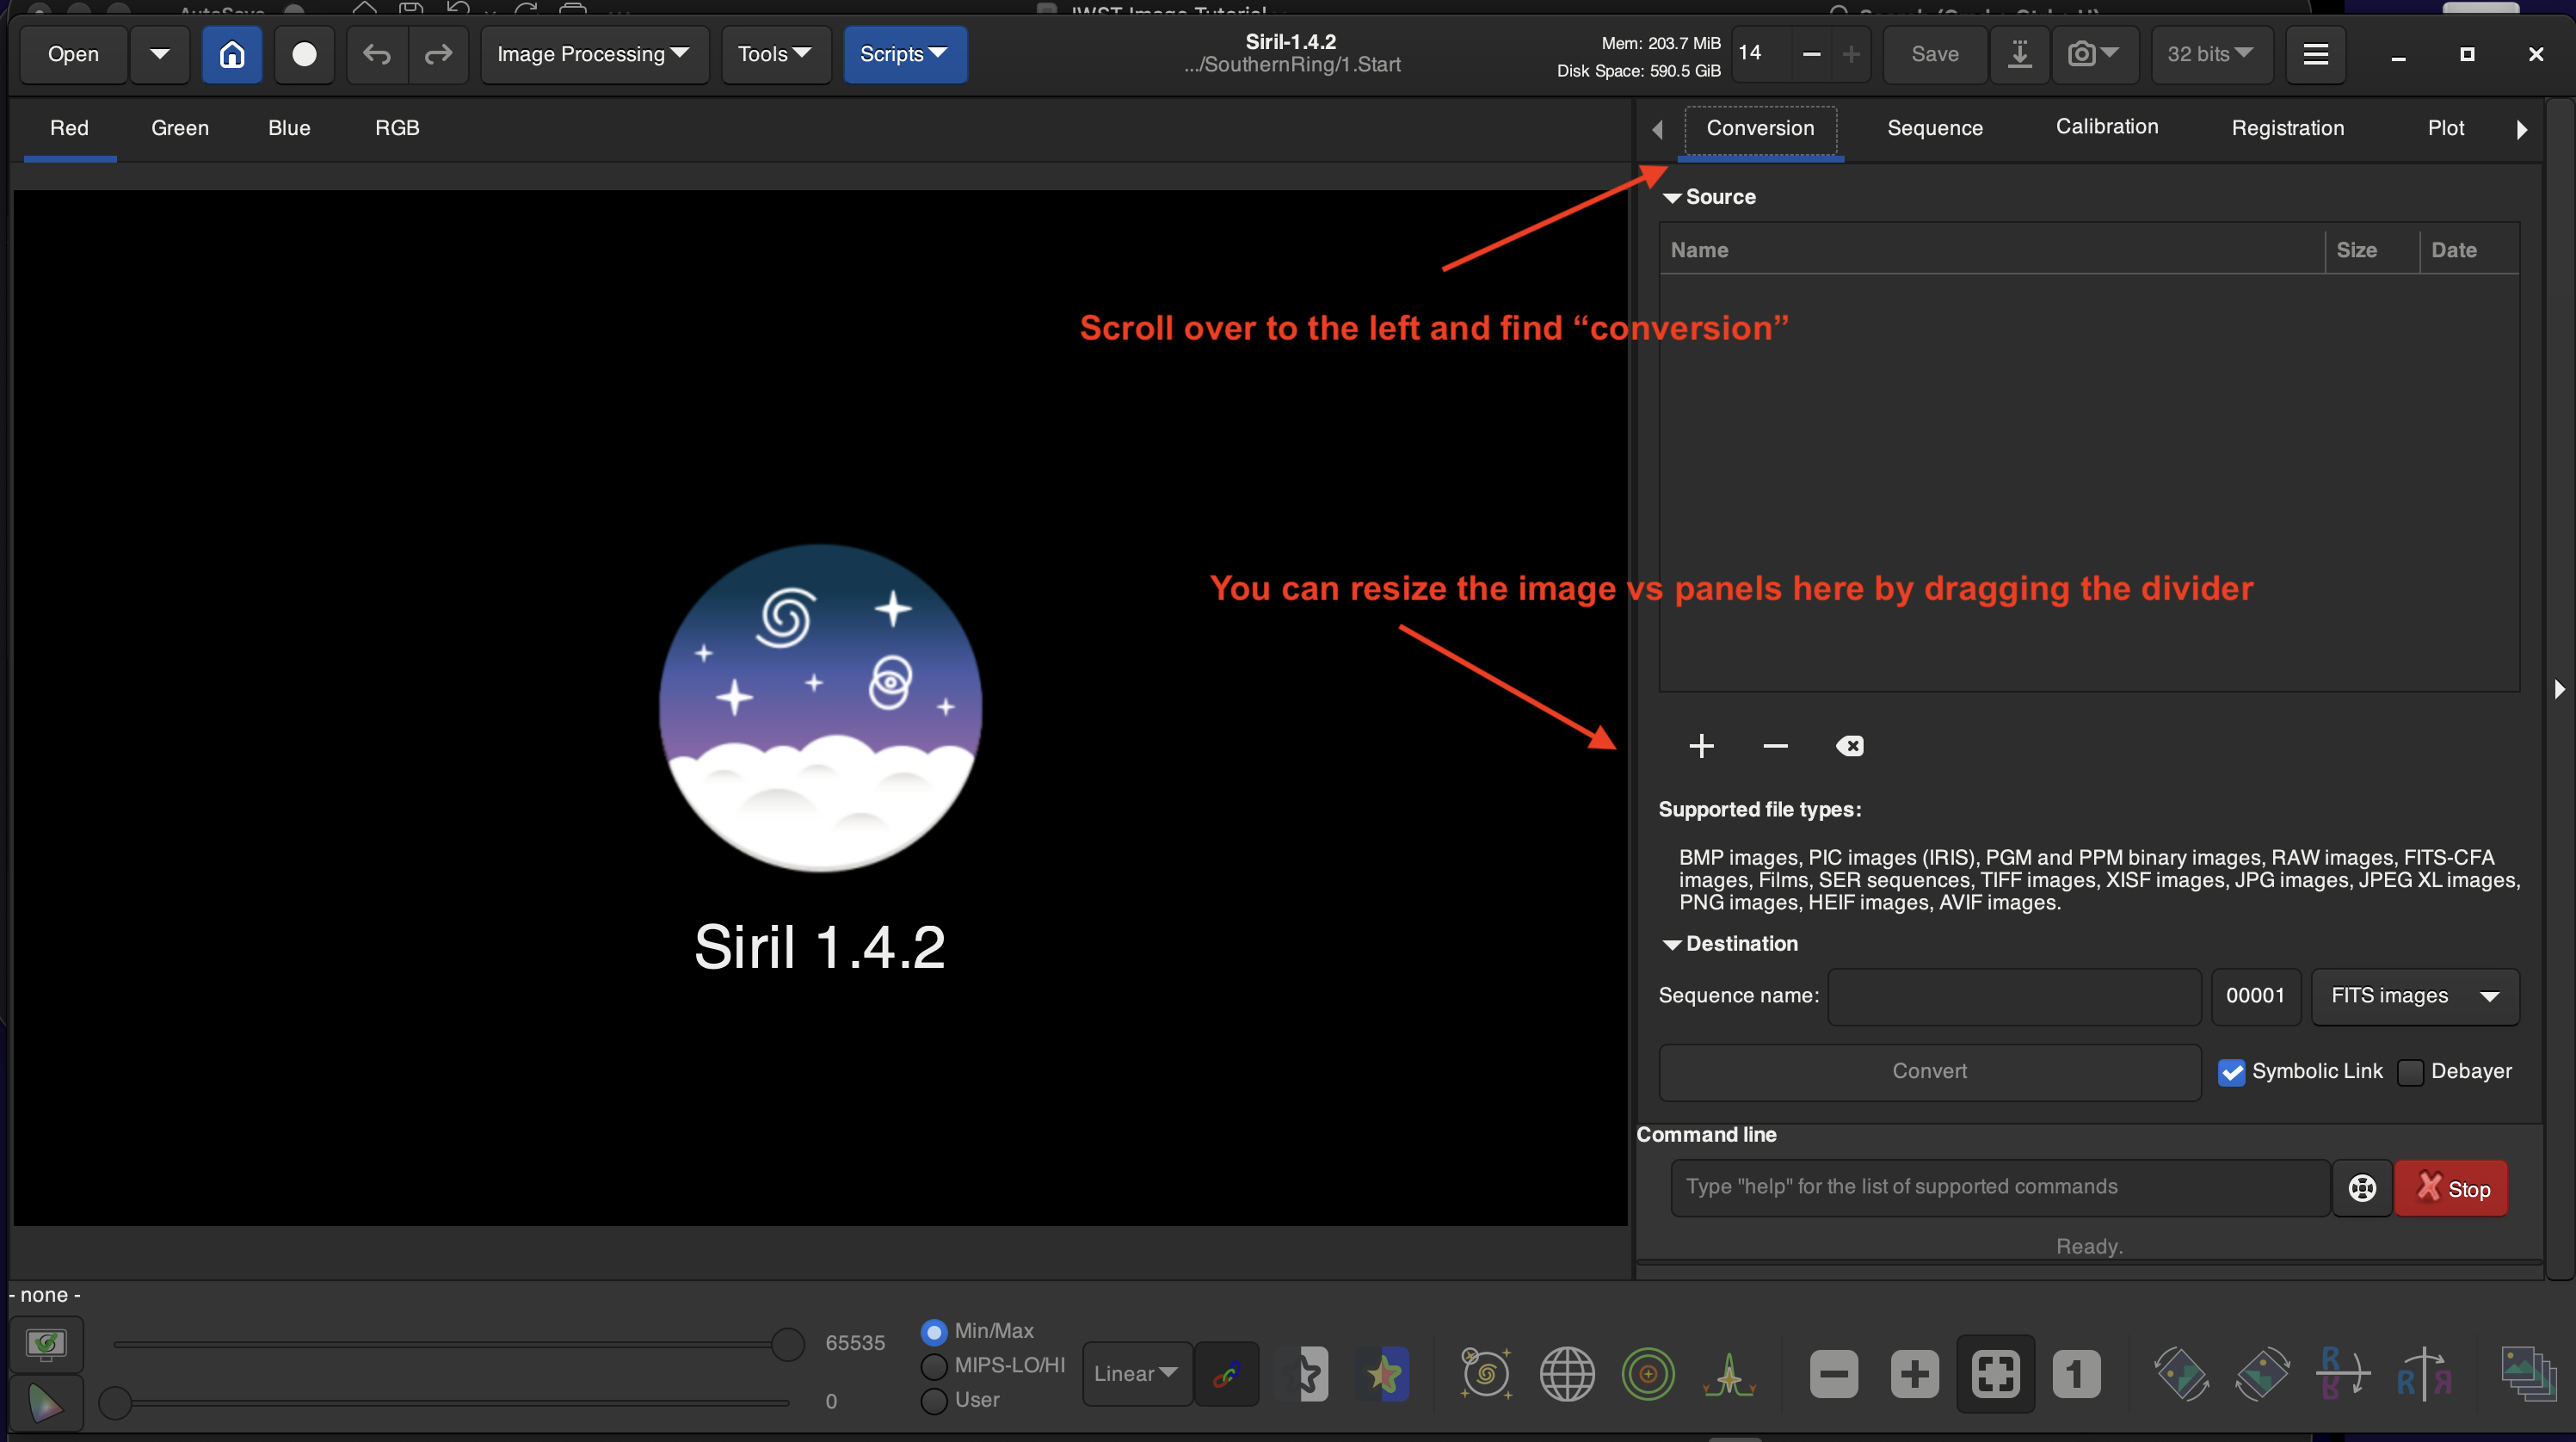
 Here are a few things you can do to clean up the interface by resizing the consol and navigating to our first step:
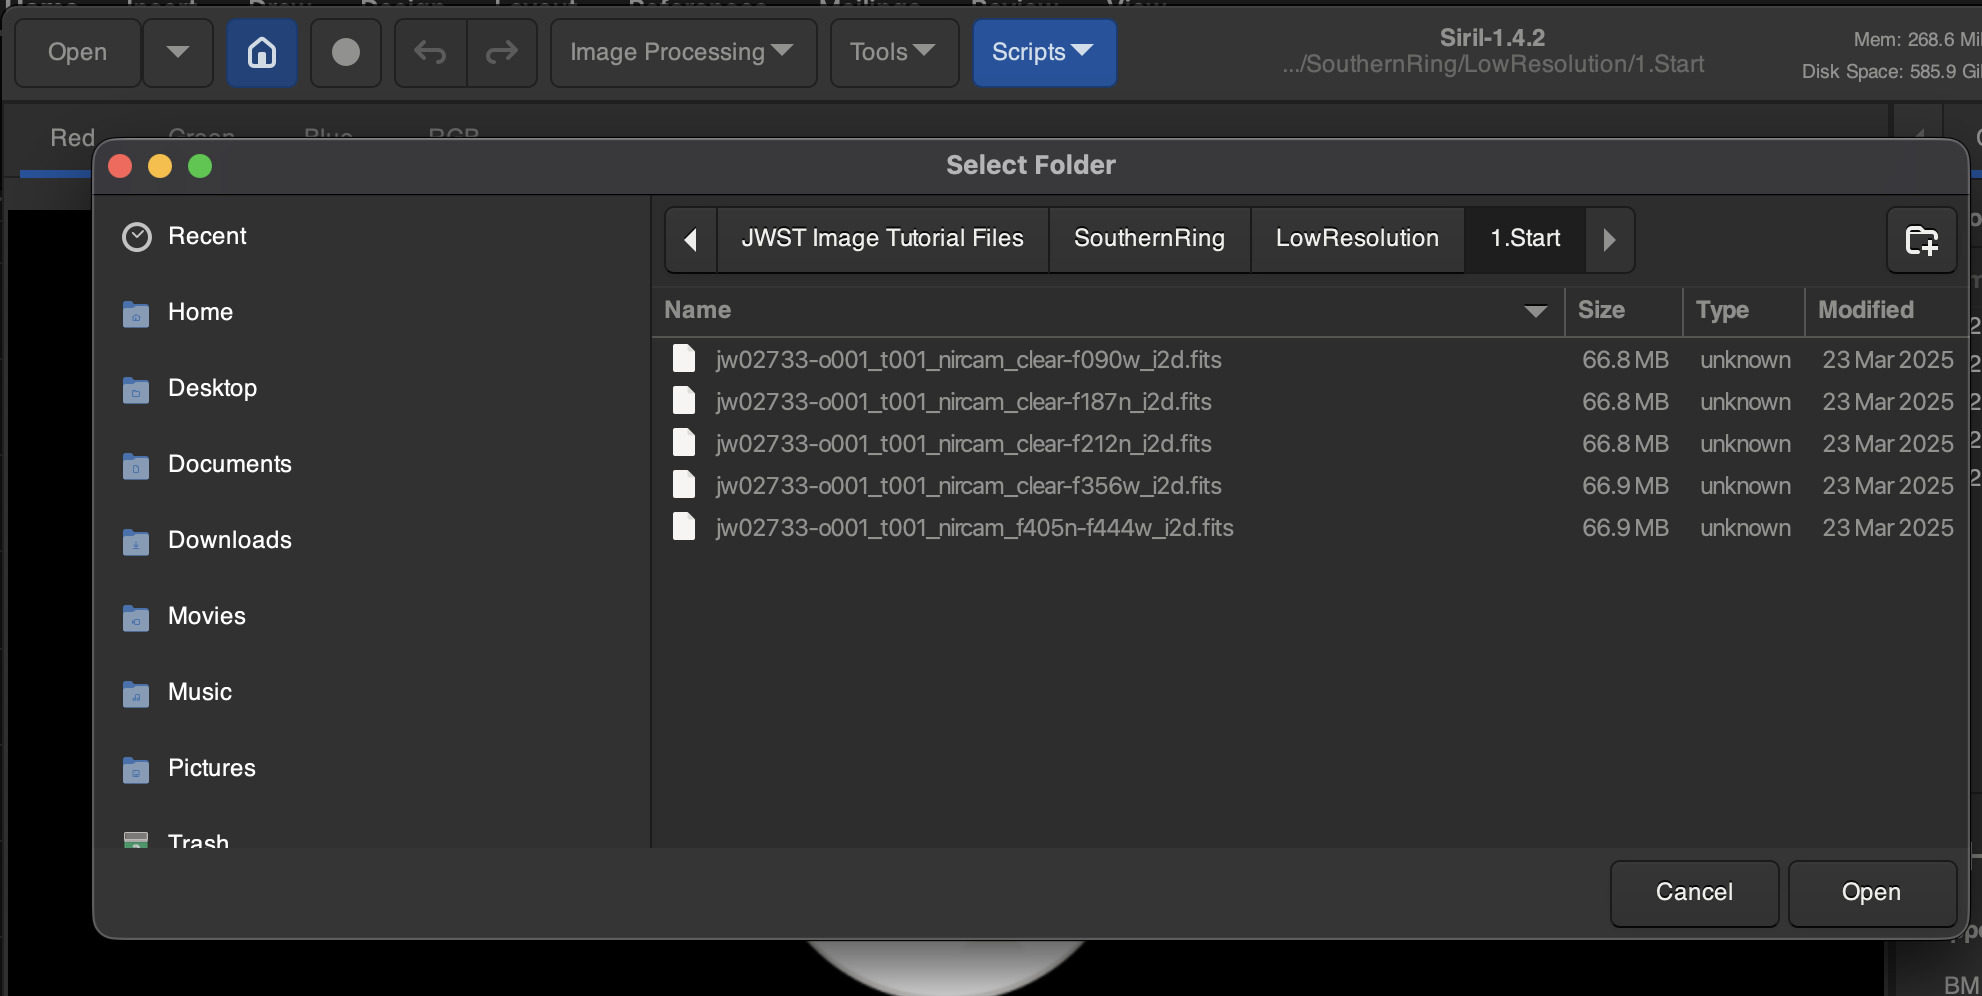
Set the working directly to where your downloaded files are:
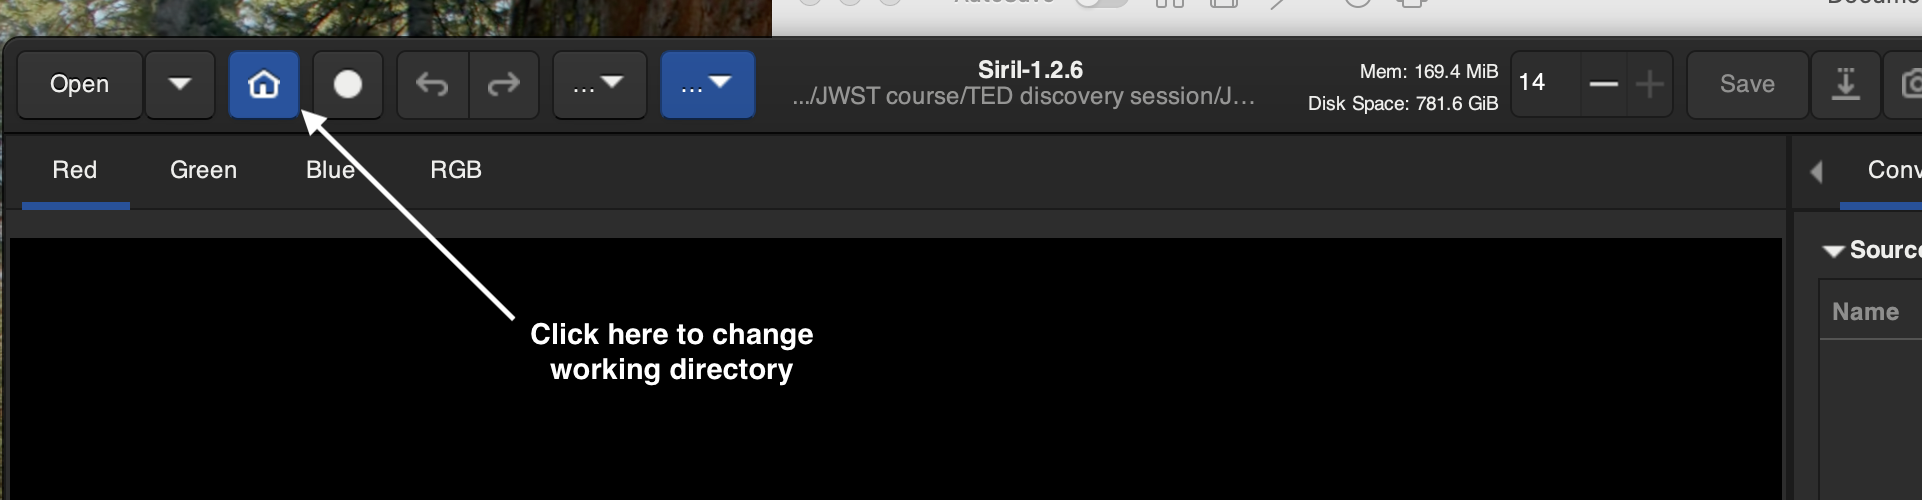
Navigate to the folder where you have downloaded your MAST images:
Convert .fits files to .fit sequences
Click the “Conversion” tab and then the plus symbol and select all the .fits files so they are all highlighted and click add.
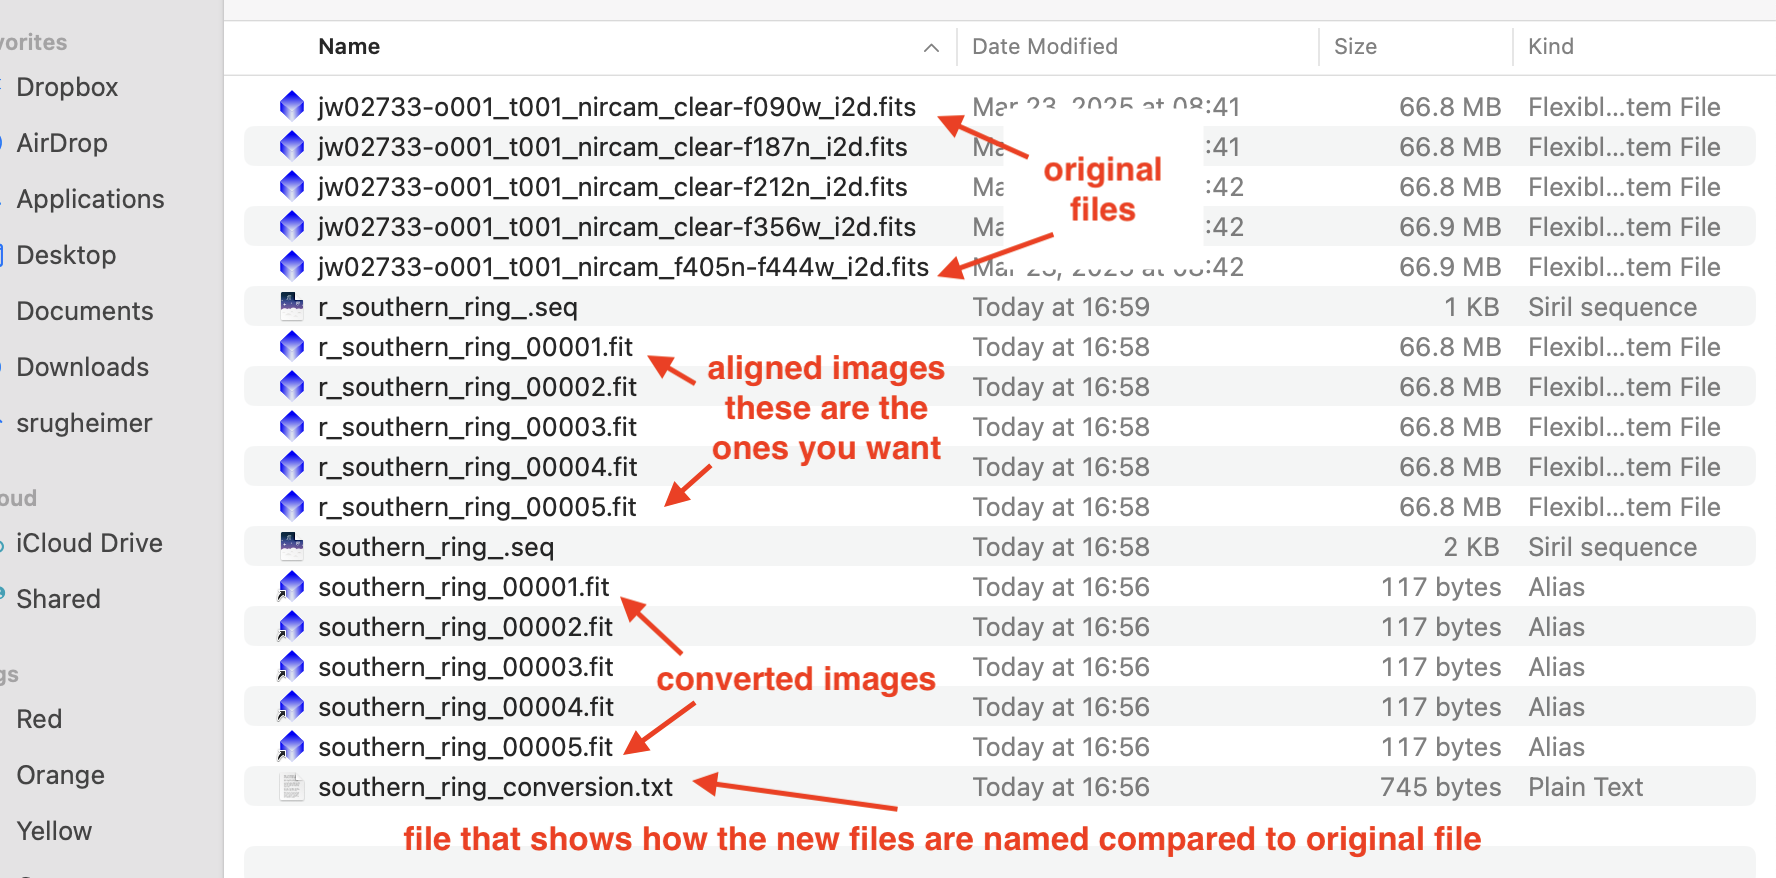
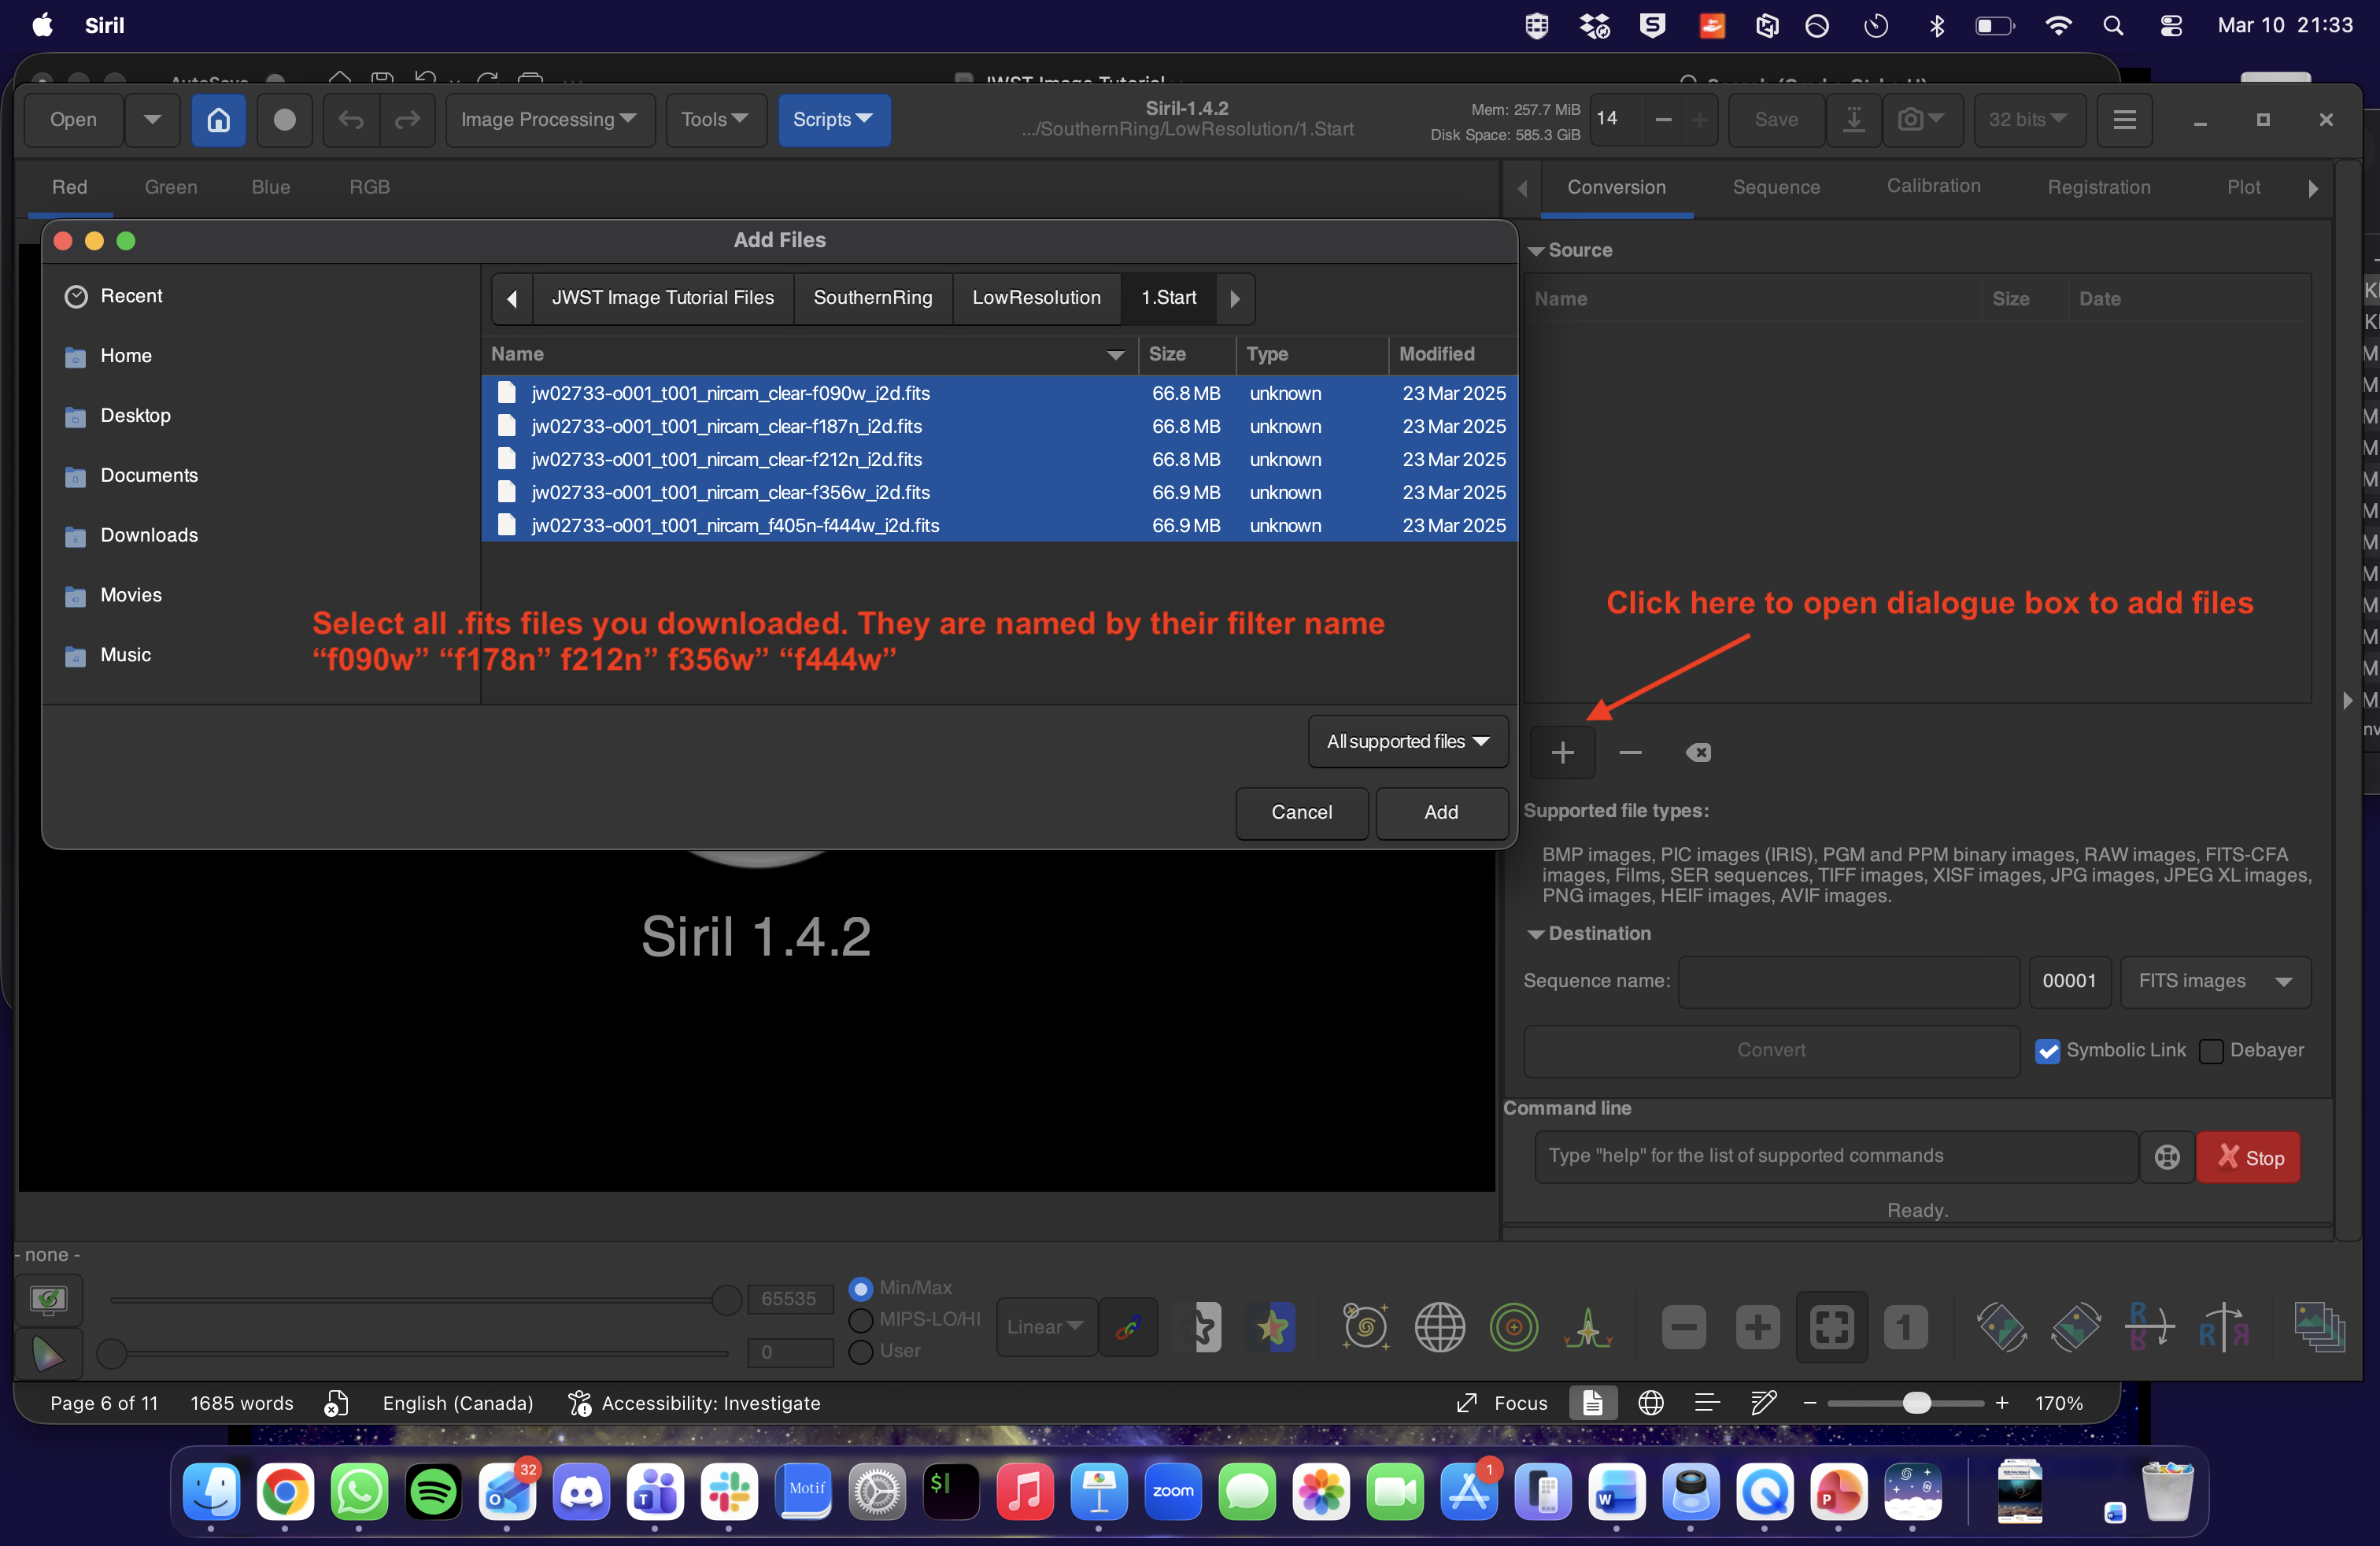 In the dialog box you can name your sequence which will name all the converted files according to that notation. I recommend something like “southern_ring” or your target name then click convert. Then the output of all processes in Siril will name at step as
 southern_ring_0001, southern_ring_0002 etc. This removes the camera and filter information that is in the names of the downloaded MAST images. However, in your directory there is a .txt file with the original names and what their new name is so you can map the filter to the number.
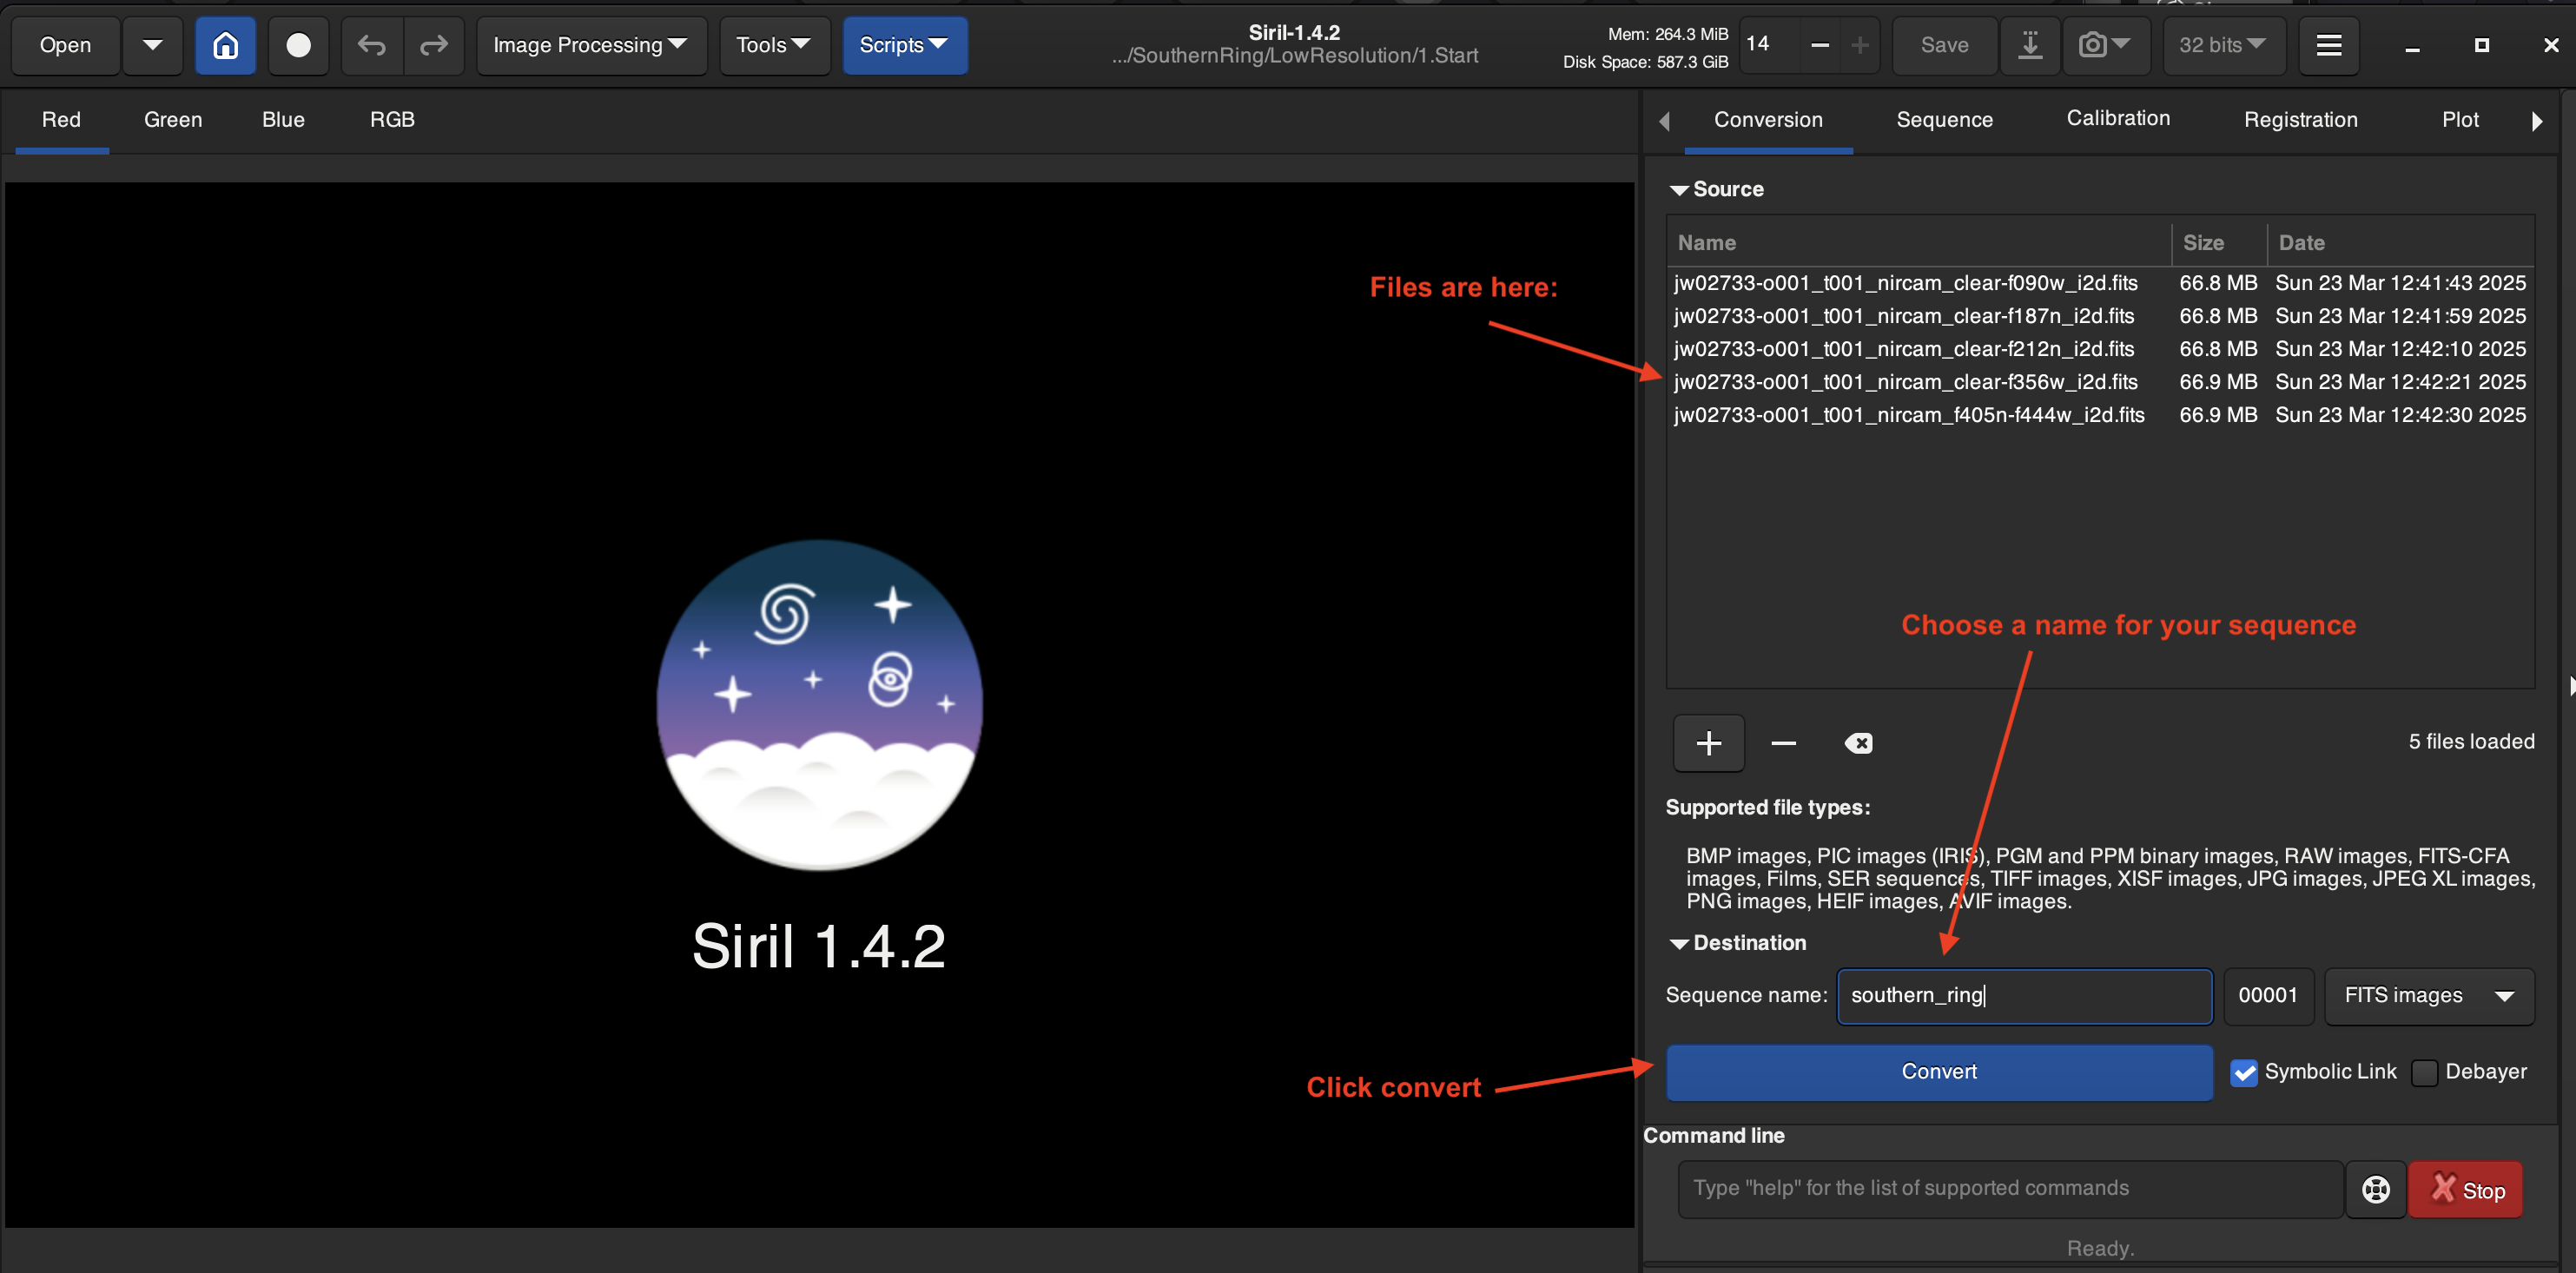 You should see now the new files that have been created called
 southern_ring_0001.fit etc. in your working directory on your computer. You can also find these under the folder 2.Registered in the zip file.
Autostretch to see rough data
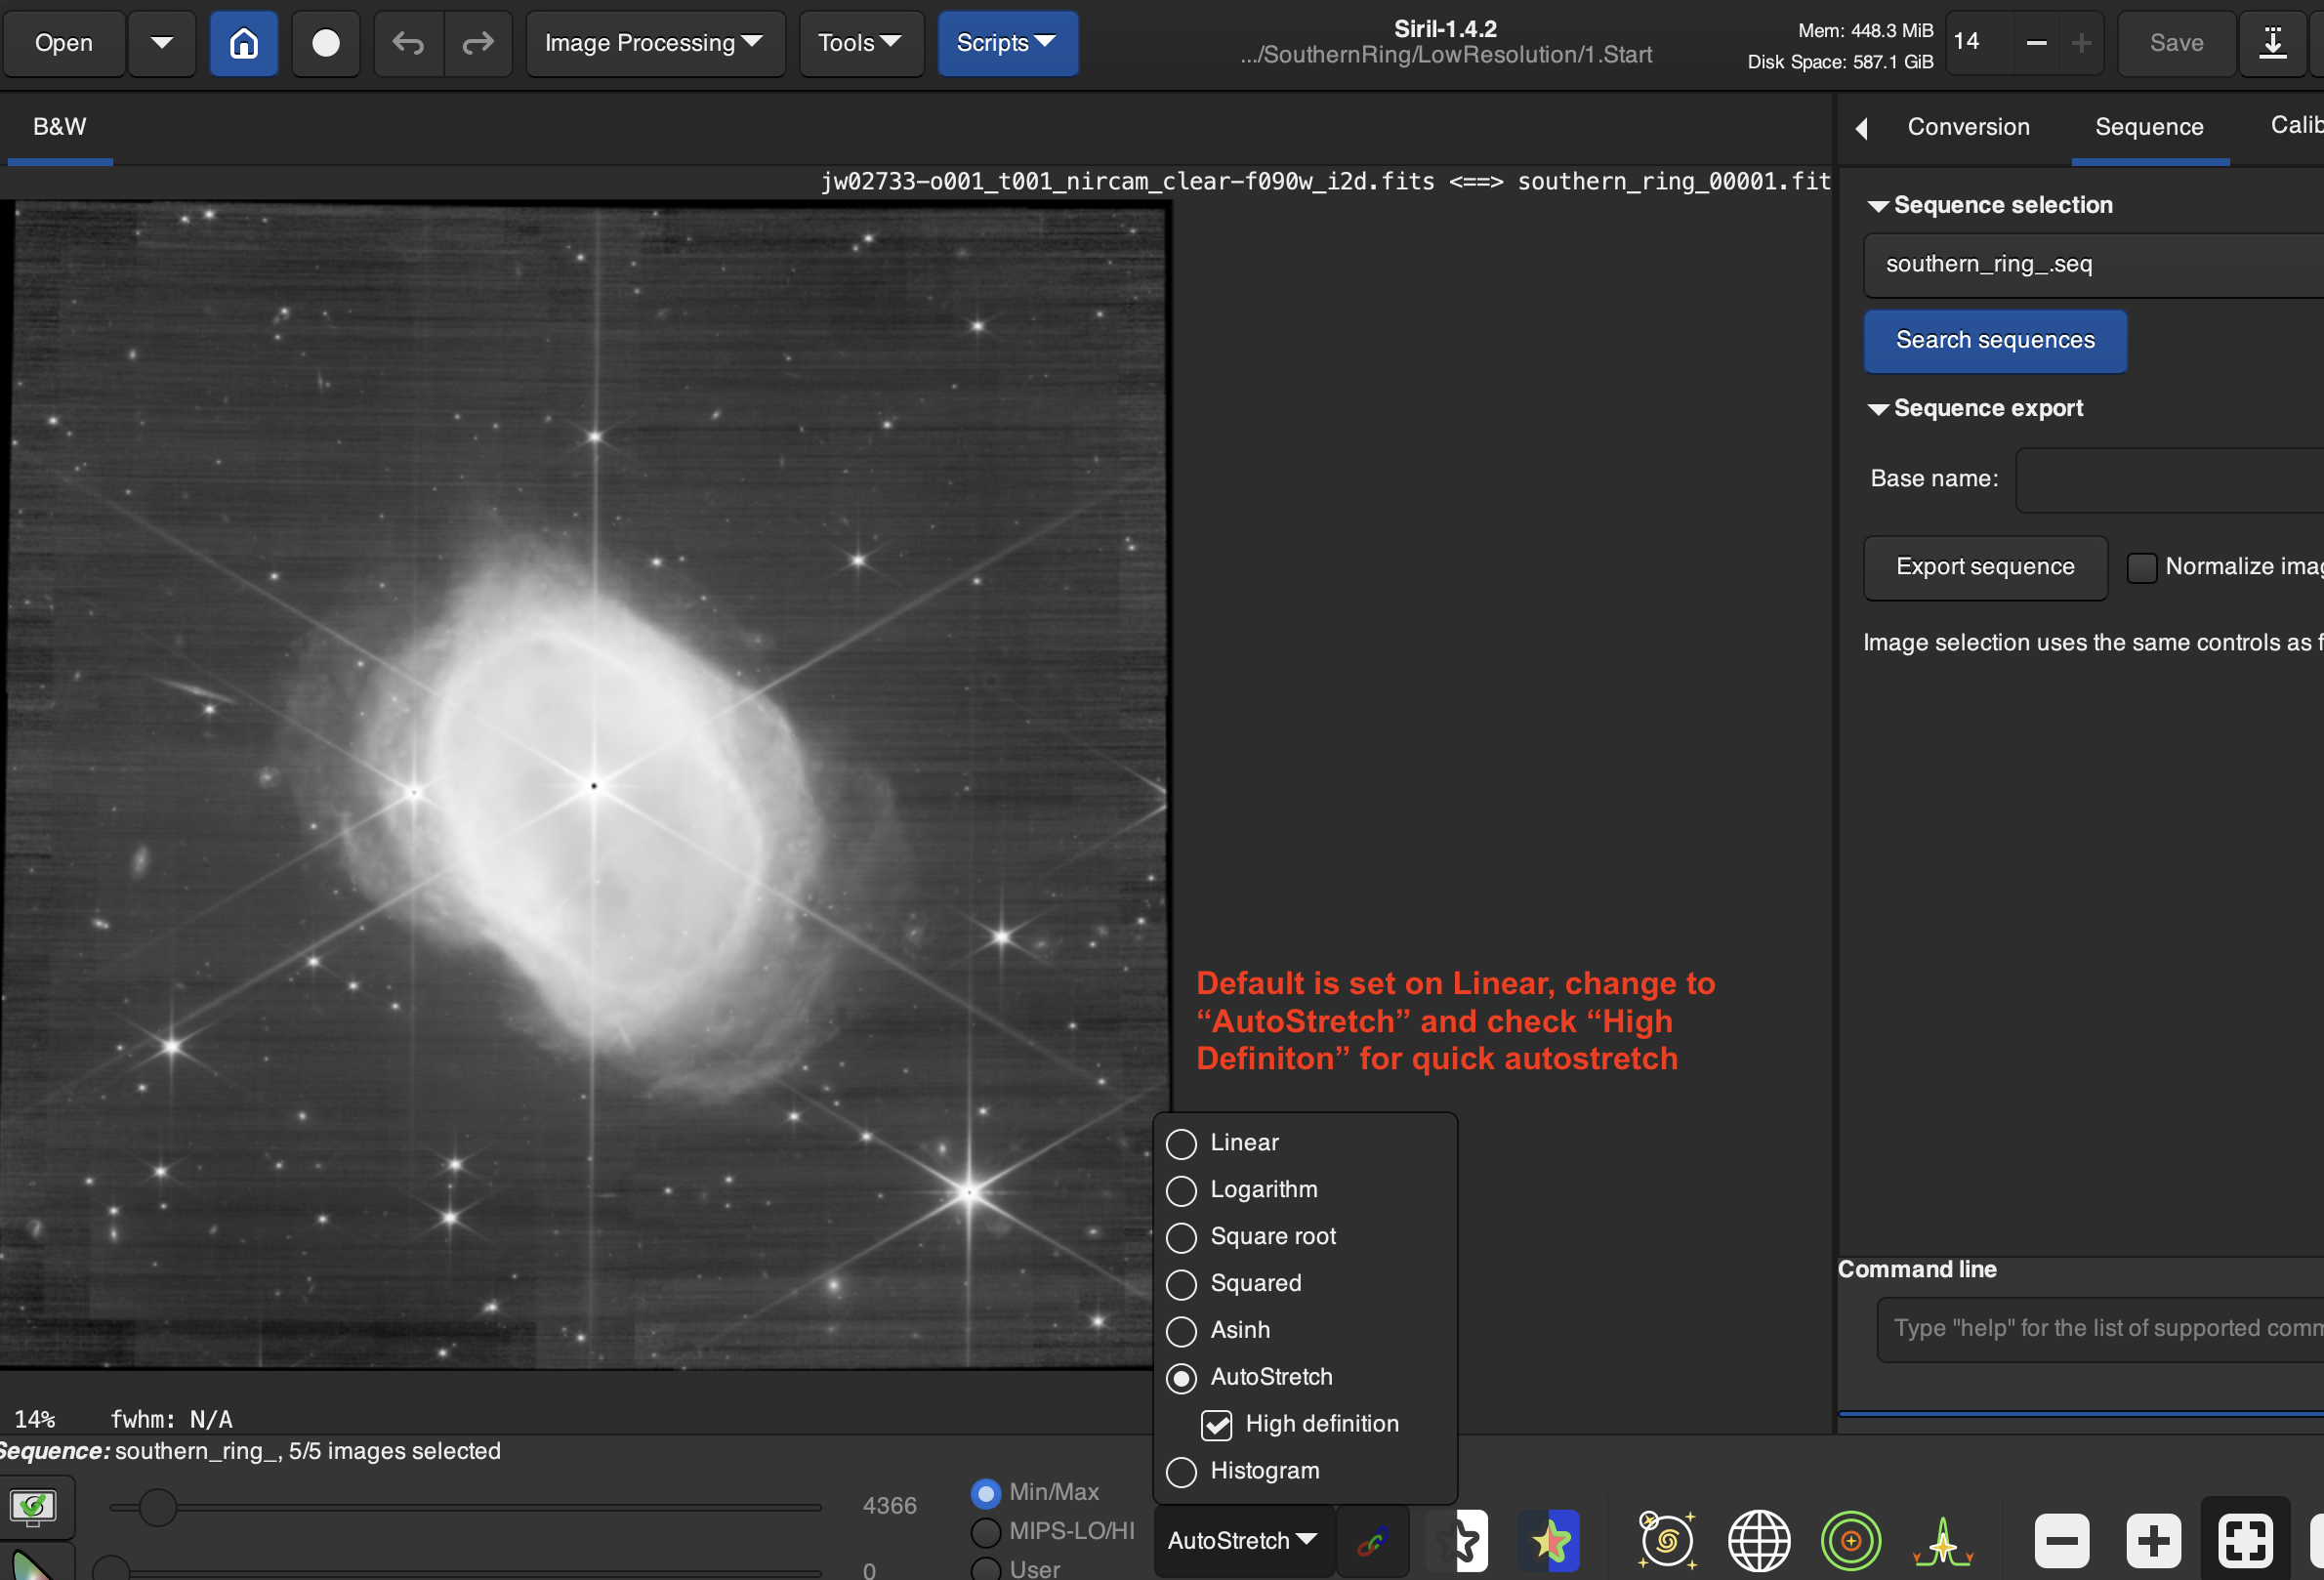
Your images will look black at first, our eyes are not as sensitive as the camera and so the data is located where we can’t see it. The raw JWST NIRCam image isn’t actually black; it just appears black because the pixel values span a very large dynamic range and are stored as linear intensity values. When displayed with a default linear stretch on a normal screen, almost all pixel values fall near the dark end of the display scale, so the image looks black until you apply a stretch (e.g., logarithmic or histogram stretch) that maps the faint signal into the visible range. It’s like having an audio recording where the volume is set extremely low. The sound is there, but until you turn up the gain, you hear almost nothing.
We can do a quick and dirty “autostretch” just to see each of the filters. But we don’t want to save this autostretch as that will destroy our image, it’s far too noisy. We will do a manual stretch later, but the autostretch is useful to see the different filters.
Autostretch: At the bottom of the screen click “Linear” and select “Autostretch” and check “high definition”
Align your images (Registration)
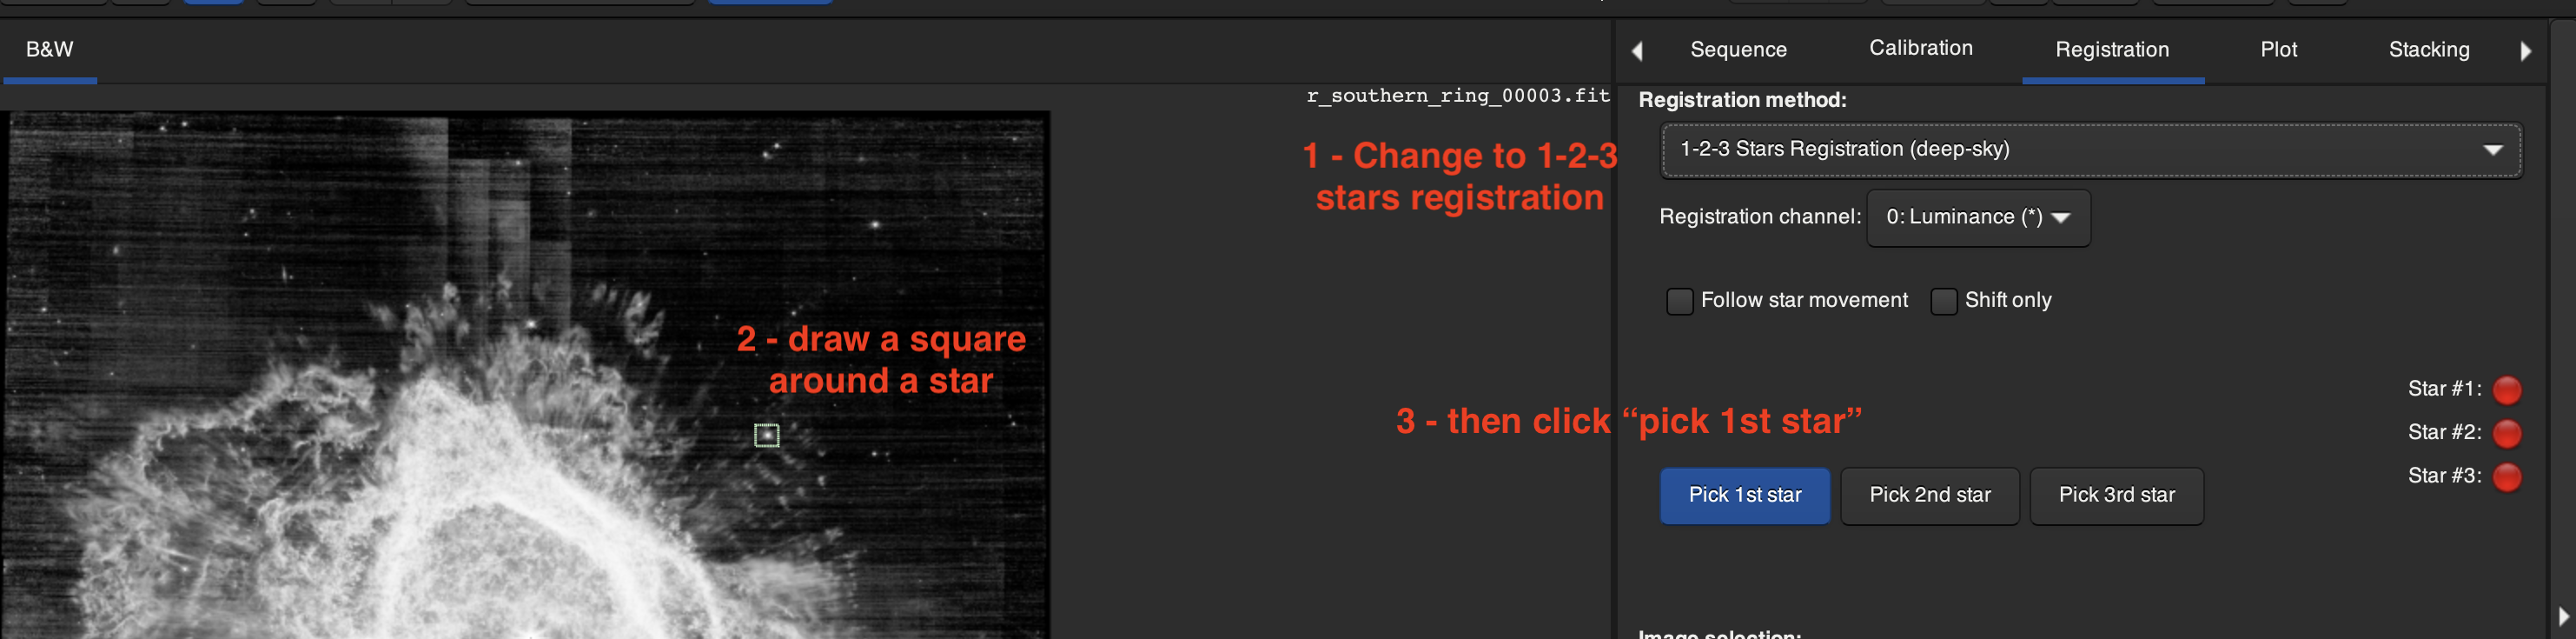
Because the telescopes cameras are not exactly aligned, we need to align the images so we can stack them together. You can do this automatically with a function called “Global Star Alignment” or by “1-2-3 Star Alignment”. The easiest is Global Star Alignment. The software will try to identify the stars common to each image and then perform a rotation and shift to any of the images need to align to the reference image. Sometimes this fails. In 1-2-3 star alignment, you select three stars that are visible in each image by putting a box around them. This also sometimes fails and you will have to try it again with 3 new stars until it works. Siril is far less accurate at doing this essential step than the non-free software, PixInsight.
However, once it works, the software then performs the translation to the remaining images. The Southern Ring Nebula works great so I would start with that object first to make sure you understand how to align images before going to more difficult ones like Pillars of Creation.
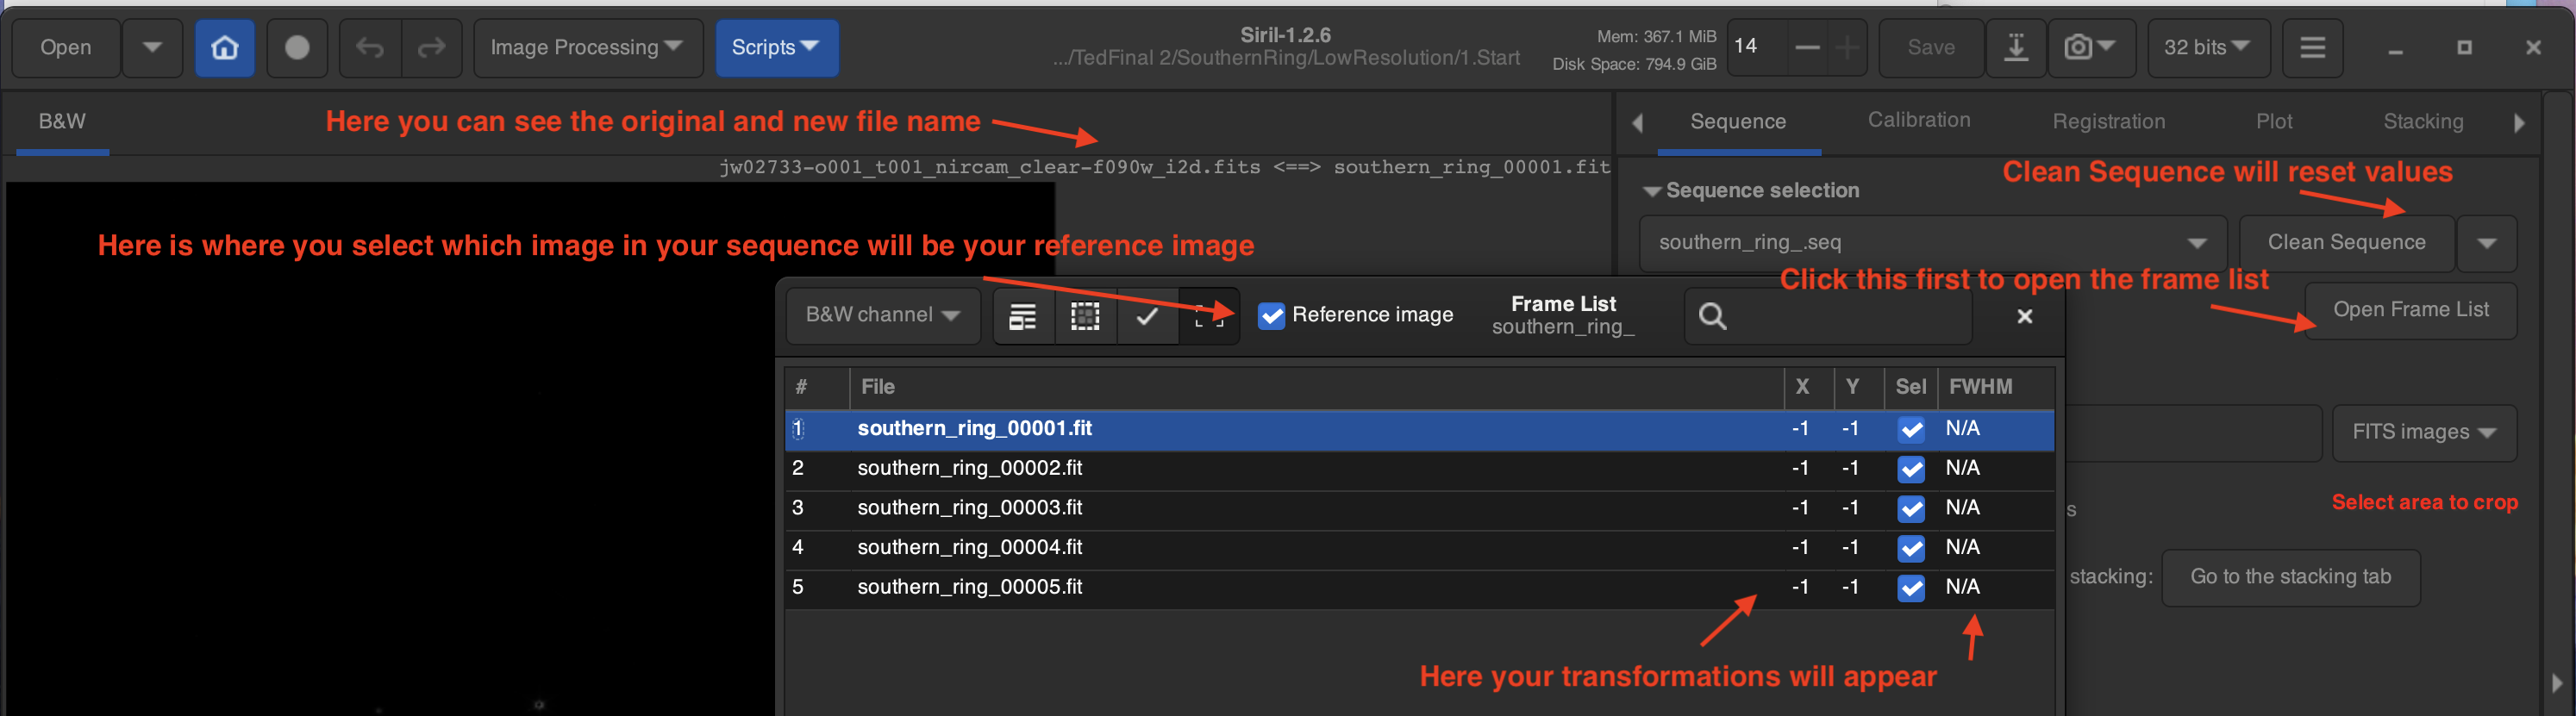
Choose your reference image
Click the “Sequence” tab. Click “Open Frame List” which will open now your converted files (.fit files named how you specified in the previous step.) When you open the frame list, the first image by default is selected as your reference list. This may not be the best image though.
For the Global Star Alignment function in the next step, choose a reference image with the least number of visible stars. For the 1-2-3 stars registration function, choose a reference image with a medium to high number of visible stars. You might need to trial different reference images and repeat if the alignment fails. Note for NIRCam – there are two channels. By default within a single observation campaign, the short wavelength channel images are all aligned together and the long wavelength channel images are all aligned. So you only need to align across the two channels. And ideally you want images in both channels to get a wider wavelength coverage.
On autostretch, the images are very poorly stretched, but you can at least confirm the object and by flicking between each one in the Frame List, and you will see which are aligned and which are not. Once images are aligned, if you click between each image, stars won’t move between all of the images.
I’d always try “Global Star Alignment” first which you can select from the dropdown menu under the “Registration” tab. Reduce the minimum number of stars to 4, and make sure your interpolation routine is set to Lanczos-4. Then click go register.
 If all images succeed, great! Double check they are actually aligned visually since sometimes the program will say it’s succeeded when it hasn’t. To do this, go back to the Sequence tab and open the frame list and visually click through each frame to see that the stars are not moving between any of the frames. If not, try the 1-2-3 stars registration.
 To use the 1-2-3 stars registration, you would draw a green box around your first star that is conserved in all images then click “first star”. Repeat for star 2 and star 3. If this fails, repeat with different star picks. While Siril has the advantage of being free, it does fail more often. I personally recommend buying PixInsight if you want to get more serious in image processing as it is much more powerful and succeeds a lot more frequently.
 We can be done with Siril at this point. While it is possible to stretch and color the images in Siril, it is cumbersome and Gimp is free and better. These are your new aligned and registered images that have been saved and ready to open in Gimp. You can also find these under the folder
 3.Aligned in the zip file. Here are the list of files you should have from the above steps in your working directory.
PixInsight
You can do the previous steps in PixInsight. There is a paid software that is a lot more powerful and reliable than Siril. I have a 30 min video tutorial myself using PixInsight and GIMP through my JWST course on The Great Courses, released March 27th 2026 called Experiencing James Webb: The Invisible Universe Revealed.Click to play: James Webb Great Series Trailer
Part 3: Image Processing in GIMP
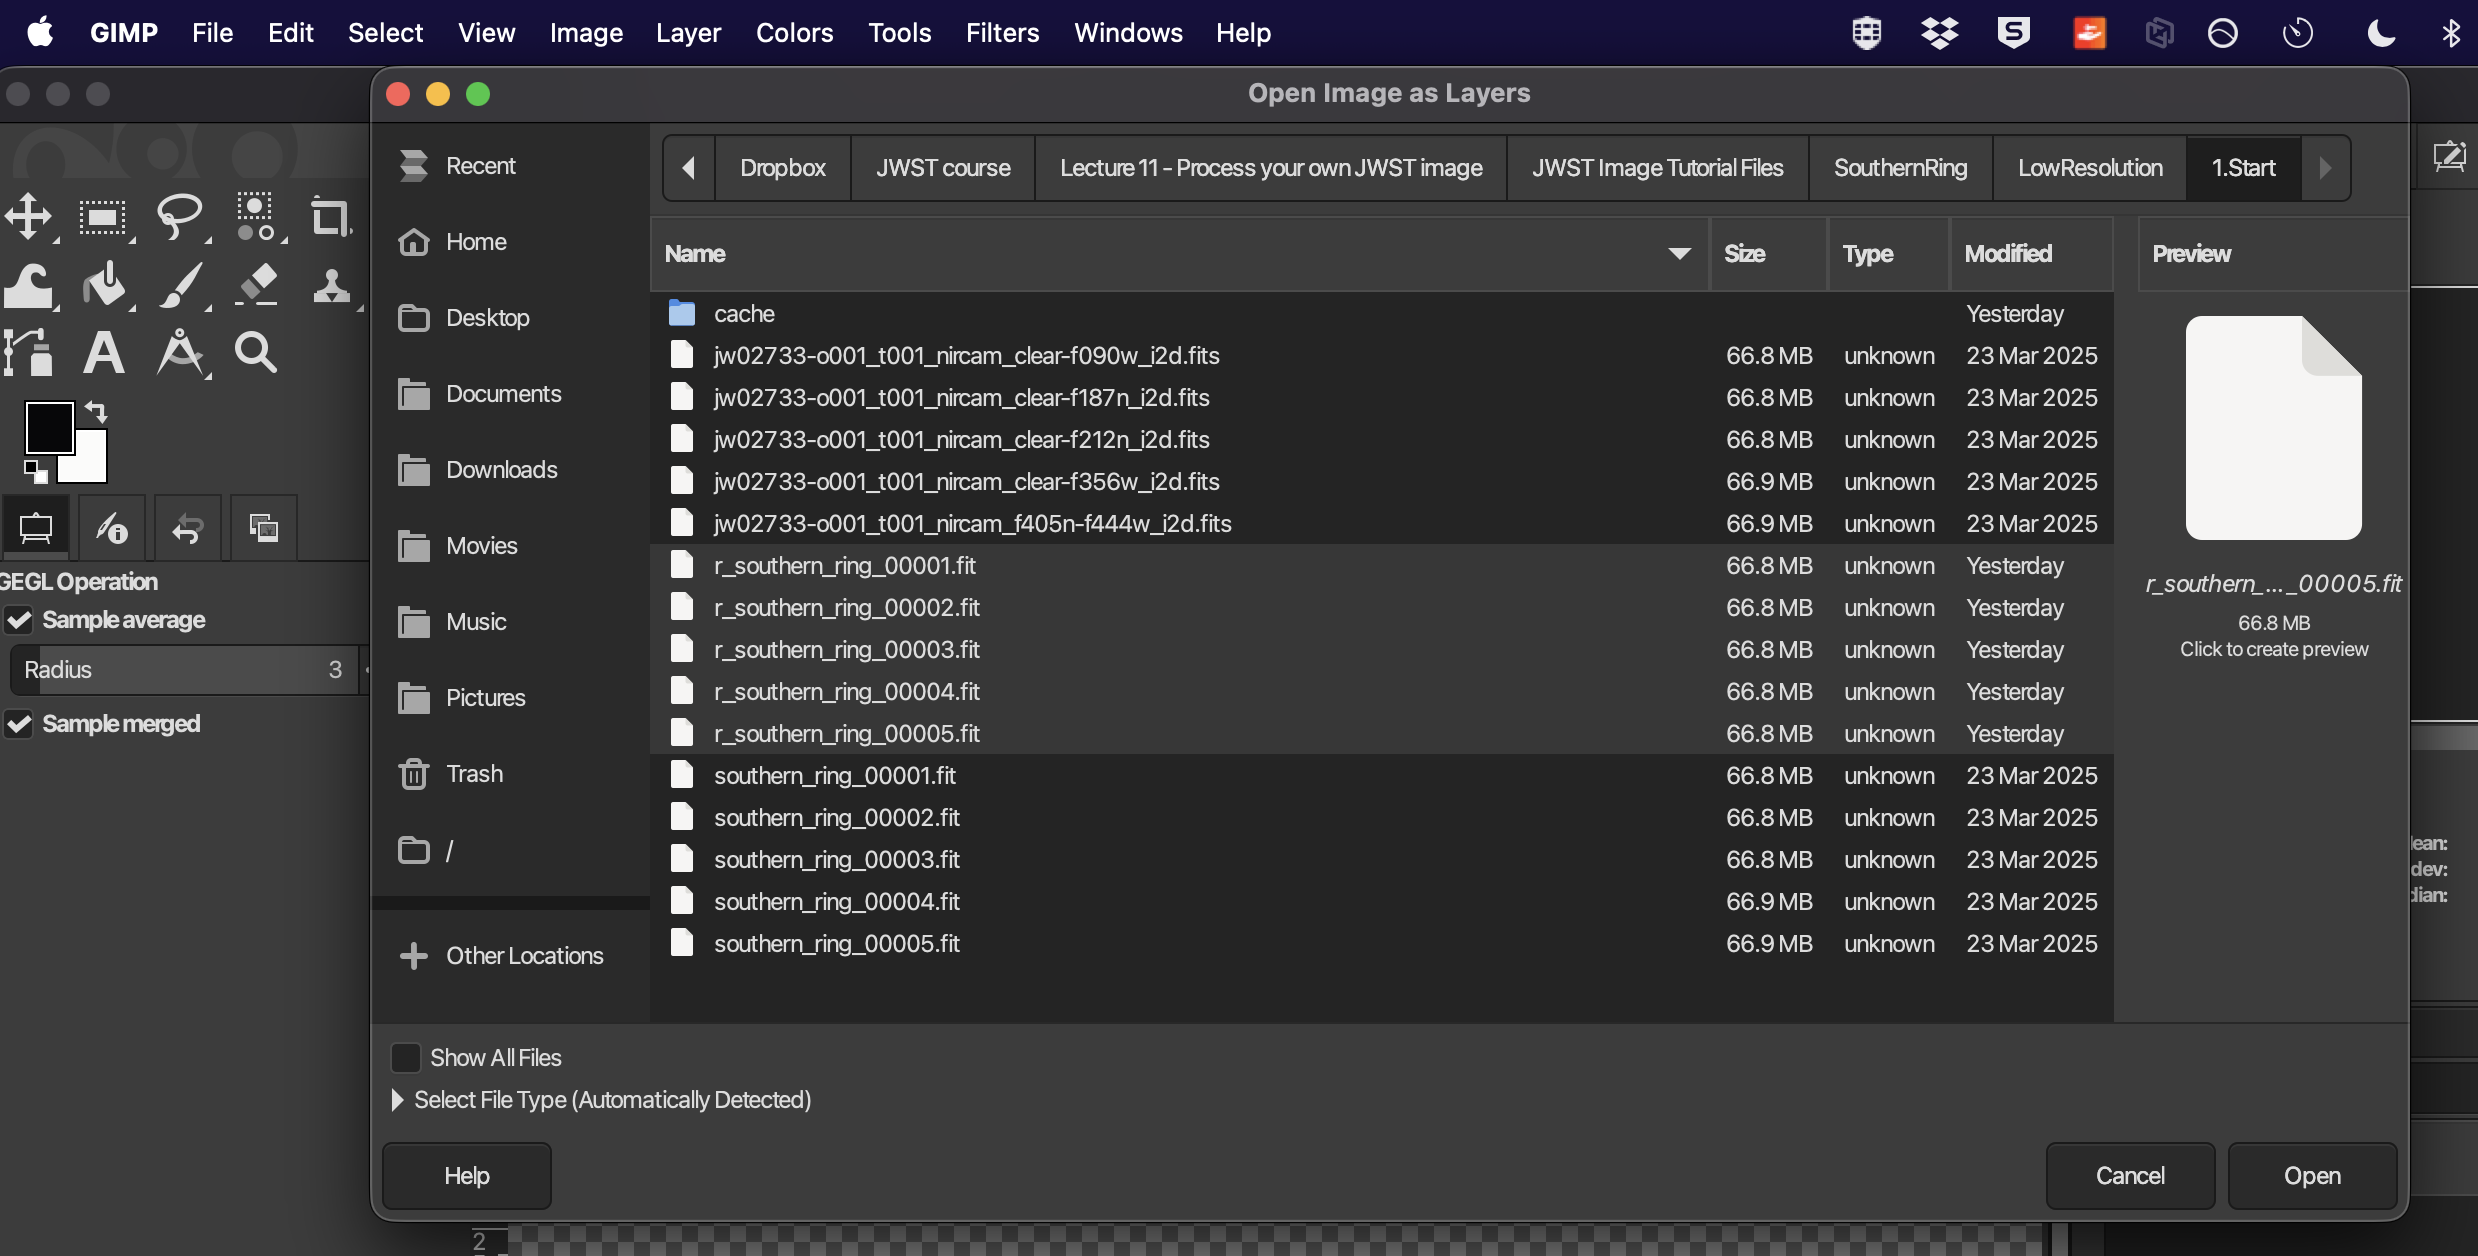
We will open our files in GIMP. When you open GIMP, close any of the initial automatic windows that open. Then go to “File → Open As Layers” and navigate to your aligned and registered images. They will be named something liker_southern_ring_0001.fit etc. Open all of the images from that last step, each as a new layer, and keep the defaults in the window that opens up. Keep the default option “Replacement for undefined pixels” as black and click open for each file.
Opening Layers
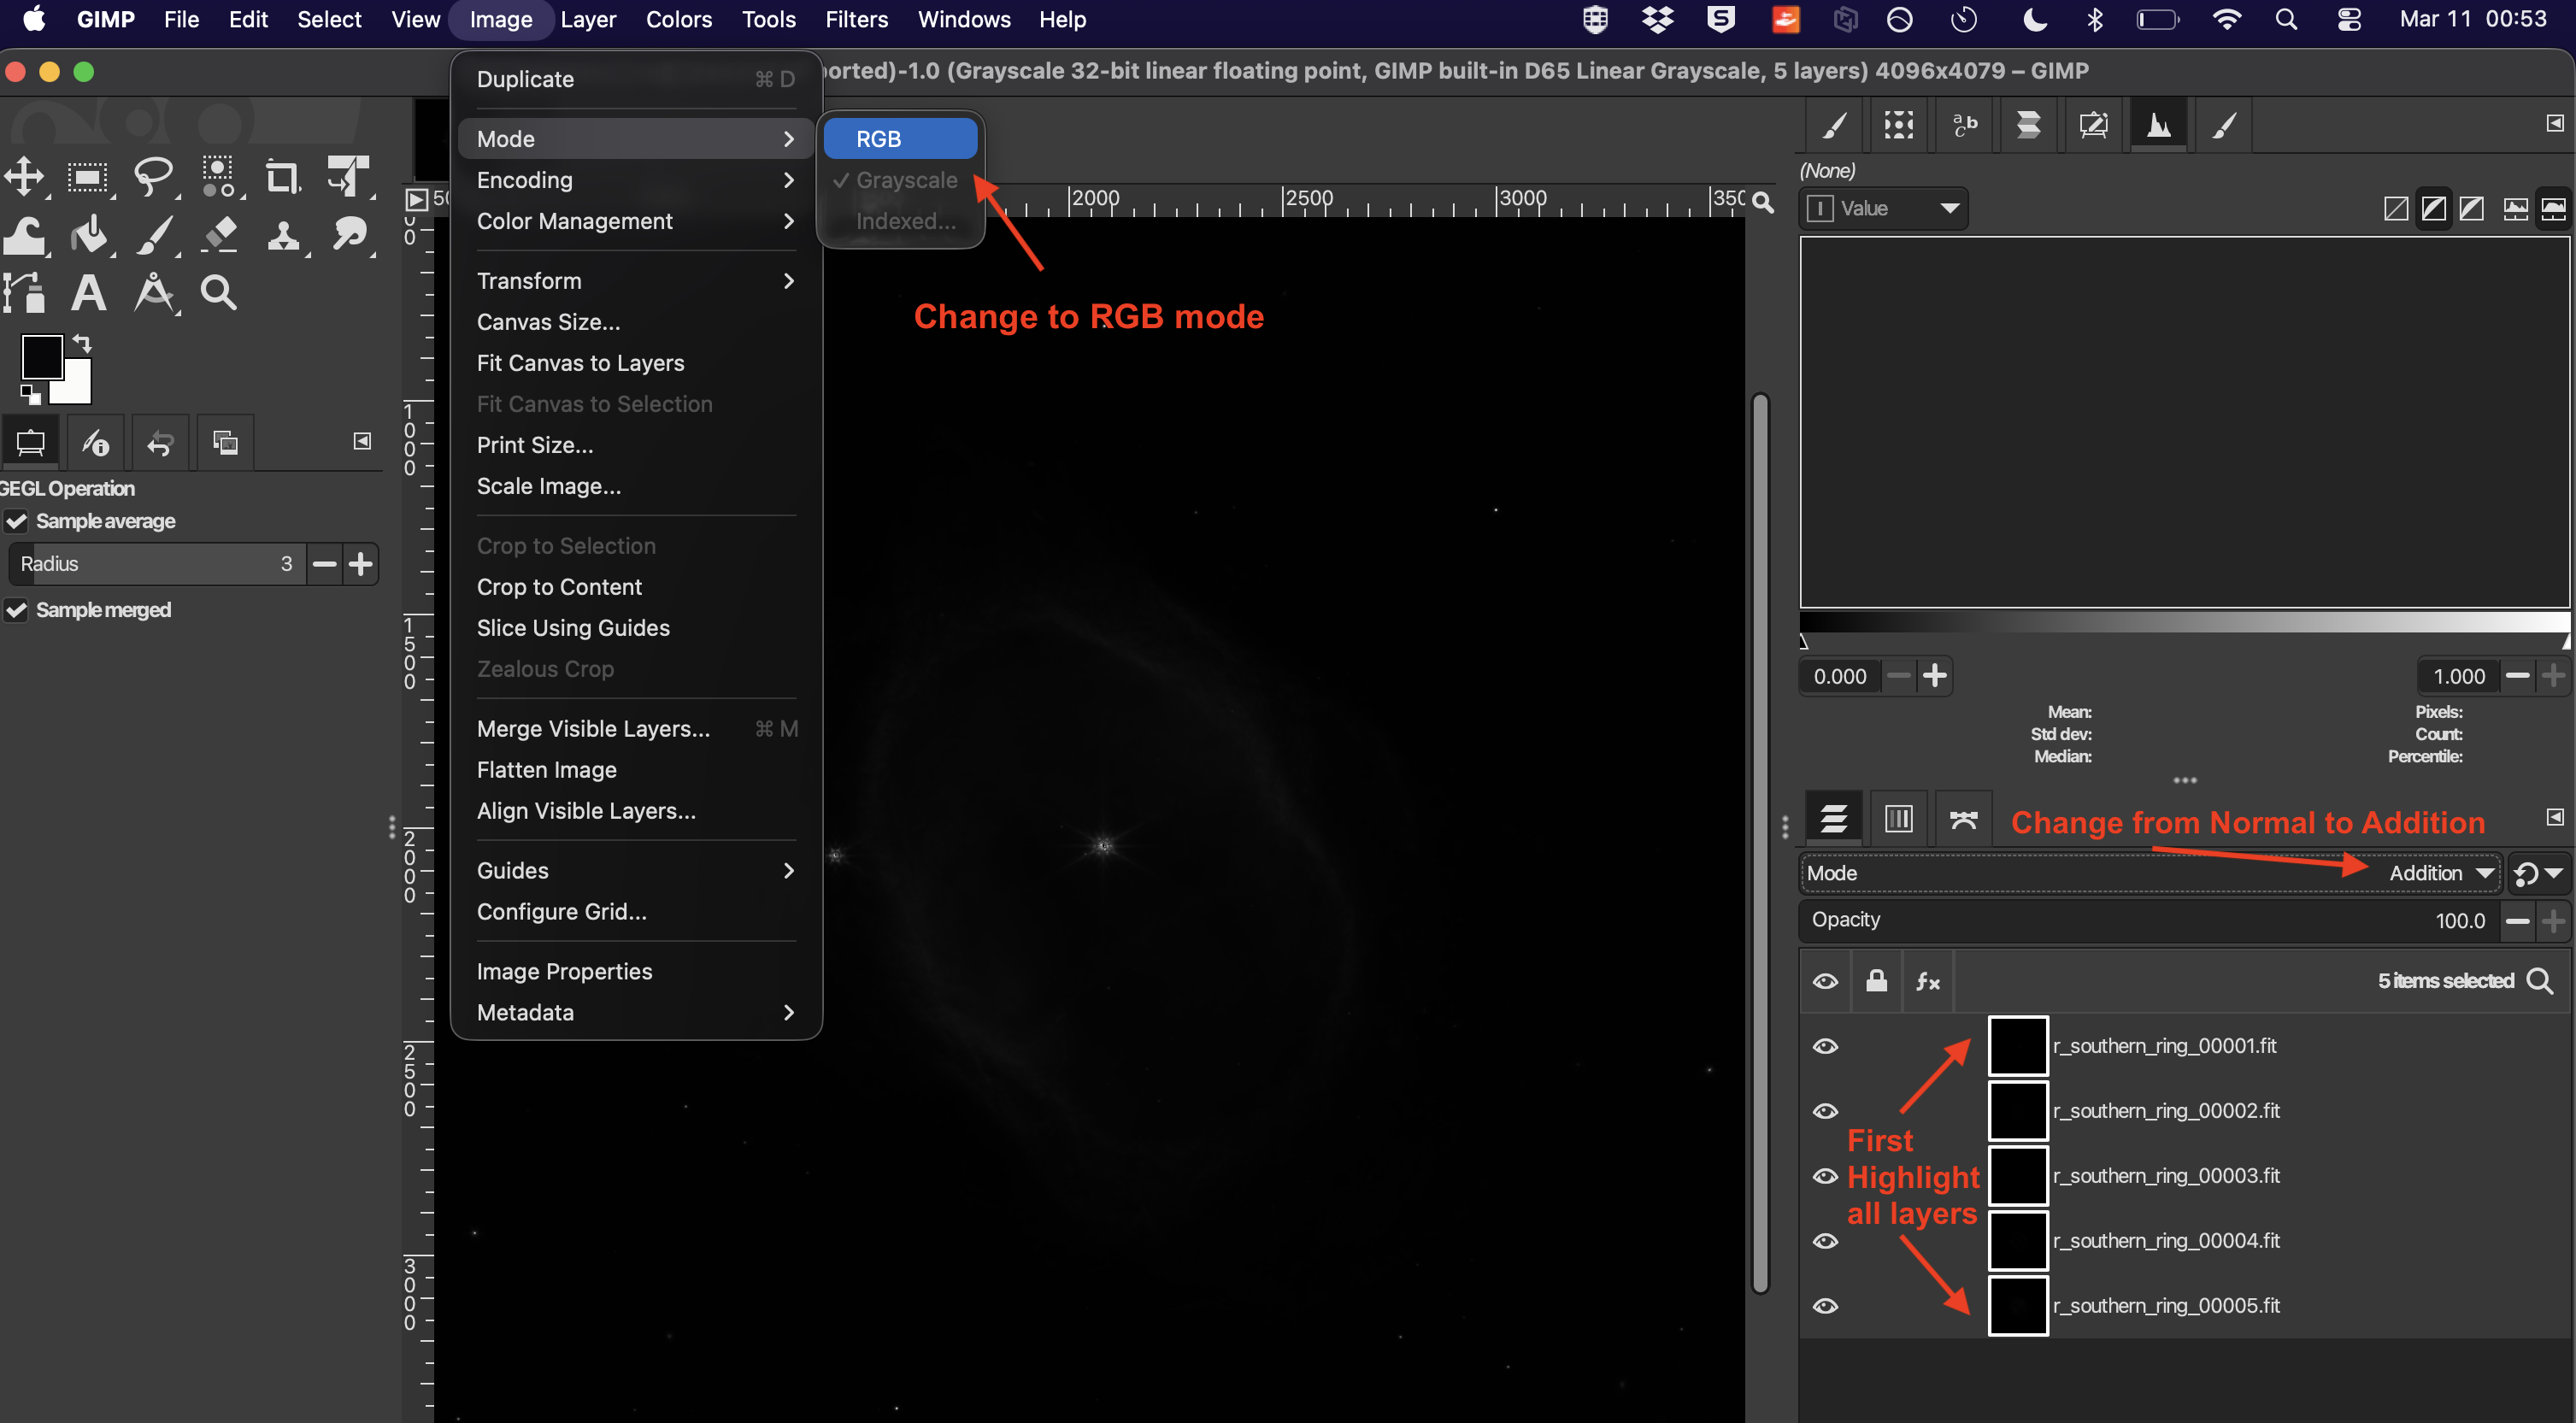
Open your aligned .fit files as layers. Set the Image Mode to RGB
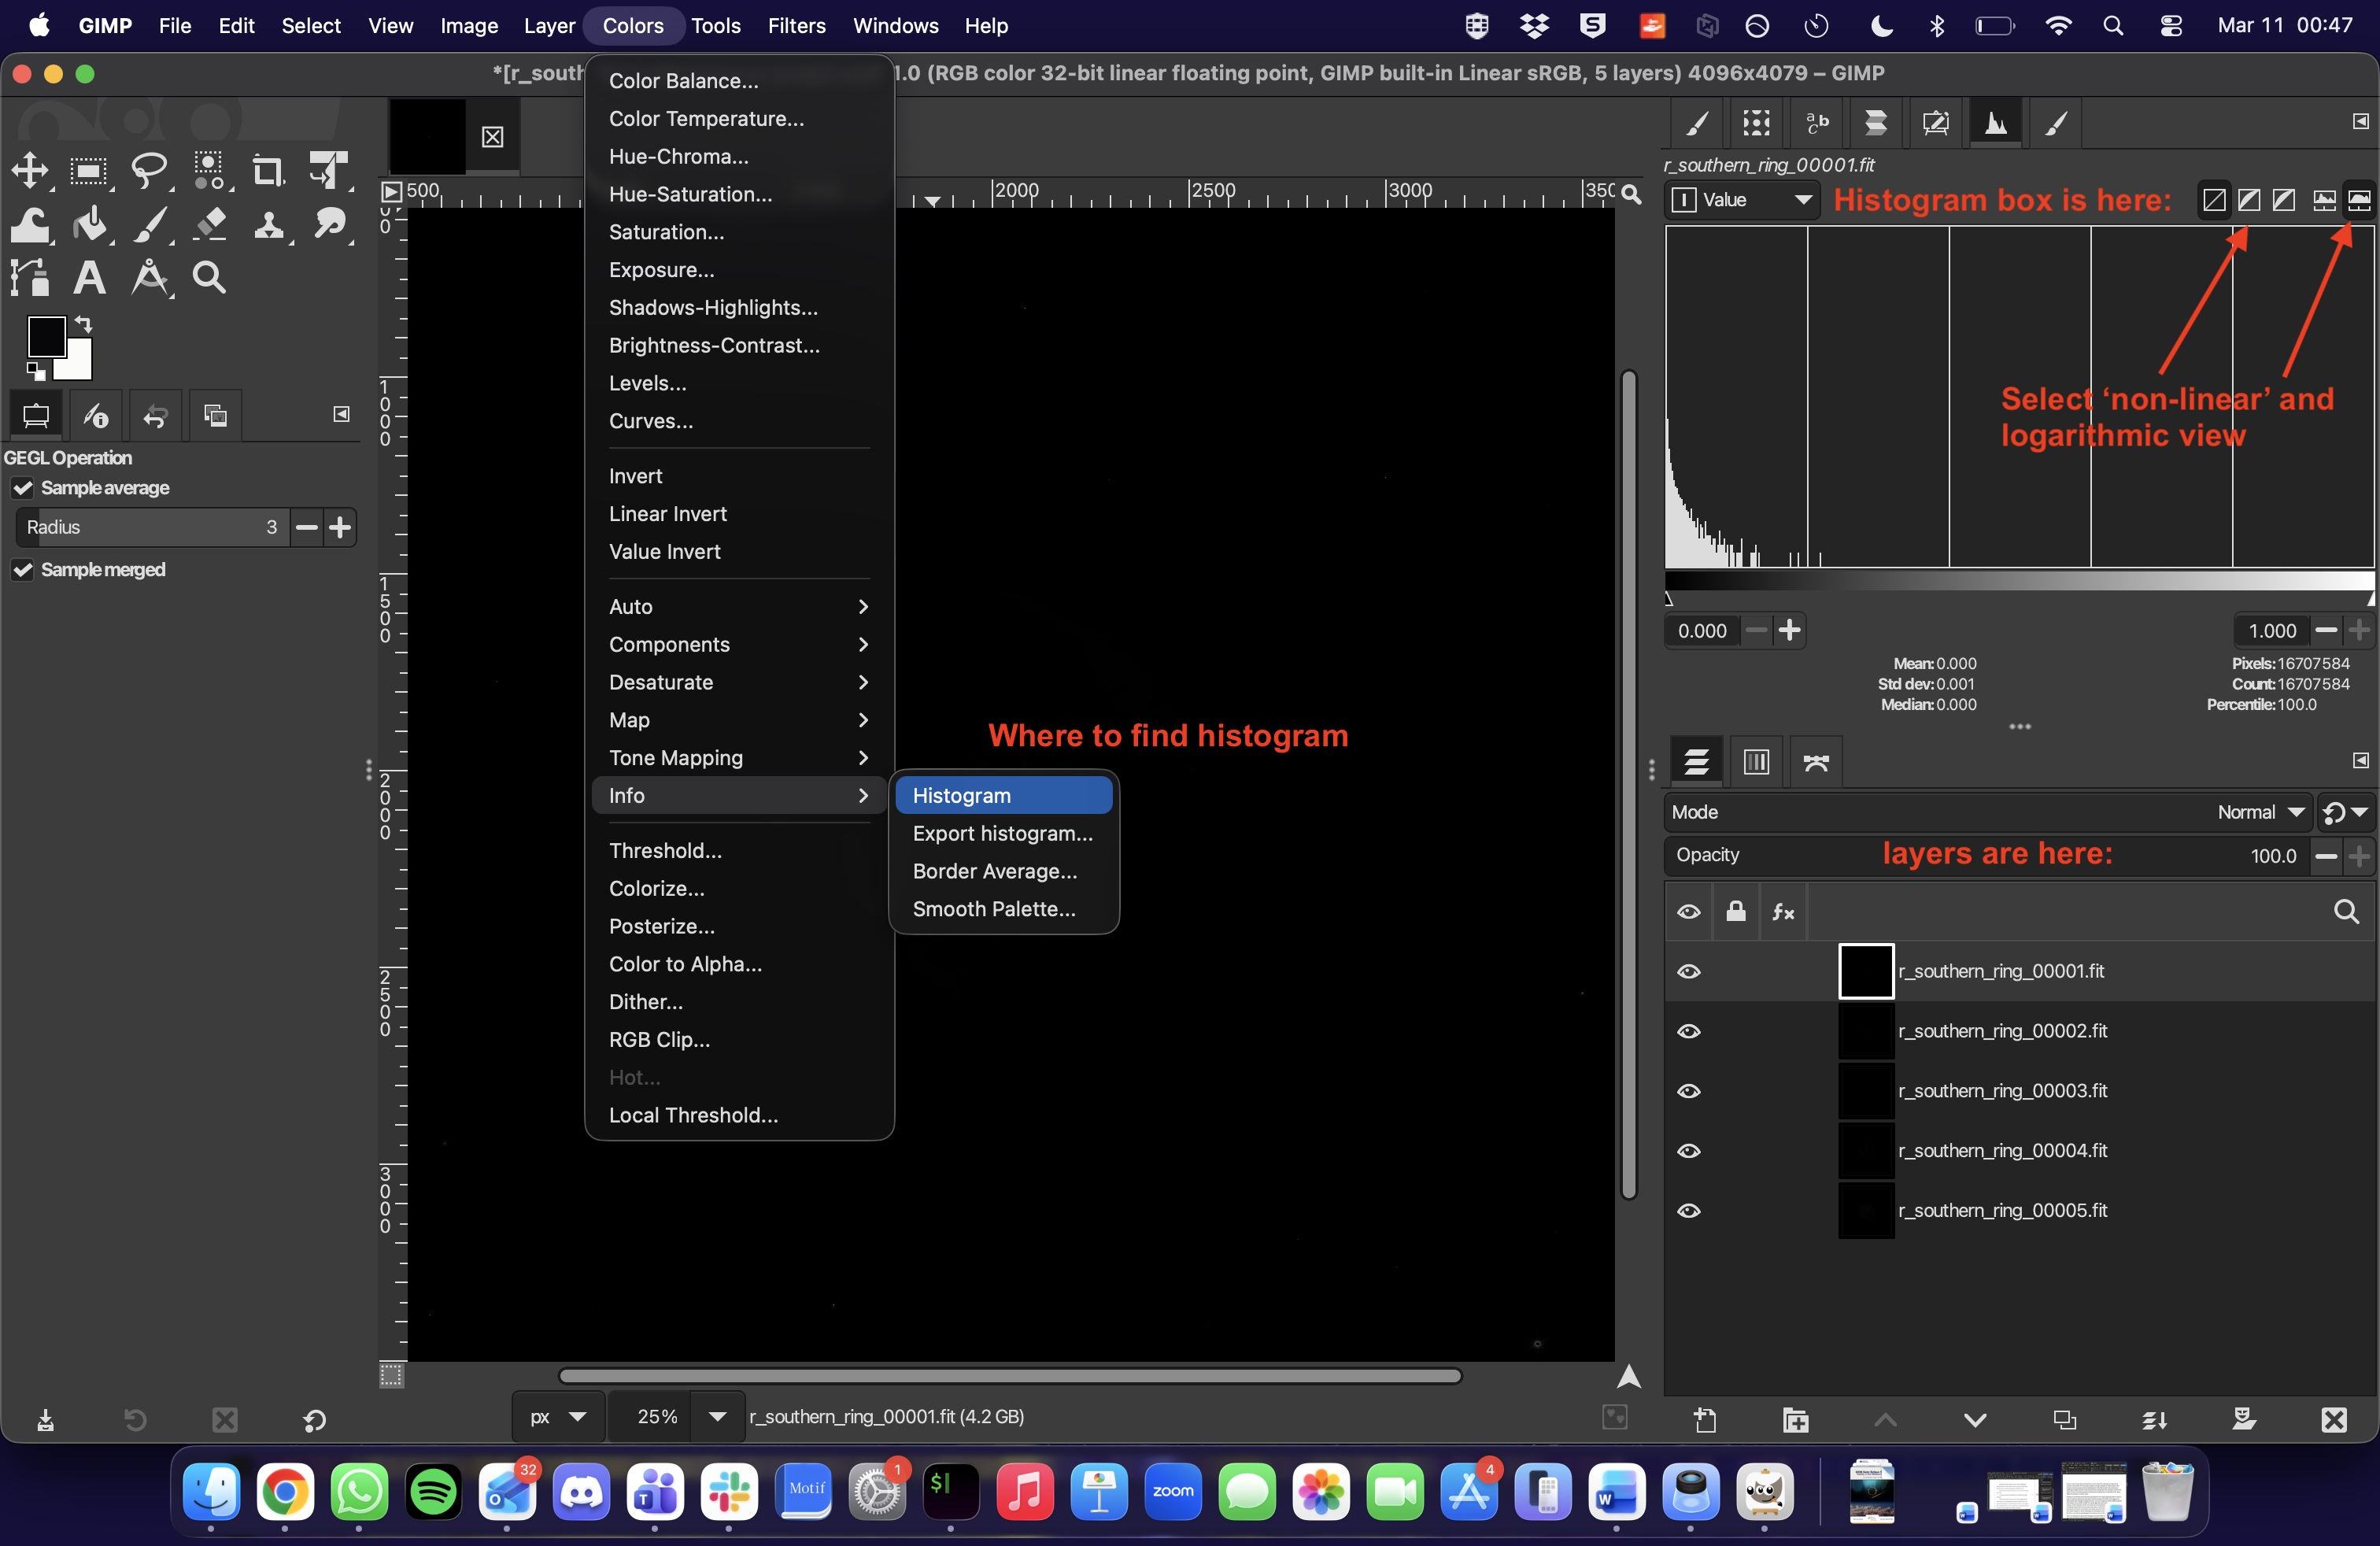
Set Histogram View
We’ll be using the Histogram view so to find that go to “Colors → Info → Histogram” and the Histogram box will appear on the right.
RGB Mode
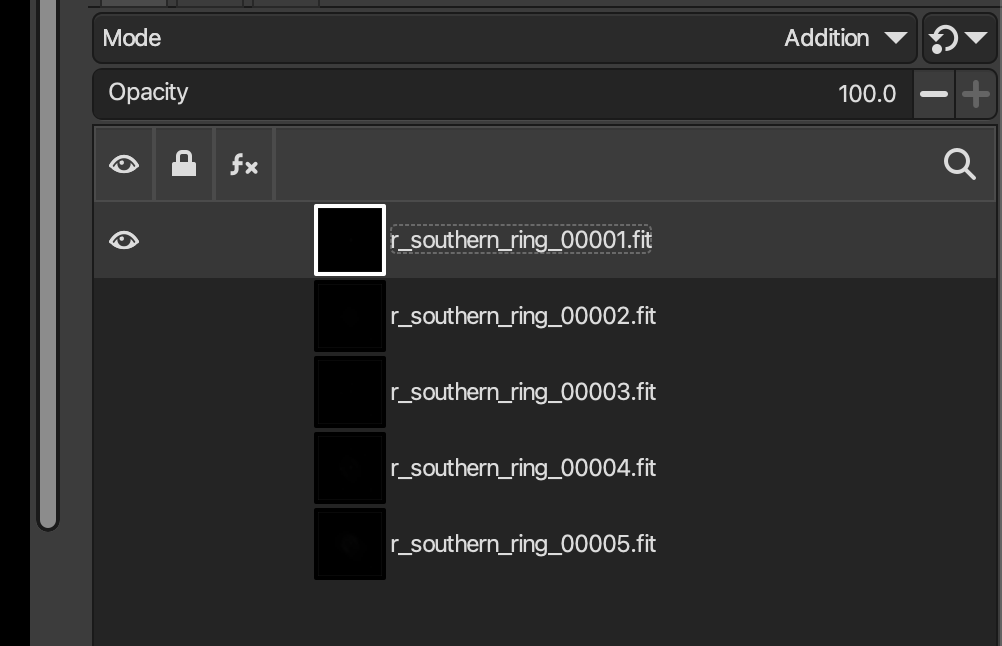
You need to also change the mode to RGB and addition. Ensure all the layers are highlighted so they are all selected for this step. You can shift click or control click to simultaneously select multiple layers.
In the menu bar click “Image → Mode → RGB” and click the dropdown menu Mode on the right panel and change from “Normal” to “Addition”.
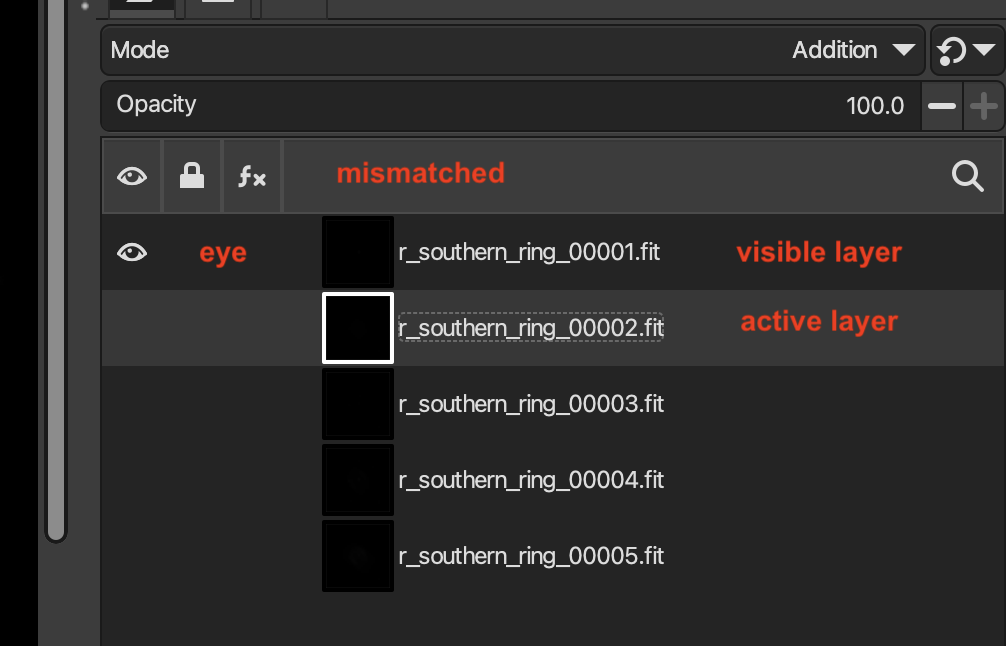
Visible Layer
You will want to only have one layer visible at a time. The eye symbol tells you which image is being displayed to the left. But the highlighted layer is the active layer you are applying any transformations to. So make sure that these are not mismatched, and that you always have the eye symbol turned on only for the highlighted image like this:
This is an example of a situation you don’t want where the top layer 00001 as the eye and is being displayed to the right, but the next layer in the list, 00002, is the one that is the active working layer”.
Stretching
So remember that, because our eyes are not as sensitive as the camera and so the data is located where we can’t see it because the pixel values span a very large dynamic range. We have to apply a stretch to map this faint signal to values our eyes can see.
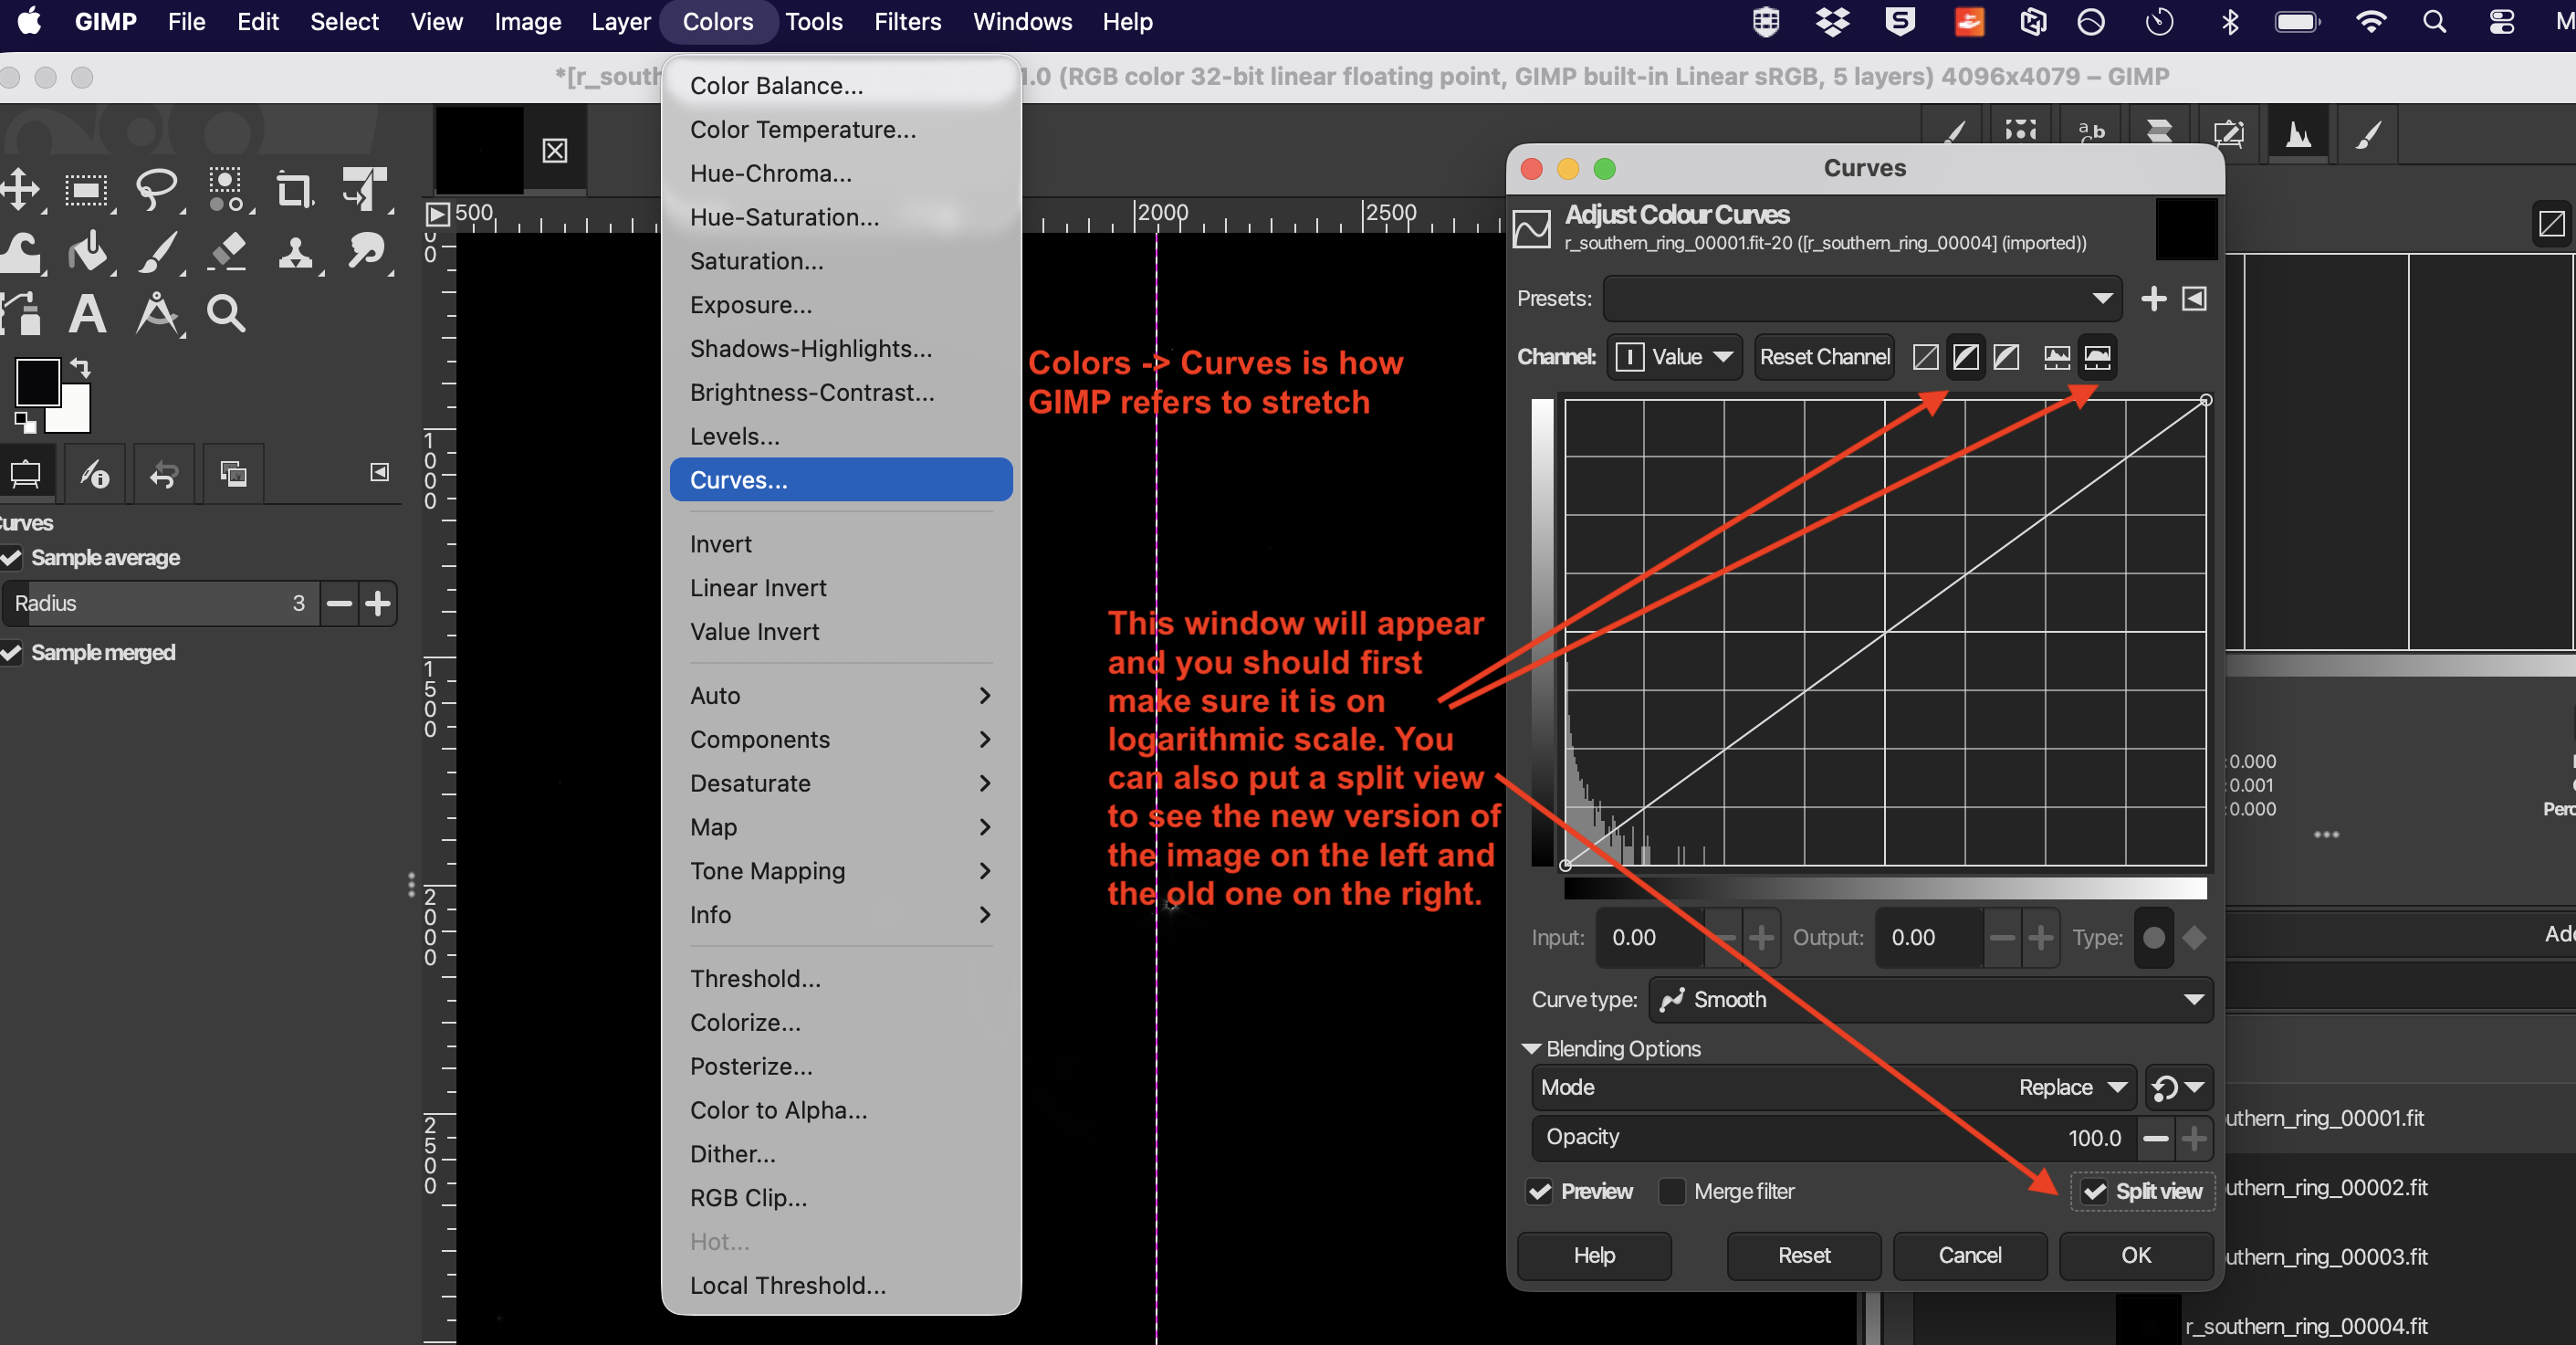
First when you open “Colors → Curves…” you’ll want to make sure your histogram is set to logarithmic scale. In any of these options going forward, there is also a “split view” box you can check to see the new image (on the left) and the old version if you want to cancel (on the right).
Apply curves in stages to map the faint signals into visible ranges. Ensure your visible layer (the "eye" 👁) matches your active highlighted layer.
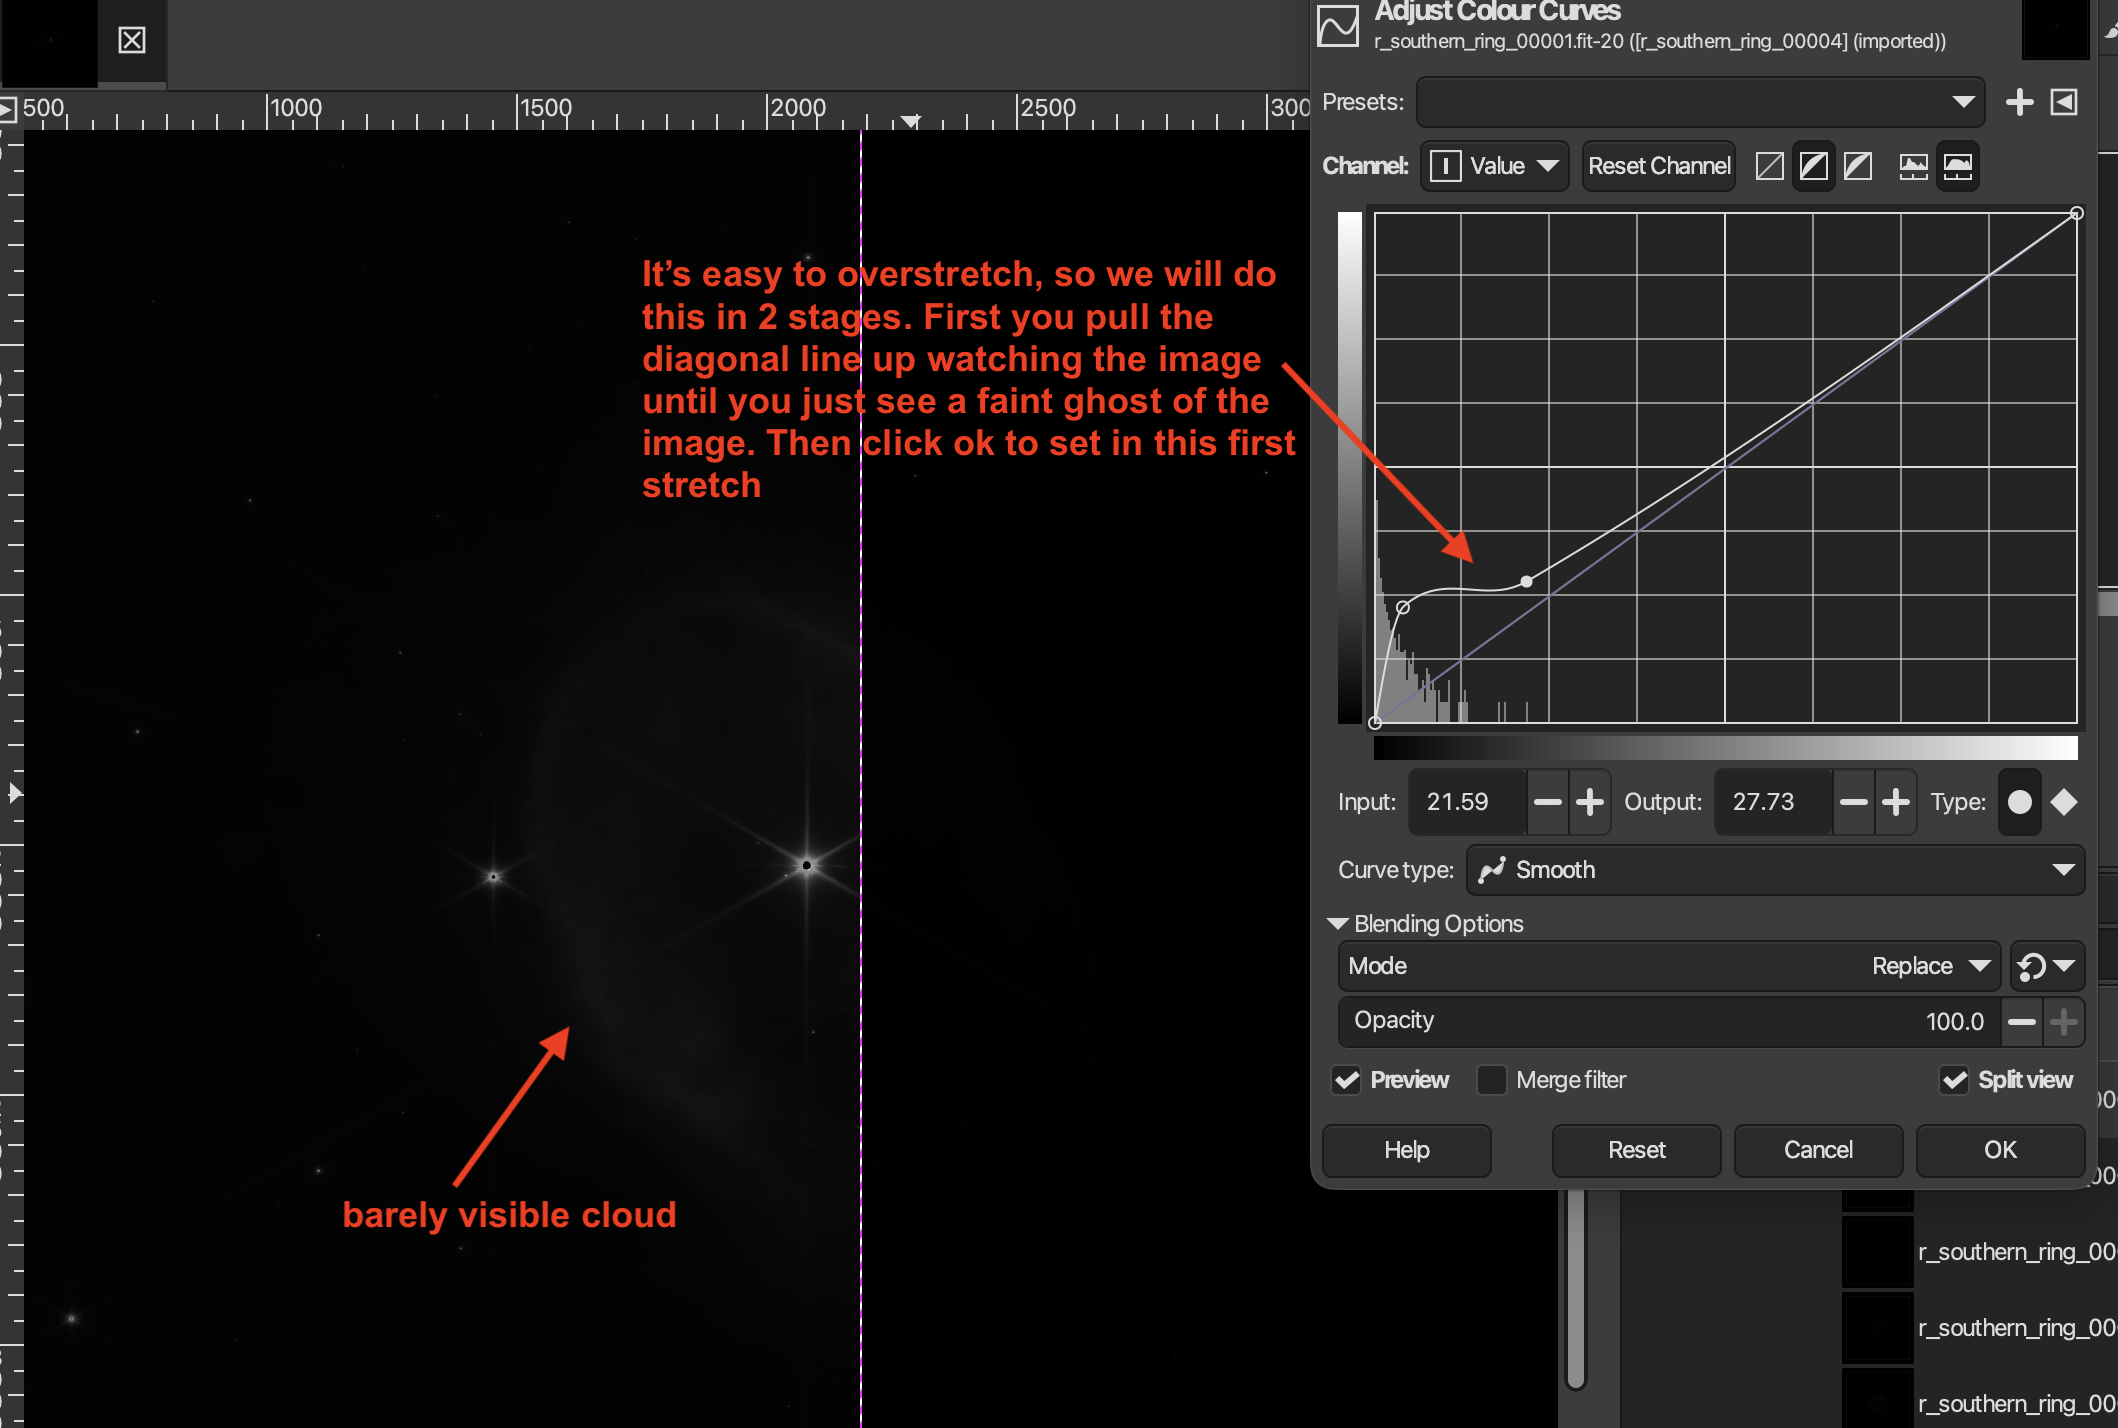
We will apply the stretch in two stages. It’s very easy to overstretch, and that adds unnecessary noise. On the other hand, if we under-stretch, we will miss out on features. It can be useful to overstretch each filter and then undo that, just so you see where all the dust and gas is in your image so you don’t miss any faint parts of the image. Once you apply a stretch, you can’t undo it, so it’s a situation of measure twice and cut once.
Typically, I drag up the curve line slightly until I just start to see the image faintly and then apply it by hitting “ok” and then reopen Curves and do another stretch where I am really aiming to get all the features shown in that filter.
Here an example of the first stretch:
Here is the second stretch. It’s slightly overstretched here which you can tell since the background is no longer black but hazy. I’d back off slightly from this but still capture all the gas and dust visible here.
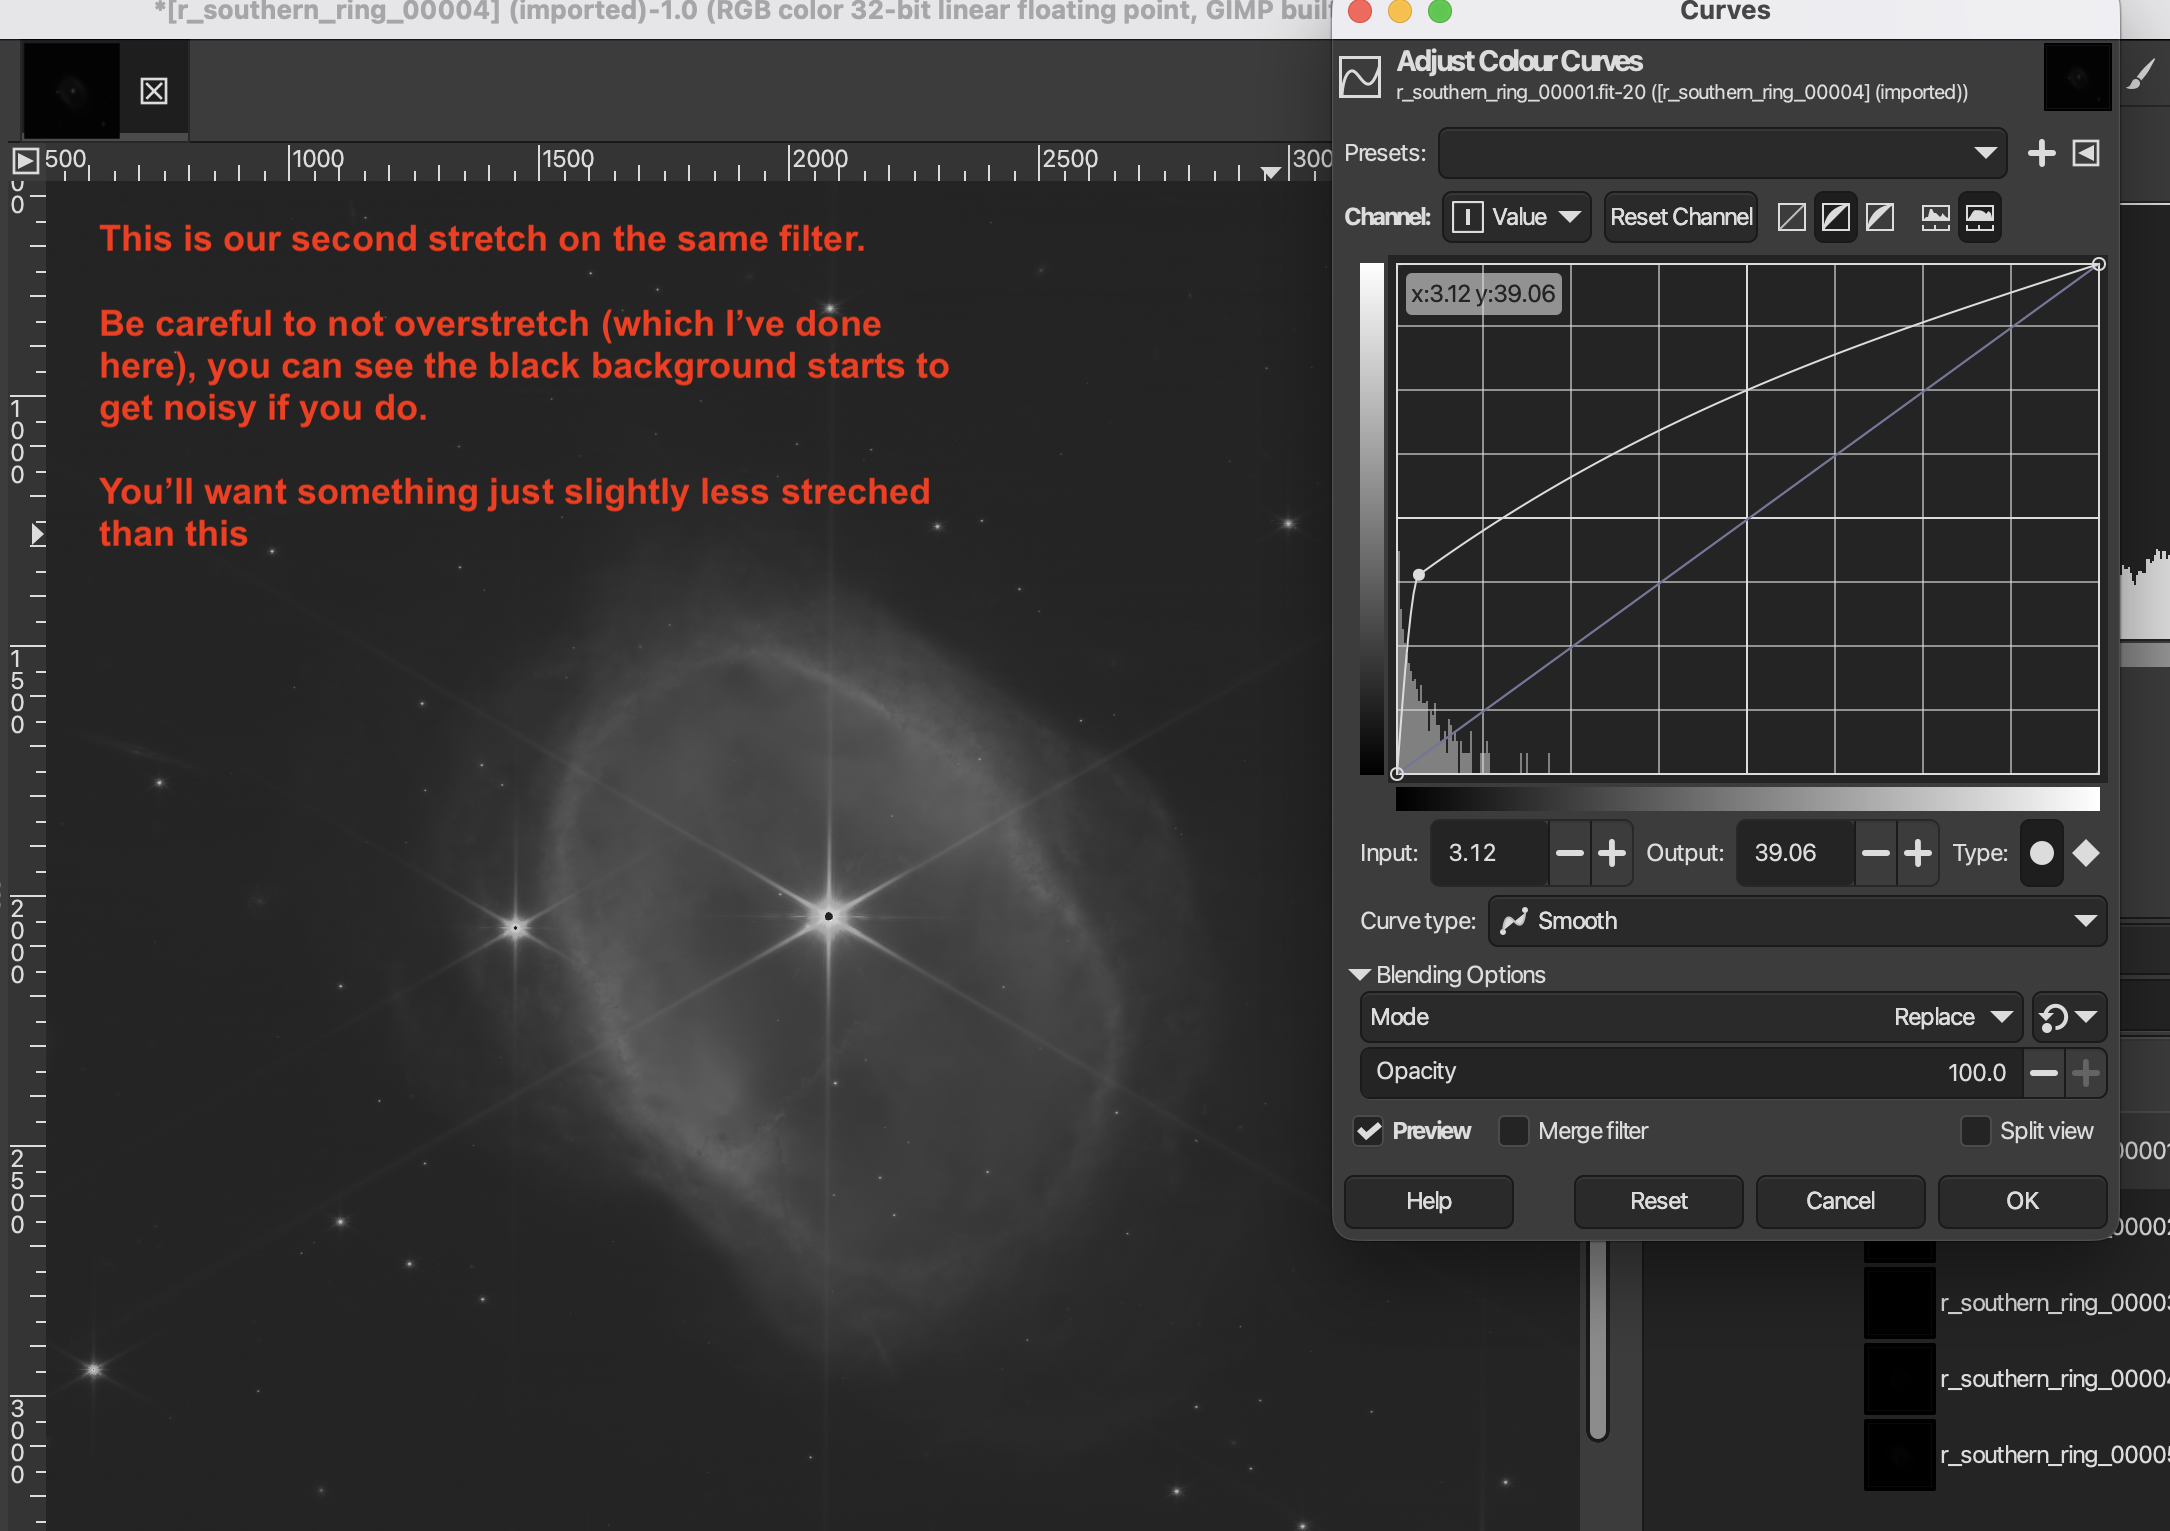
Repeat this process for each layer/filter. Remember you MUST have the highlighted active layer match the visible “eye” layer otherwise you are modifying a different filter than what you are seeing in the viewer. It’s an easy mistake to make and is common pitfall. You can also find these under the folder 4.Stretched in the zip file.
Coloring layers
Now we will add colors to each of the filters/layers.
These are the published JWST filters (you can get the exact colors for each filter on a NASA final image release) and the most common colors these near-infrared wavelengths are mapped to. Let’s remember, JWST is observing in wavelengths are eyes can’t see, so it’s somewhat arbitrary the exact color mapping. However, like in visible wavelengths of light, the most science motivated way to do this is to map the bluer colors to shorter wavelengths and the redder colors to longer wavelengths. But feel free to have fun and play with the colors you want!
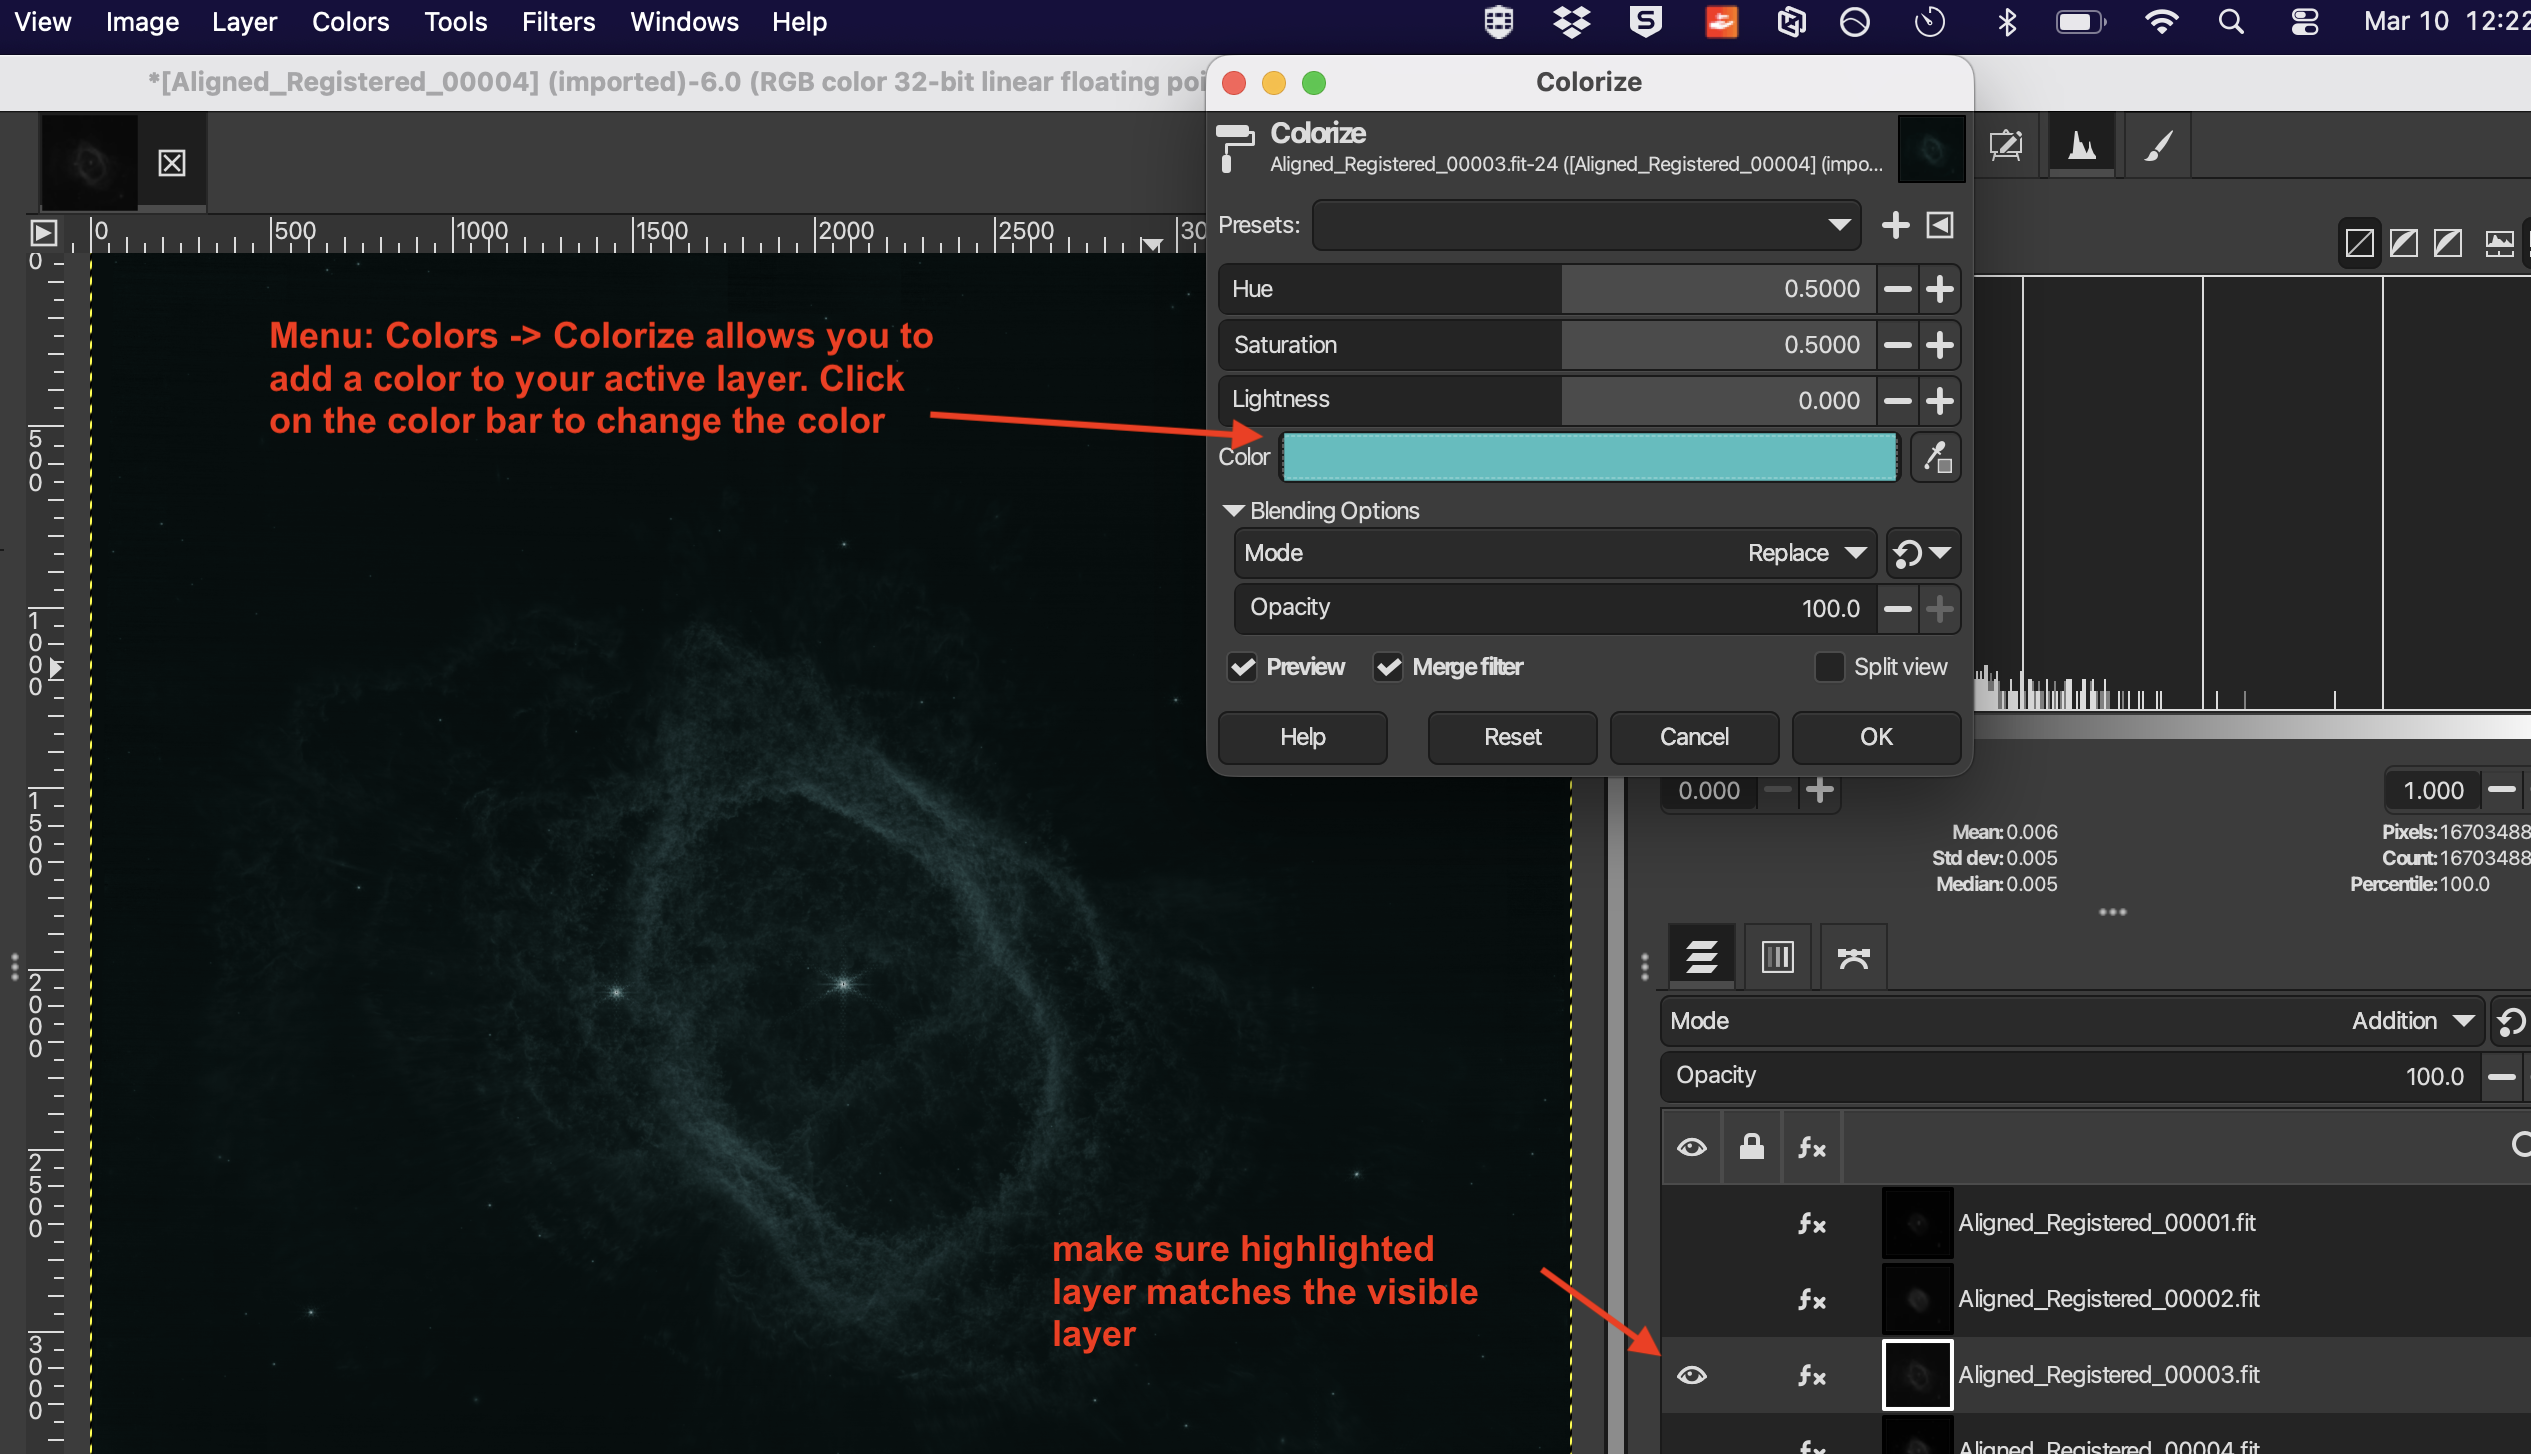
Once you open the menu (Under Colorse → Colorize) you will want to click on the color bar to open up a greater selection for choosing for that layer. Remember to make sure your visible layer and active layer are consistent.
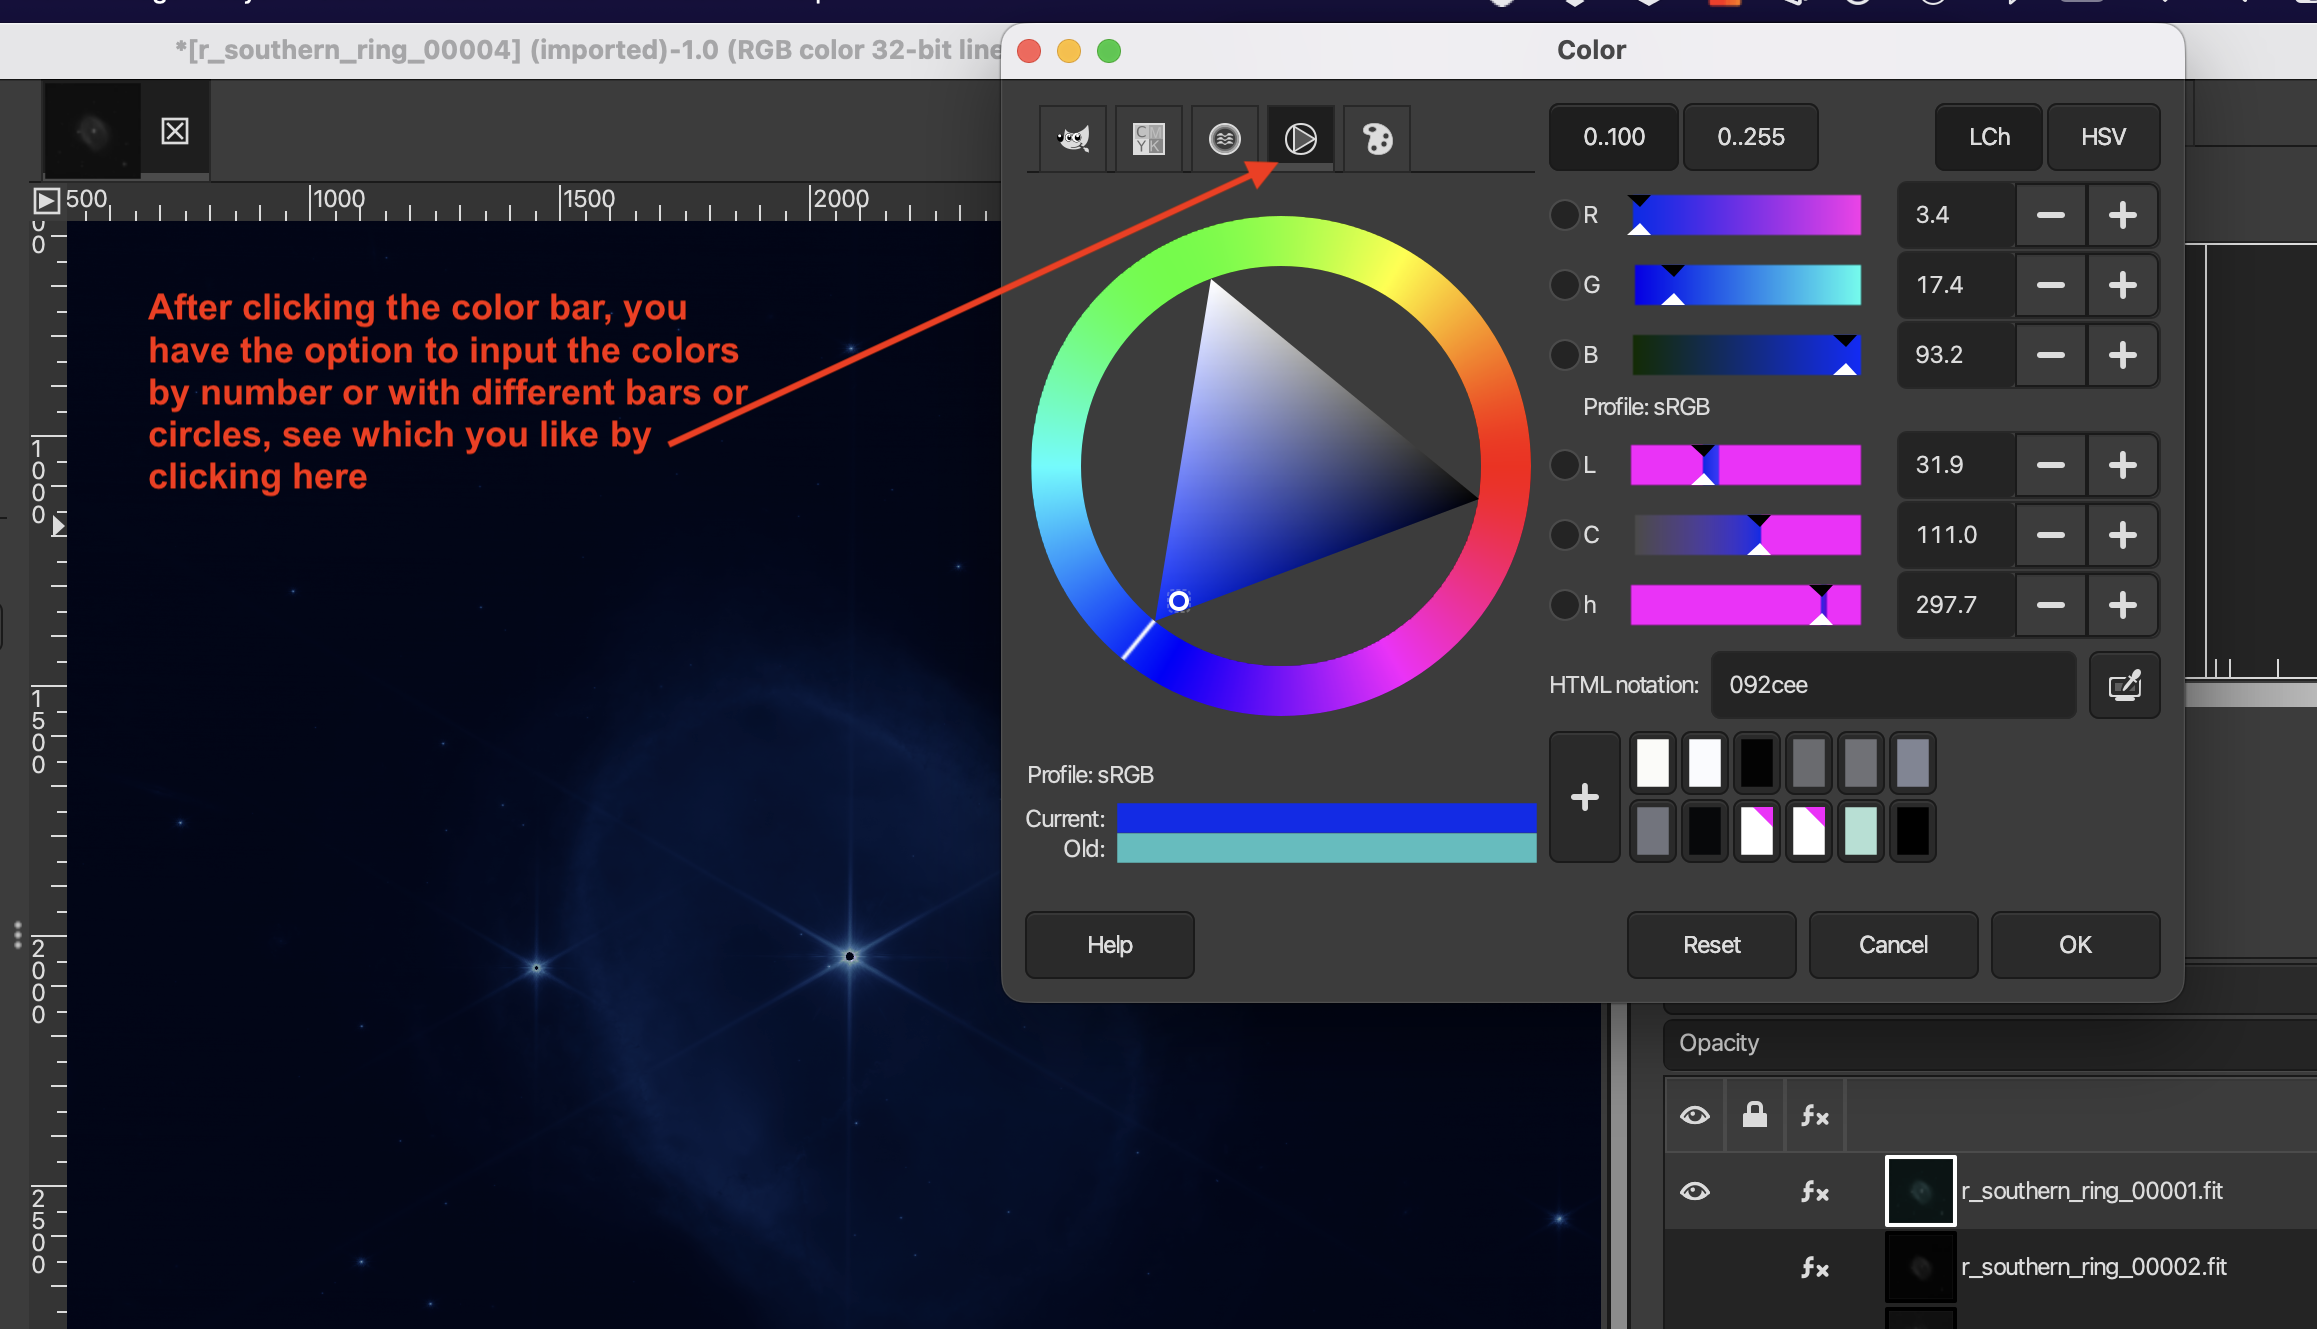
I typically like the wheel option for choosing colors, but there are a number of different options at the top. As well you can input the numerical color value if you prefer.
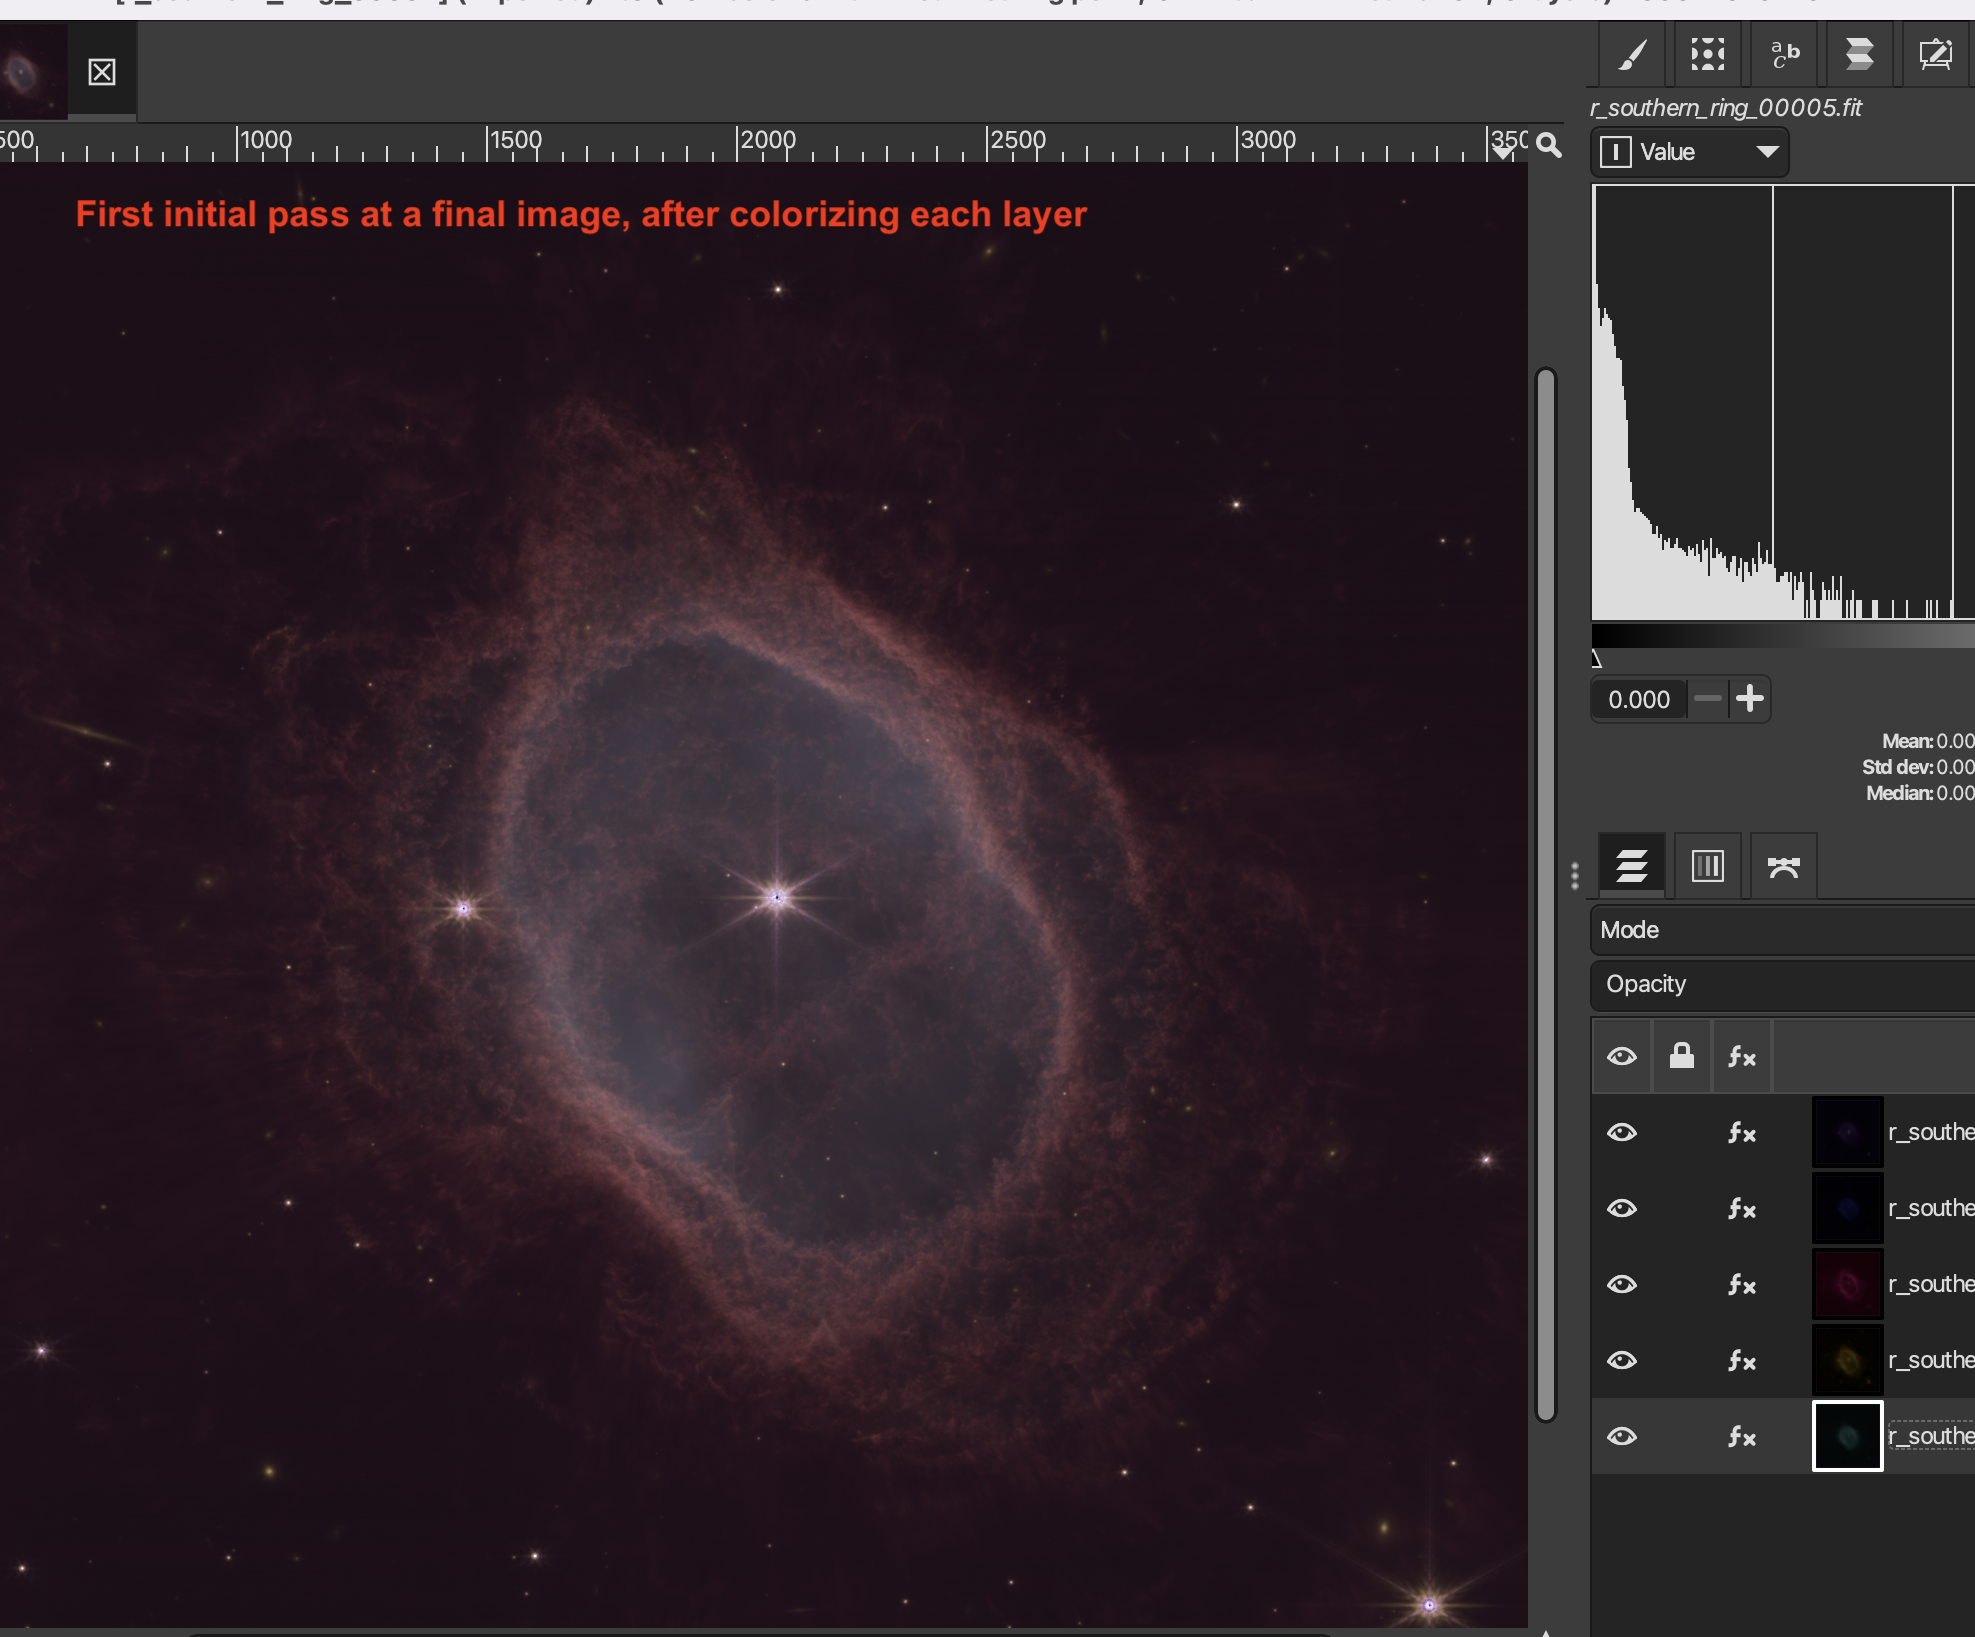
After adding these preliminary colors, here is an example of what your image might look like after turning on all the layers to be visible:
But that is still fairly hazy and the colors are muted. There are a lot more things you can do, and hours of YouTube tutorials online. Here are a few initial suggestions.
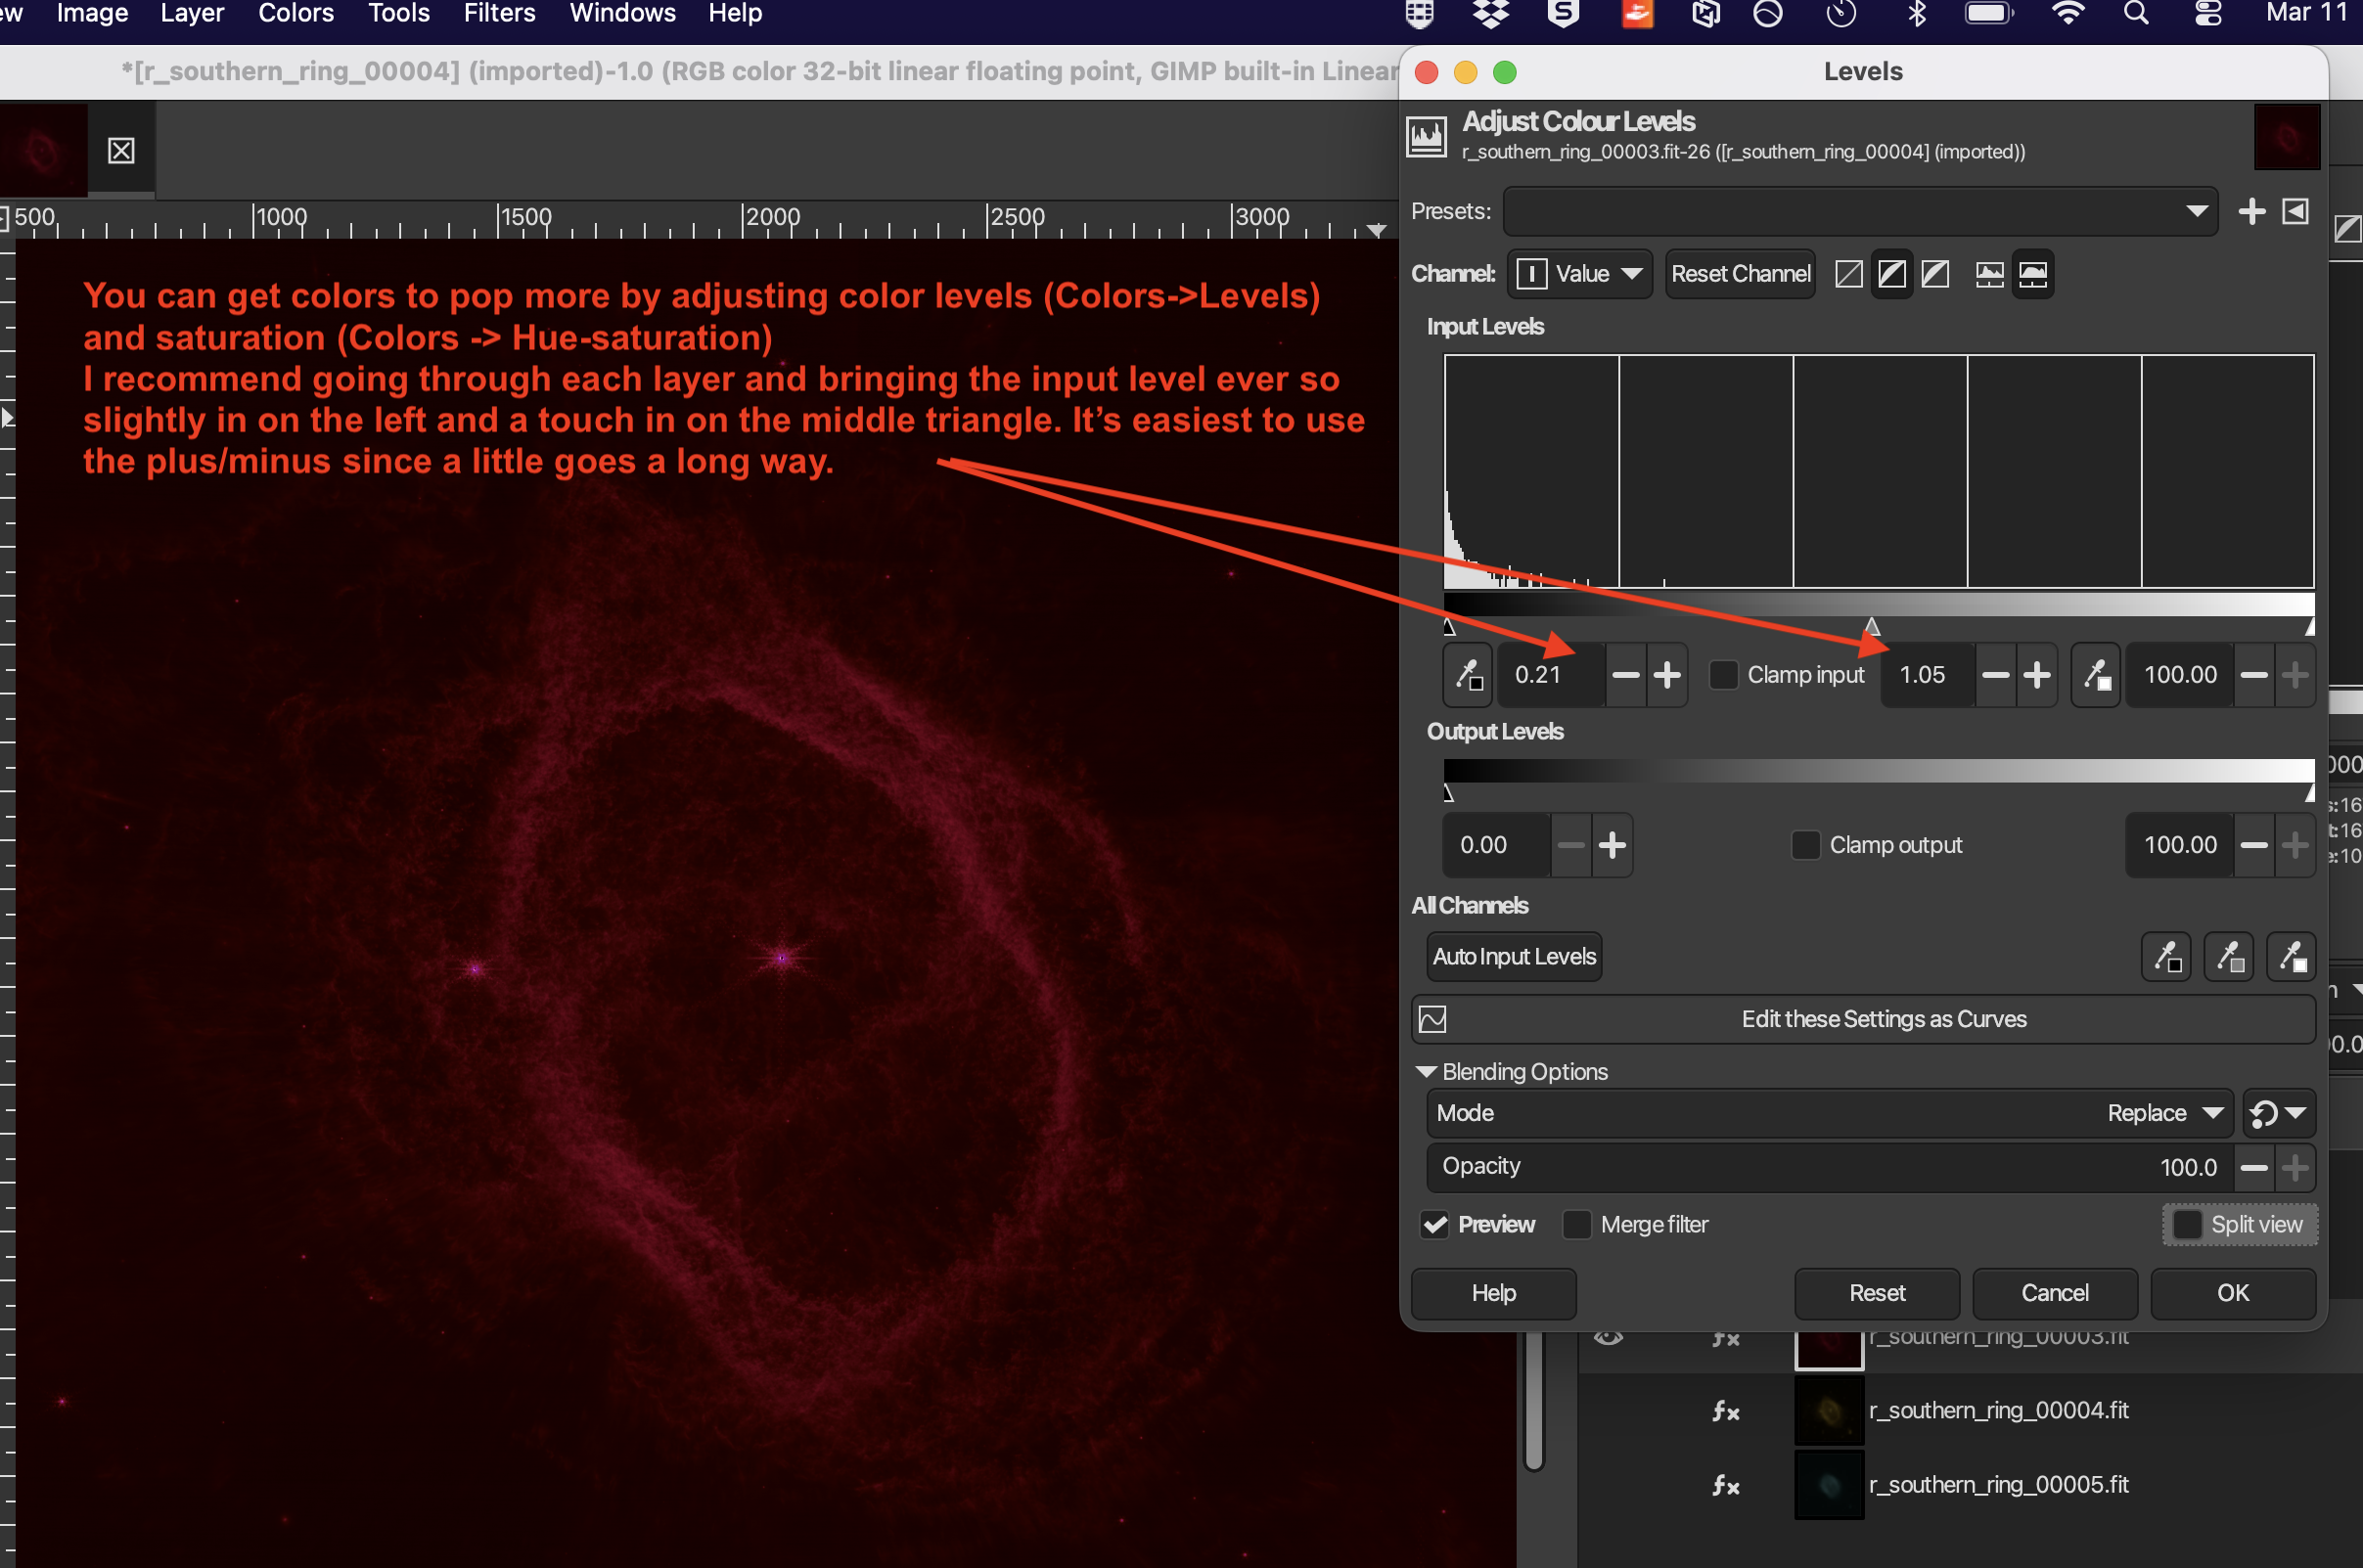
Levels
The first thing I’d suggest is to play with “Levels” (under the Color menu) for each layer. Very small touches make huge changes here and it’s easy to overdue it. Using split view will be very helpful. I find that I like moving the far-left triangle (under Input Levels) just the smallest of touches (easiest done with the plus and down arrow) and the middle triangle to the left a little bit. Do this for each of the filters.
Extra Touches
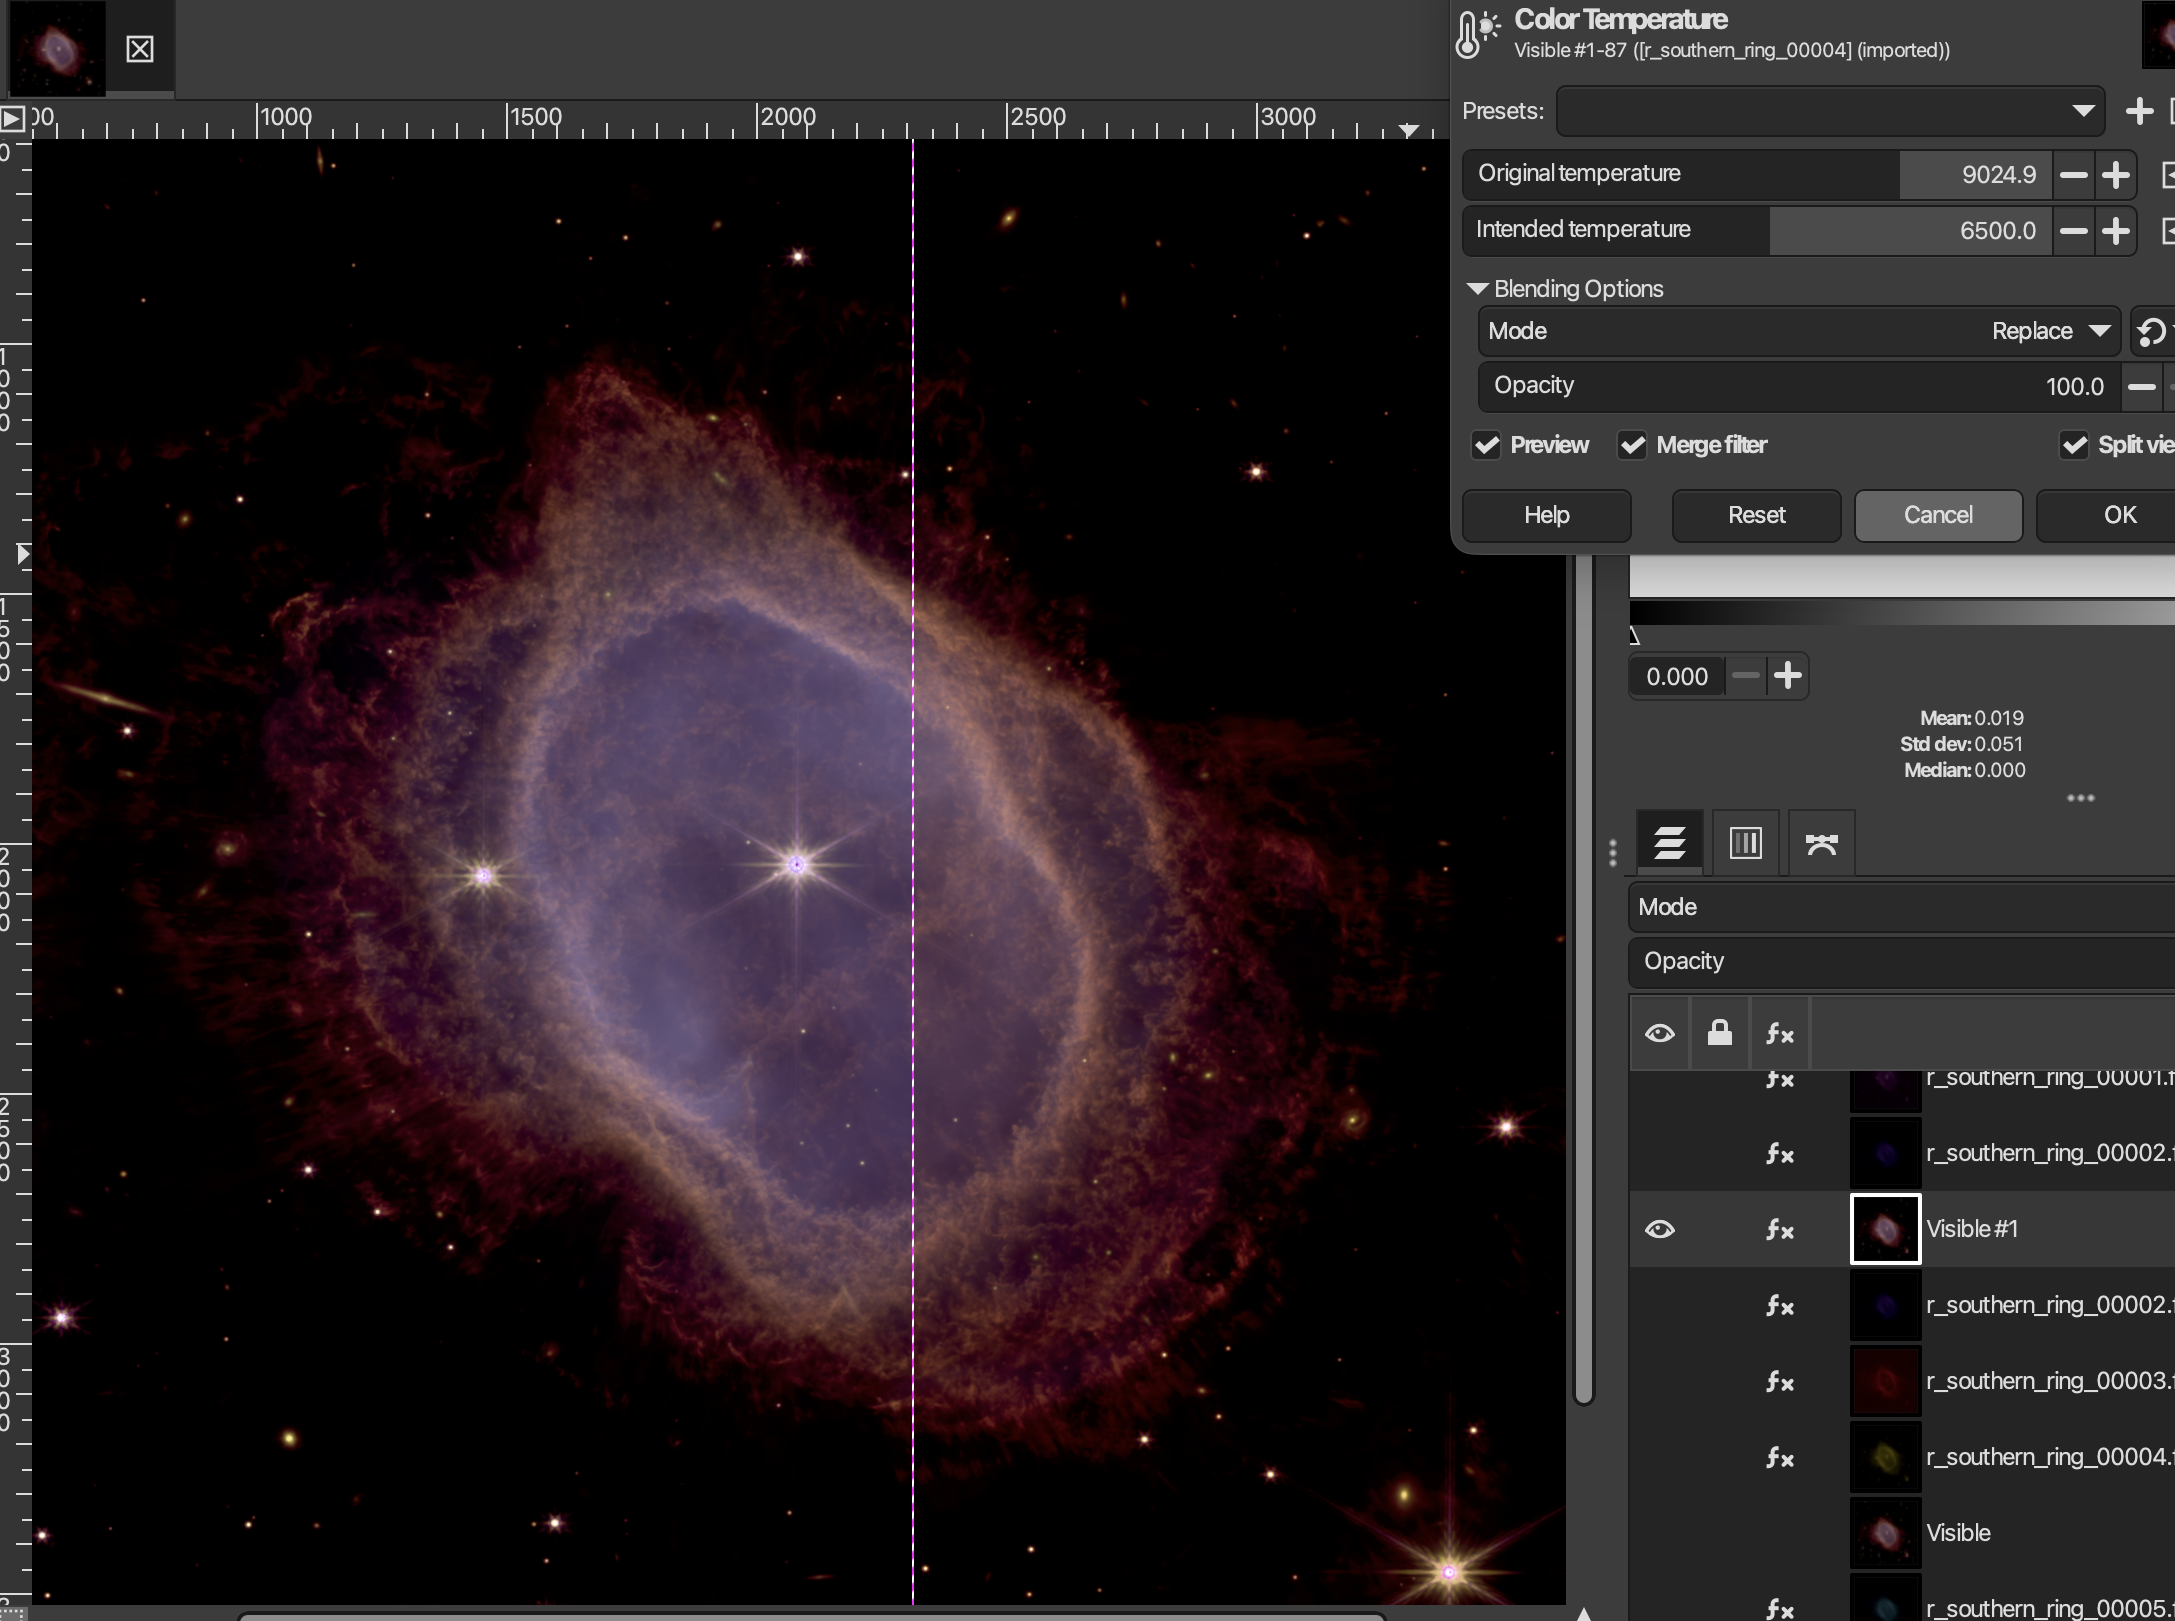
You can get much better colors and clean up the image by playing around in GIMP. I recommend to start by increasing the color intensity with Hue-Saturation (under Colors menu), changing the Shadows and Highlights (under Colors menu), Color Temperature (under Colors), and the noise reduction (under Filters → Enhance → Noise reduction). Split view is especially helpful here as you make small changes.
Export Final product
You’ll want to create a new layer from all the layers you have. You can do this under "Layer → New Layer from Visible", making sure all the layers have the eye activated and are visible and adding together. You can also duplicate an individual layer here if you want more of one color or to amplify it.
You can then export your image to a .png or .jpg or any standard image format which will by default include any visible layer. Go to "File → Export" and then name the file including the file extension (ie “Southern_Ring.png”).
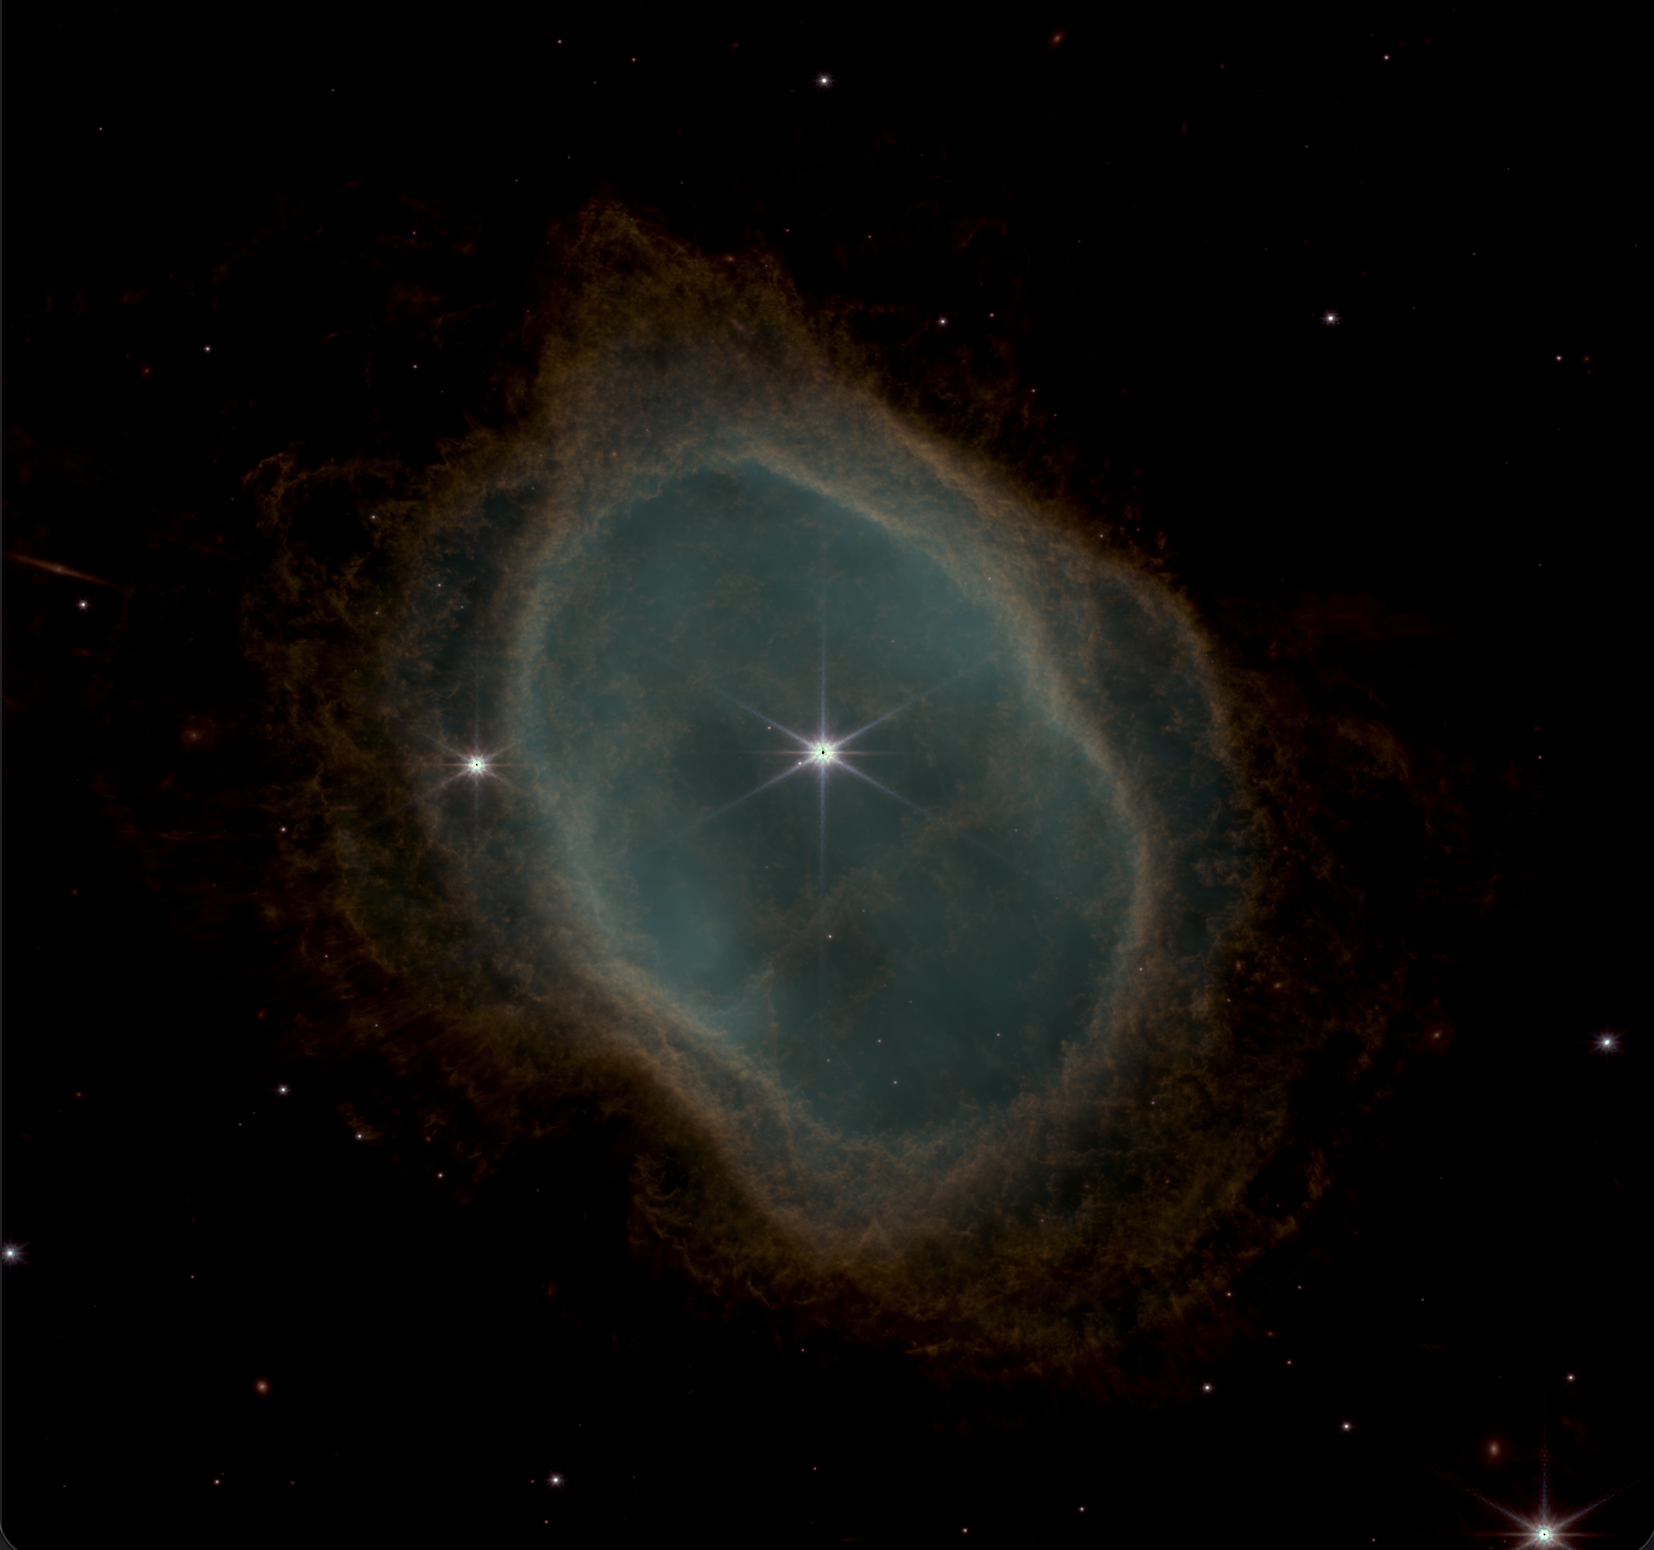
Depending on how you map your colors and adjust the hue sensitivity etc, you can be artistic with your image. Here are two versions I made with slightly different choices throughout.
Troubleshooting
- Image dominated by one color: That filter is likely overstretched. You'll have to restretch it.
- Layers blocking each other: Ensure all layers are set to "Addition".
- ALWAYS check you are working on the visible layer Really easy mistake to make.
Additional Resources
- Siril Tutorials
- My graduate student Aiden Weatherbee has a website with some artistic images merging with classic art and other tips.
- JWST NIRCam filters
- Initial steps and Colorizing in Siril with Aiden Weatherbee videos. Also additional written tips.
- YouTube has lots of other videos and tips.